
You're choosing decoration for a new run of company polos, event hats, or retail-ready hoodies, and both flat embroidery and 3D puff embroidery look appealing on the proof. One version appears clean and refined. The other has bold height that catches attention immediately. The right answer depends less on which style looks more impressive and more on whether your logo can physically support the stitching method.
Flat embroidery vs 3D embroidery is therefore a production decision, not just a visual preference. Letter size, line thickness, color count, garment type, expected wear, and budget all affect the result. A detailed corporate mark may need flat embroidery, while a simple wordmark on a structured cap may be an excellent candidate for 3D puff.
Table of Contents
- Choosing the Right Stitch for Your Brand
- The Core Difference Between Flat and 3D Puff
- Comparing Flat and 3D Embroidery Across Key Factors
- When to Choose Flat Embroidery vs 3D Puff
- Artwork Requirements for Flat and 3D Designs
- How to Order the Right Embroidery for Your Project
Choosing the Right Stitch for Your Brand
A business owner ordering branded polos usually wants a logo that looks polished across every shirt, even when the artwork contains small lettering, thin lines, or several colors. A streetwear brand ordering structured caps often wants the opposite effect, a raised wordmark with a strong tactile presence. Both goals are valid, but they call for different construction methods.
Flat embroidery places thread directly into the garment, creating a smooth, two-dimensional finish. 3D puff embroidery places a foam layer beneath the stitches, causing selected parts of the design to rise above the fabric surface, as described in this overview of 3D puff embroidery construction.
That physical difference changes the way customers perceive the finished product. Flat stitching generally feels controlled, precise, and suitable for uniforms or logos that need to communicate professionalism. Puff embroidery creates depth and visibility, which can make a short, bold name or symbol feel more like a premium apparel graphic.
Practical rule: Choose the decoration that supports the way people will read and wear the logo, not simply the decoration that looks most dramatic on a digital mockup.
Consider a landscaping company with a mountain icon, a long business name, and a phone number. Flat embroidery is likely the sensible foundation because it can preserve more detail and accommodate smaller elements. A skate label with one large block word on a structured snapback has a stronger case for puff, because the design can use broad shapes and does not depend on delicate internal detail.
The choice also affects brand consistency. A logo that looks excellent in puff on a hat may become difficult to reproduce on a soft polo or a narrow bag panel. Before approving a sample, match the method to the logo's structure, garment, audience, and expected use.
The Core Difference Between Flat and 3D Puff
Flat embroidery is built directly on the garment. The digitizer converts artwork into a stitch sequence, selects stitch types for fills and outlines, and places thread onto the fabric with no raised insert underneath. The finished surface remains relatively even because the thread follows the garment's plane.
3D puff uses the same general principle of programmed stitching, but adds a foam layer beneath specific parts of the artwork. Satin stitches cover the foam, compressing it and locking it into the design. After sewing, the excess foam is removed around the stitched edges, leaving the covered areas raised.
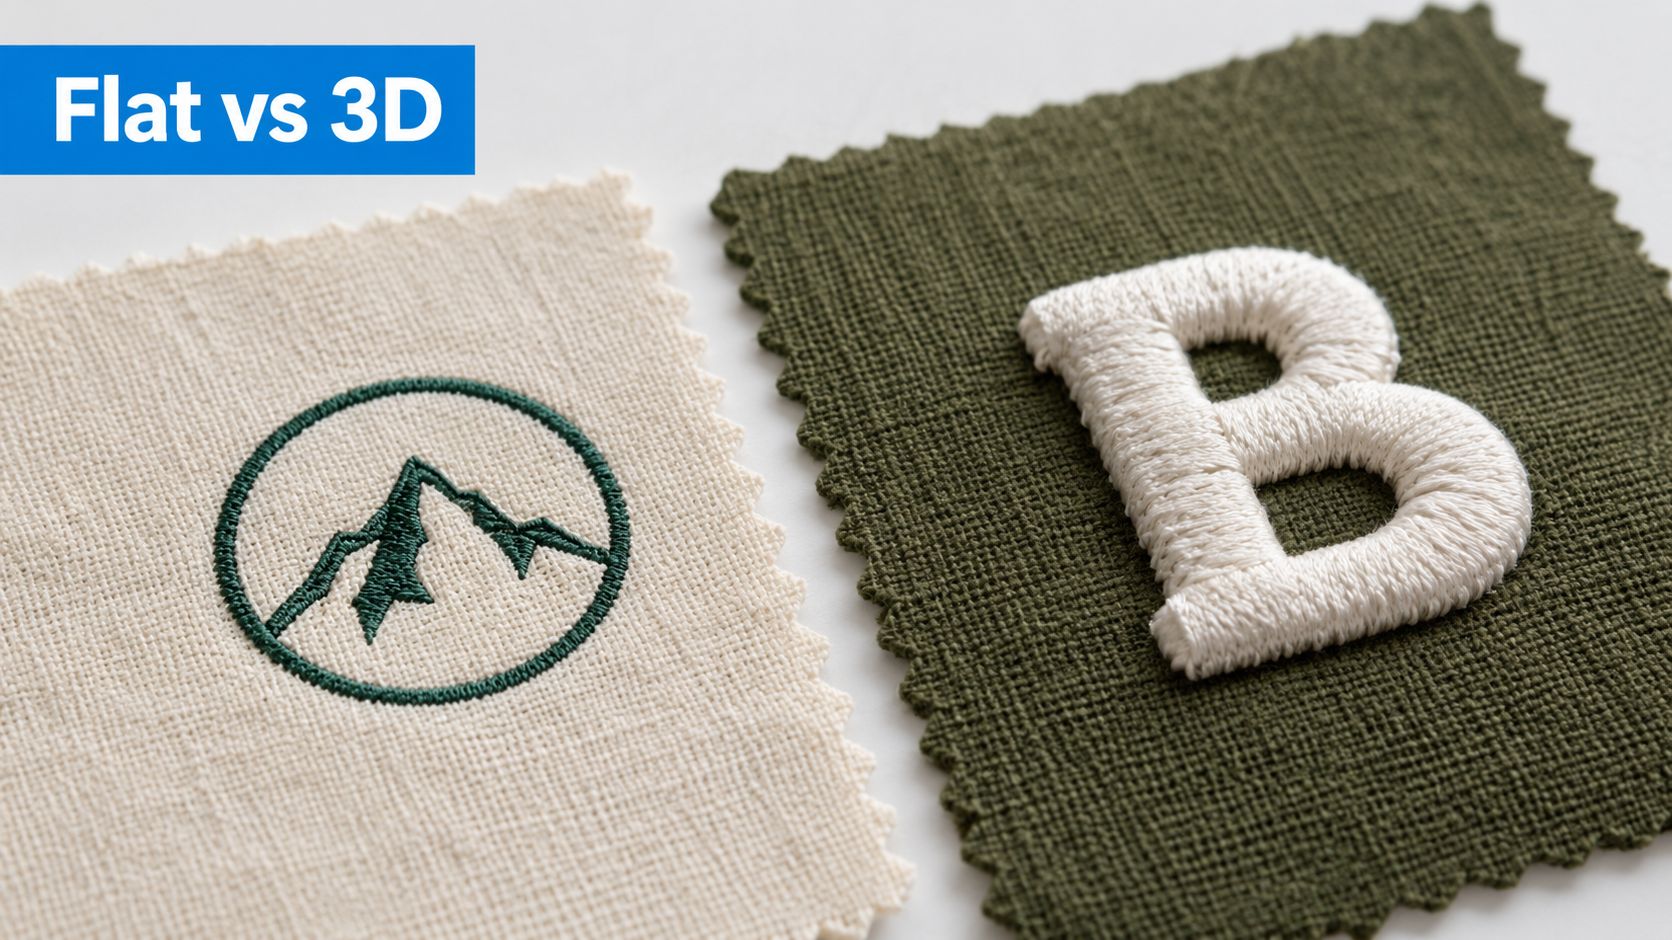
A simple analogy helps. Flat embroidery is like drawing on a tabletop with a thick marker. The color sits on the surface, and the image can include fine features. Puff embroidery is closer to placing a shaped cushion under the marker line. The mark becomes more noticeable from the side, but the cushion needs enough room to be covered cleanly.
The distinction has a long history. Flat embroidery developed as surface-level stitching without added padding, while 3D embroidery grew from raised-work traditions that used padding, stuffing, wire, or other materials to lift motifs above fabric, according to this history of flat and 3D puff embroidery.
How the production sequence changes
Flat embroidery can often be produced as a direct stitching operation using thread and needles. Puff embroidery commonly requires a second construction stage, foam placement before the top stitches are sewn. The file must account for foam coverage, edge control, stitch direction, and the removal of exposed material.
The foam is commonly closed-cell or EVA material in the 2 mm to 3 mm range, according to this technical guide to 3D puff embroidery. That added layer explains why ordinary flat settings don't automatically produce a clean raised result.
For a closer look at the finished effect and application process, review this 3D puff embroidery service guide.
The digitizer must also control density carefully. Puff designs need enough satin coverage to hide the foam, but excessive stitching can crush the structure, stress the garment, or create thread breaks. Flat embroidery has its own density requirements, but it doesn't need to perform the same foam-covering job.
Comparing Flat and 3D Embroidery Across Key Factors
A logo that looks clear on a screen can fail once it is reduced to stitches. For a company uniform, a retail hat, or a small merchandise run, compare each method at the finished size, then account for care, artwork editing, production time, and budget. The design's text size and complexity often determine which method is practical before appearance becomes the deciding factor.
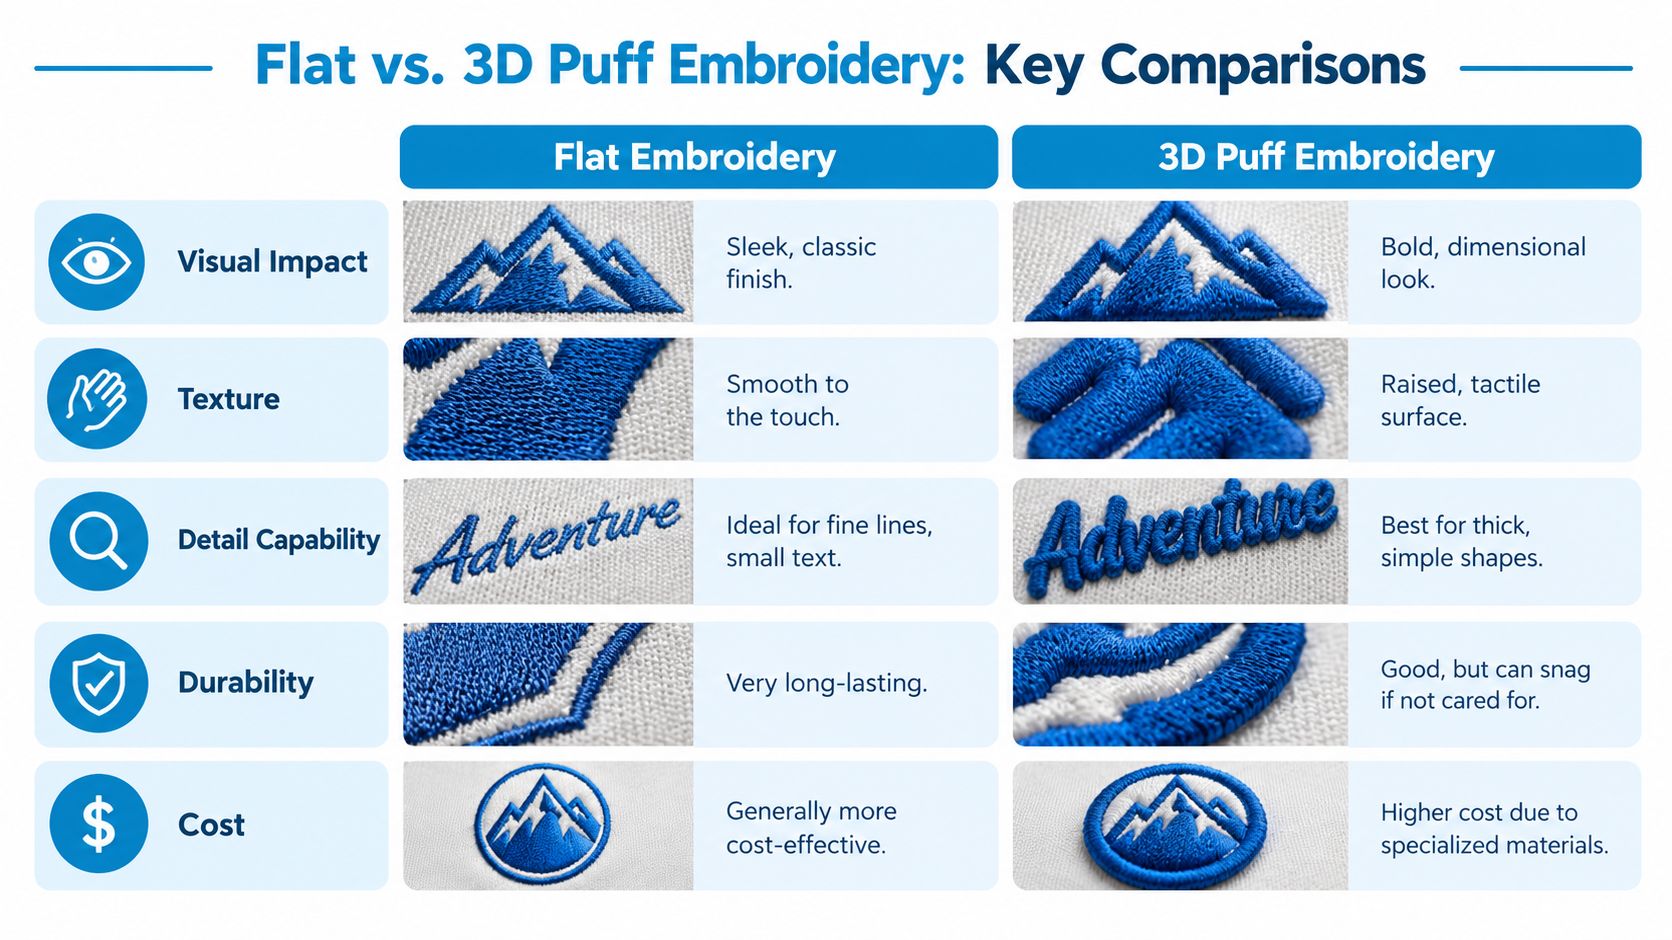
Visual impact and texture
Flat embroidery produces a smooth, flush surface with a familiar stitched finish. It suits logos that should sit naturally on polos, jackets, uniform shirts, totes, and other branded goods. The result is usually easier to place across different garment types because it does not depend on a raised profile.
3D puff adds height and a tactile surface. That extra dimension gives bold lettering and uncomplicated symbols more presence, particularly on structured caps. It can help a short wordmark read quickly from a distance, although the effect depends on enough space around each shape for the foam and covering stitches.
Detail and complexity
Flat embroidery gives the digitizer more room to retain fine lines, smaller elements, and complex multi-color artwork. It still has limits. Tiny details may close up after conversion to stitches, especially when the logo is reduced or placed on a textured fabric.
Puff requires broader satin columns, open spacing, simple outlines, and strong shapes. Foam occupies the interior of the design, leaving less room for intricate details. Thin lines, tight gaps, gradients, and small secondary text may need to be removed, enlarged, or assigned to a separate flat-embroidered element. A logo with several words or fine internal detail may therefore be unsuitable for full puff, even if its overall shape appears bold.
Durability and care
Both methods can produce durable branded apparel when the file is digitized correctly and the garment suits embroidery. Flat embroidery has fewer raised edges, so it generally offers fewer surfaces that can catch during routine handling.
Puff exposes a raised structure to more contact, compression, and snagging. One embroidered apparel market report reports that 3D puff may lose 10–20% of its height after 20–30 washes. Treat that figure as a planning consideration rather than a guarantee for every garment. For repeated uniform use, judge the decoration by how it will look after regular laundering, not only by its first-day impact.
Cost and production time
Flat embroidery is usually more economical when the logo can be sewn directly without foam preparation. Puff adds foam, handling, trimming, and specialized digitizing. Those steps can increase the quote and give the production team more variables to control.
The added cost may suit retail caps, event merchandise, or a limited branded collection where dimensional impact supports the product. It can be harder to justify for large uniform programs, where consistent reorders and cost control may matter more than raised texture. Ask whether the artwork needs full puff, or whether a flat base with limited raised elements can deliver the intended effect with fewer production constraints.
| Feature | Flat Embroidery | 3D (Puff) Embroidery |
|---|---|---|
| Surface effect | Smooth and flush | Raised and dimensional |
| Best artwork | Detailed logos and fine elements | Simple, bold shapes |
| Texture | Even stitched surface | Tactile foam-supported surface |
| Garment fit | Polos, uniforms, jackets, bags, and many fabrics | Structured caps and suitable heavier garments |
| Color flexibility | Typically supports more complex color work | Usually needs fewer practical colors |
| Production | Direct stitching process | Foam placement plus top stitching |
| Budget position | Generally more cost-effective | Higher cost for specialty applications |
Flat embroidery is the safer choice when detail, versatility, and repeatability control the decision. Puff is suited to artwork built around height, boldness, and tactile branding, provided the lettering and shapes are large enough to support a clean result.
When to Choose Flat Embroidery vs 3D Puff
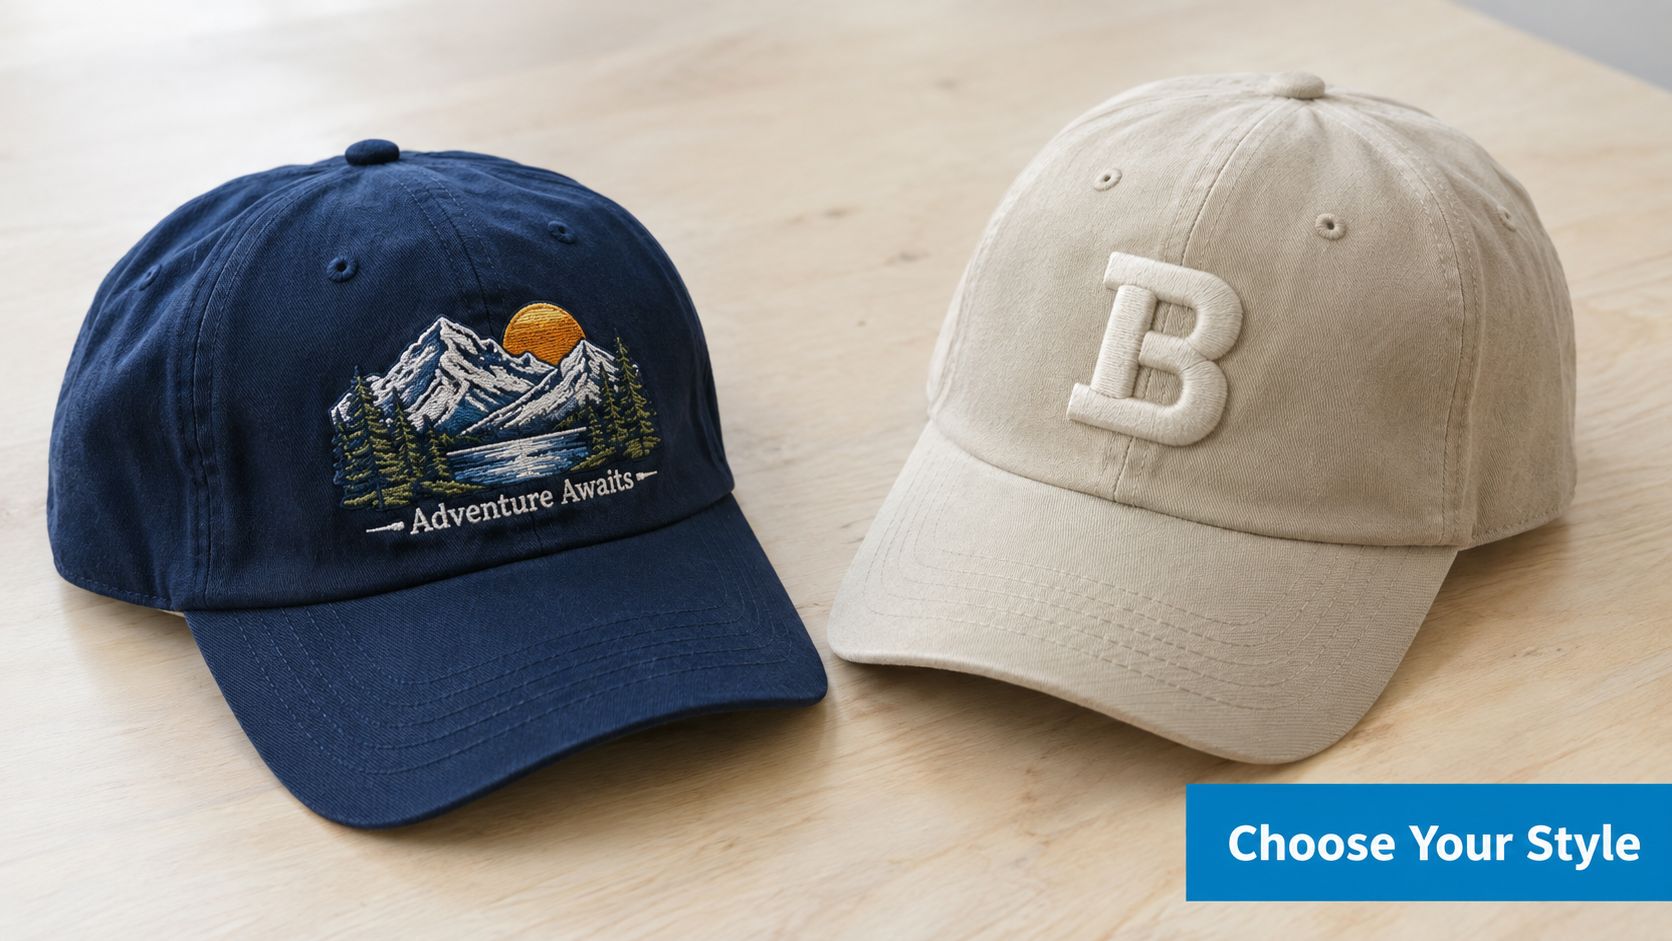
A corporate polo with a detailed company emblem usually belongs in flat embroidery. The decoration needs to sit comfortably on the chest, preserve small lettering, and remain appropriate across meetings, field work, and everyday wear. Flat stitching also adapts more easily when the same logo appears on jackets, bags, or other uniform pieces.
For a structured baseball cap, the decision changes. A short wordmark in wide block letters can take advantage of puff's height, particularly when the cap is part of a streetwear line, sports identity, or event merchandise collection. Modern 3D puff became a recognizable mass-market decoration in the late 20th century, emerged in industrial embroidery during the 1980s, and became a default look for structured caps in the early 2000s, according to this background on the development of 3D puff embroidery.
Match the method to the item
Use flat embroidery when:
- The logo contains small text: A business name, department label, or service description may become unreadable when converted into puff.
- The artwork has fine lines: Detailed icons, maps, tools, leaves, or line drawings need the smoother surface of flat stitching.
- The same logo goes on several garments: A flat file can be more adaptable across polos, outerwear, bags, and other items.
- The order is uniform-focused: Staff apparel usually benefits from consistent, restrained branding rather than a highly raised focal point.
Use 3D puff when:
- The design is a bold wordmark: Broad letters give the foam enough coverage and create a clear raised silhouette.
- The item is a structured cap: The firm front panel supports the dimensional decoration better than a very soft, unstable surface.
- The brand wants a tactile streetwear look: Height can become part of the product identity rather than merely an embellishment.
- The artwork has limited internal detail: A simple mark is less likely to lose definition during foam coverage and finishing.
Consider a hybrid treatment
A hybrid approach can solve a common branding conflict. The main wordmark can use puff for visual impact, while a smaller tagline, location, or secondary symbol uses flat embroidery. This lets the primary element stand out without forcing every detail into a construction method that can't support it.
Hybrid decoration requires careful artwork planning. The elements need enough separation to avoid crowding, and the production team must sequence the flat and raised areas so the final design remains clean. For a business ordering hats for an event, this can be more effective than choosing puff for the entire logo or abandoning dimensional branding altogether.
Artwork Requirements for Flat and 3D Designs
The artwork often decides the method before the buyer does. A logo may look sharp on a monitor but fail when reduced to a small cap panel or embroidered onto a polo. The production artist has to translate lines, spaces, letterforms, and colors into stitches, and foam makes that translation less forgiving.
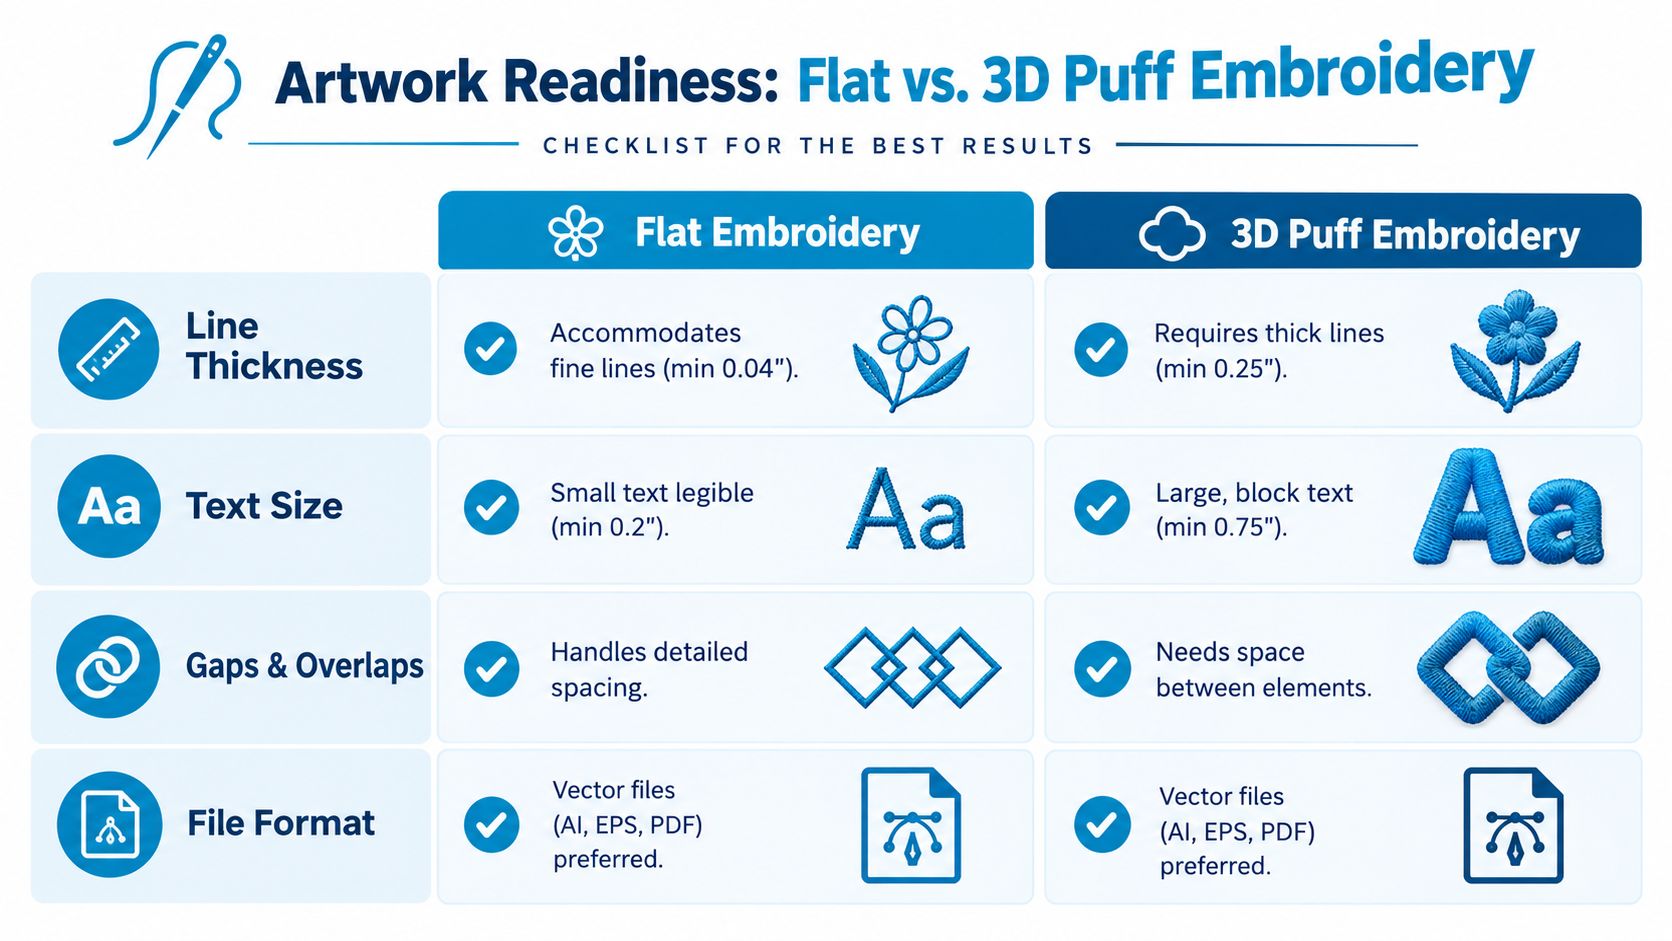
Flat embroidery can accommodate more detail, but it still needs embroidery-friendly artwork. Lines must have enough substance to hold thread, enclosed spaces must remain open after stitching, and small text should be tested at its actual finished size rather than judged from a large screen preview.
Test the lettering first
A practical threshold places minimum text height at about 5 mm for flat embroidery and about 8 mm for 3D puff, while 3D puff typically works with about 8 practical colors compared with up to 15 for flat embroidery, according to this flat embroidery and 3D puff artwork comparison.
Those thresholds aren't a substitute for a sew-out. Font construction, fabric, stitch direction, and letter spacing all affect legibility. Still, they provide an early warning. If a logo contains tiny text below the practical range, the solution may be to enlarge it, remove it, move it to a separate flat element, or use another decoration method.
Simplify before digitizing
For 3D puff, start with the largest and strongest parts of the logo. Wide block letters and uncomplicated icons are safer than narrow script, delicate outlines, or crowded shapes. Foam needs broad satin coverage and strong edge control, so a design with many tiny internal features can lose clarity.
Review the artwork with these questions:
- Can every letter remain open: Closed counters and narrow openings may fill with thread or foam.
- Are the gaps generous enough: Tight spaces can disappear when the satin columns expand visually.
- Does the logo depend on gradients: Embroidery uses thread colors and stitch structures, so smooth digital shading needs interpretation.
- Can secondary details move elsewhere: Small text may work better as flat embroidery or as a separate placement.
- Is the file suitable for digitizing: A clean vector file gives the production artist clearer shapes, but the file still needs decisions about stitch types, sequencing, density, and compensation.
For more specialized preparation, review the logo digitizing service for embroidery. The important point isn't just submitting a file. It's submitting artwork that can be engineered for the intended garment and finished size.
Production advice: Approve the actual embroidered proof, not only the artwork proof. The sew-out reveals problems that a flat digital preview can't show, especially with small text, tight spacing, and raised foam edges.
How to Order the Right Embroidery for Your Project
Start with the product, not the stitch style. A structured cap, soft polo, hoodie, jacket, and tote each present different surfaces, and the same logo may need separate artwork treatment for each one.
Then answer four practical questions:
- What must the customer read first? If the brand name or symbol needs immediate recognition, make that element large and clear.
- Does the artwork contain fine detail? If it includes thin lines, small type, several colors, or intricate shapes, begin with flat embroidery.
- Will the items receive repeated washing and handling? Uniform programs should weigh long-term appearance, maintenance, and reorder consistency.
- Is the raised effect part of the product identity? If the answer is yes and the artwork is simple enough, 3D puff may justify its added production requirements.
The central decision is not limited to flat embroidery vs 3D embroidery. It's whether the design is eligible for puff at the intended size. Puff needs simpler shapes and wider letters, which makes artwork review an essential production step, as explained in this guide to choosing between flat and 3D embroidery.
For a practical starting point, you can review custom logo embroidery options and submit the logo with the garment type, placement, finished dimensions, quantity, and preferred colors. A production team can then recommend flat, puff, or a hybrid treatment before the order moves forward.
The best result comes from deciding early. A clear artwork review prevents unsuitable puff files, protects the budget from avoidable revisions, and gives your hats, uniforms, or merchandise a finished appearance that matches the brand.
Dirt Cheap Product, Inc. provides custom embroidery, including flat and 3D puff decoration, for hats, polos, shirts, outerwear, bags, and event merchandise. Visit Dirt Cheap Product, Inc. to upload your logo, review apparel options, and request guidance on the stitch method that fits your artwork and project.