
You're probably here because you've seen a hat or jacket logo that sits up off the fabric and looks far more premium than regular stitching. It catches light differently. People notice it from across a room. Then the practical questions start. Will my logo work like that? Is it only for hats? Does it cost a lot more? Is it worth it for a staff uniform order, a retail merch drop, or an event giveaway?
Those are the right questions.
For a small or mid-size business, 3D Puff Embroidery isn't just a decoration style. It's a branding choice. It can make a simple cap feel like retail merchandise instead of standard promo gear. It can also become a headache if the artwork, garment, or order setup isn't right. The smart move is to understand where it shines, where it struggles, and how to order it without surprises.
Table of Contents
- Make Your Brand Stand Out with 3D Puff Embroidery
- What Exactly Is 3D Puff Embroidery
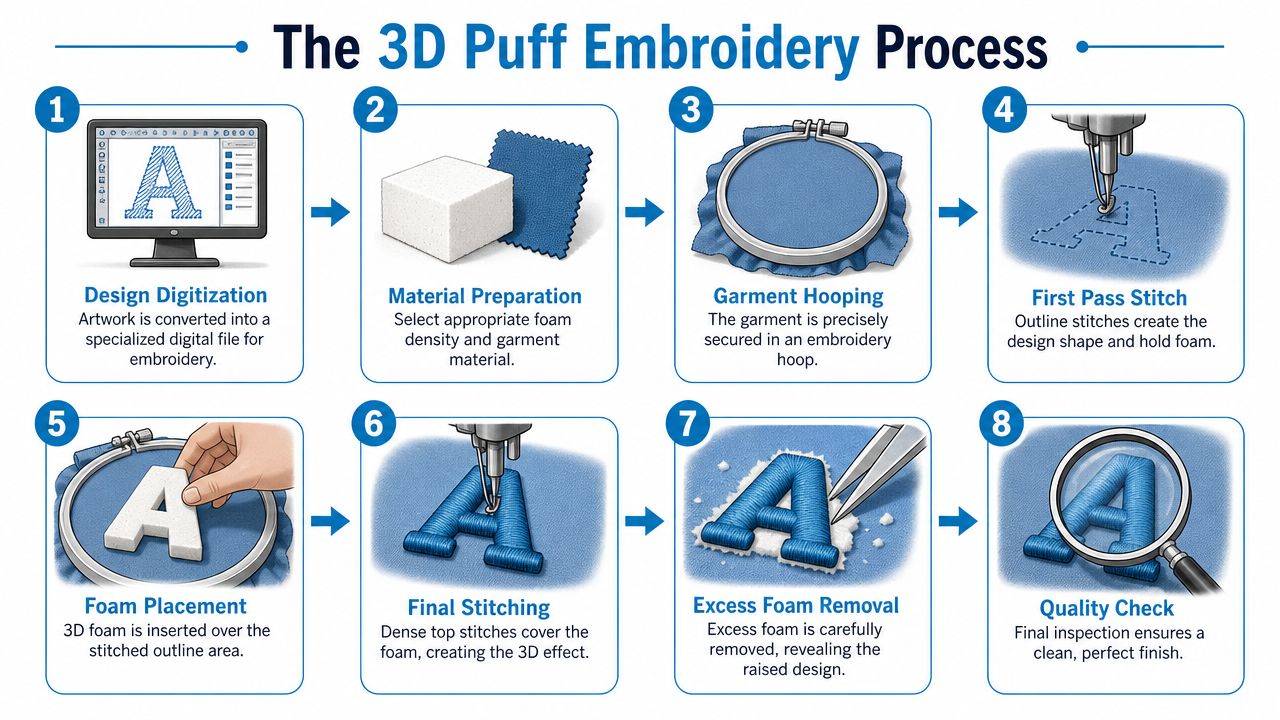
- How the 3D Puff Embroidery Process Works
- Essential Design Rules for a Perfect Puff
- Best Use Cases for 3D Puff Embroidery
- Understanding Costs Timelines and Ordering Tips
- Frequently Asked Questions About 3D Puff
Make Your Brand Stand Out with 3D Puff Embroidery
A lot of first-time buyers discover 3D puff the same way. They're comparing branded hats at a trade show, on a golf outing, or in a competitor's storefront. One logo looks flat and functional. The other has height, shadow, and texture. It feels more expensive before anyone even touches it.
That difference matters when you're ordering apparel to represent your business. A raised logo can help a cap look like something your staff wants to wear, not something they were told to wear. It can also help retail merchandise feel intentional instead of generic.
Say you run a landscaping company, a brewery, a gym, or a home services brand. You want one hat style that works for employees, loyal customers, and event giveaways. A clean puff logo on the front of a structured cap often does that job well because it gives the mark more presence without changing the actual artwork.
Practical rule: If your brand identity relies on bold initials, block lettering, or a simple icon, 3D puff usually creates more visual impact than flat stitching on the same placement.
This matters in merchandising too. Strong presentation often comes from texture and contrast, not just color. If you're thinking beyond the logo and into how apparel is displayed, Display Guru's merchandising advice is a useful reference for understanding how physical products attract attention in real-world retail settings.
3D puff isn't the right choice for every garment or every logo. But when it fits, it gives branded apparel a premium look that small and mid-size businesses usually want from their most visible pieces.
What Exactly Is 3D Puff Embroidery
A small business owner usually notices 3D puff at the same moment a customer does. The logo stands higher on the cap, catches light differently, and feels more like a built product than a printed mark. That reaction is the reason many brands choose it for their most visible hats.
3D puff embroidery is a method that places a layer of foam under the top stitches so parts of the design sit above the fabric instead of lying flat. The machine stitches over the foam, the thread holds the shape, and the extra material underneath creates the raised profile. The result is dimension you can see from a distance and feel in your hand.
For a buyer, the business question is simple. Are you paying for decoration, or are you paying for presence? Puff usually costs more than flat embroidery because it uses more setup attention, more thread, and a design that has to be prepared correctly. In return, it can make a straightforward logo look more premium on the shelf, in a uniform program, or at an event booth.
Why it looks different from flat embroidery
Flat embroidery colors the surface. Puff embroidery adds height to it.
That height changes how a logo reads on the garment. Bold letters and simple shapes look stronger because they create edges, shadows, and separation from the fabric. On a structured cap front, that difference is often enough to make a logo feel more retail-ready, which matters if the same hat needs to work for staff wear, customer merch, and giveaways.
Flat embroidery is still the better option for logos with fine detail. Small text, thin outlines, and intricate interior shapes often lose clarity in puff because the foam needs room under the stitching. If you are comparing thread shades for a logo that may use both techniques, these embroidery thread color ideas can help you judge contrast before you place an order.
3D puff adds physical depth, so the logo gets attention through shape as well as color.
3D Puff vs Flat Embroidery At a Glance
| Feature | 3D Puff Embroidery | Flat Embroidery |
|---|---|---|
| Visual effect | Raised, dimensional, textured | Smooth, surface-level stitching |
| Best for | Bold logos, initials, block lettering | Detailed logos, small text, fine lines |
| Feel in hand | Noticeably elevated | Relatively flat |
| Thread usage | Higher than flat embroidery | Lower thread usage |
| Common applications | Structured hats, outerwear, bold front logos | Polos, jackets, bags, detailed chest logos |
| Design tolerance | Less forgiving with tiny details | More flexible for complex artwork |
A good rule for ordering is this. Choose puff when your logo is simple enough to hold its shape and important enough to justify the added cost. Choose flat when detail, readability, and flexibility across different garments matter more.
How the 3D Puff Embroidery Process Works
Most first-time buyers assume the machine merely “does the raised part.” It doesn't. Good 3D puff depends on artwork setup, machine settings, material handling, and hand finishing.
From artwork to stitch file
The process starts with digitizing, which means converting your logo into a file the embroidery machine can read. This isn't the same as dropping a JPG into software and hitting start. The digitizer has to plan where satin stitches go, where foam will sit, and how the sequence will hold the shape together.
For 3D puff, those settings are stricter than they are for flat embroidery. The stitch file needs to support the foam without crushing it, shifting it, or exposing it in the wrong places.
What happens on the machine
Once the file is ready, the garment is hooped and the foam is placed in the embroidery area. Then the machine stitches over that foam to build the raised effect.
Here are some of the technical choices that matter during production, based on this 3D puff embroidery walkthrough video and additional verified technical guidance:
- Needle choice matters: Operators use ball-point embroidery needles in 75/11 or 80/12 sizes.
- Stitch length has limits: A stitch length of about 2.5 to 3 millimeters is the sweet spot for a clean raised look, and the general safe upper limit is 10 millimeters.
- Software settings can ruin the puff: Auto-splitting beyond 7 millimeters should be avoided because it can break the continuity of the foam.
- Machine handling changes with foam: Thicker foam requires slower machine speed and adjusted top thread tension so the thread doesn't break or flatten the design.
Why finishing matters so much
Here, a lot of the craftsmanship is displayed.
After stitching, the excess foam doesn't disappear on its own. The operator trims it away carefully. Small remnants are tucked in rather than pulled out, because pulling can distort the edge. Then many shops use low heat to shrink any remaining foam residue so the raised shape looks sharp and clean.
A rough finish is usually not a design problem. It's often a cleanup problem.
The finishing process is also one reason 3D puff takes longer than flat embroidery. As noted in the earlier source, the manual cleanup step is critical. The machine creates the structure, but the operator creates the polished edge that makes the final piece look professional.
Essential Design Rules for a Perfect Puff
A logo doesn't fail in 3D puff because the idea was bad. It fails because the artwork asked the technique to do something physical foam and thread can't do cleanly.
That's why the best puff designs are often the simplest ones. Big initials. Collegiate lettering. Geometric icons. Clean badges. These aren't “safe” choices in a boring sense. They're the designs that let the decoration do its job.
Simple artwork wins
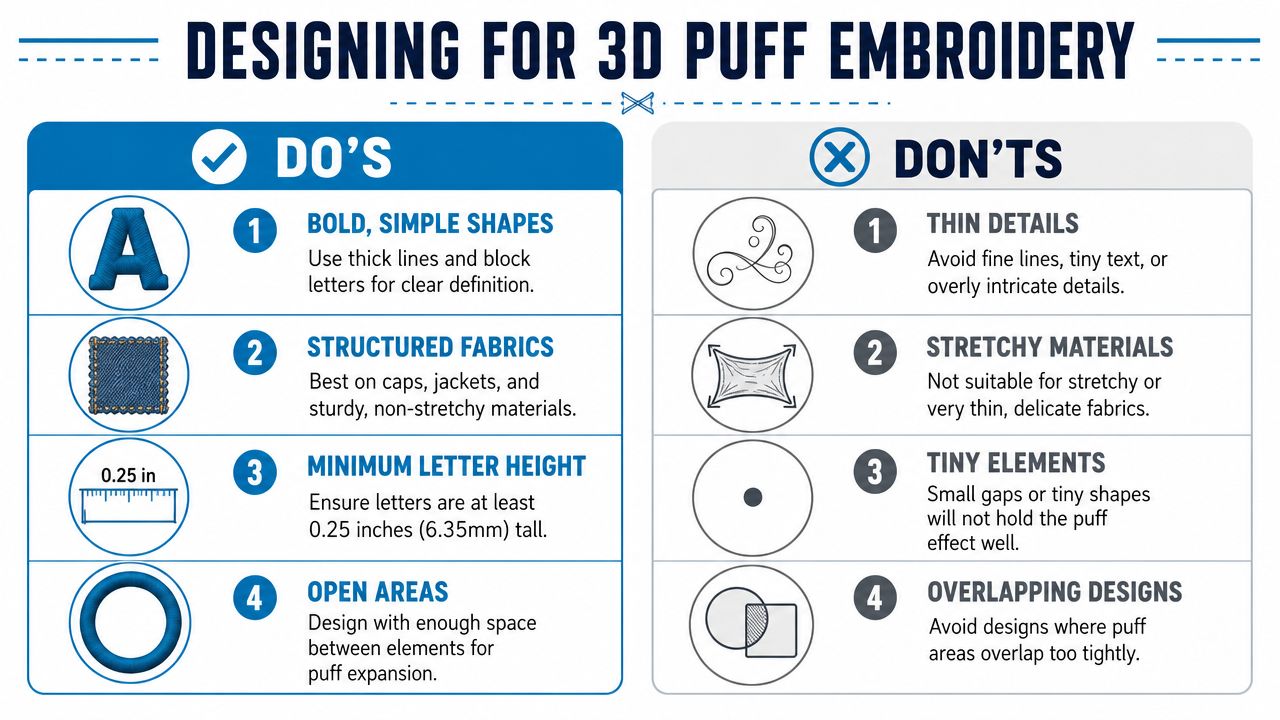
Foam doesn't handle tiny curves, little notches, or delicate script well. When thread has to wrap around very fine features, the raised look becomes uneven, messy, or flattened. That's why block letterforms without serifs tend to perform better.
If you want a practical primer on how stitch-based artwork gets prepared in the first place, this easy guide to embroidery digitizing is helpful background reading before you finalize your logo file.
A strong puff-ready logo usually has these traits:
- Thick strokes: Broad letterforms and icons give the foam room to rise.
- Simple edges: Clean outlines produce cleaner cuts around the foam.
- Open spacing: Crowded shapes can merge visually once stitched.
- Clear hierarchy: One main raised element works better than trying to puff every part of the design.
The size rules that protect quality
Many business owners are often caught off guard. A logo that looks crisp on a screen can be a poor candidate for puff once thread and foam get involved.
According to Pro Digitizing's 3D puff embroidery specifications, the ideal line weight for 3D puff falls between 3mm and 11.9mm, and font sizes shouldn't go below 0.175" if you want legibility and consistent lift. Separate verified guidance also notes that many embroidery shops treat 1/4" lettering as a practical benchmark for cleaner results, with smaller text often better handled in flat embroidery.
That leads to a simple rule: if your logo includes a bold main word and a tiny slogan underneath, don't force both into puff.
Design takeaway: Use puff for the hero element, then use flat embroidery for the supporting details.
Placement planning matters too. Before approving artwork, it helps to review a garment-specific embroidery placement guide so the design scale matches the item and location.
When to mix puff and flat embroidery
This hybrid approach solves most real-world branding problems.
Use 3D puff for:
- Front-and-center initials
- Short brand names
- Simple icons
- Top line text on structured caps
Use flat embroidery for:
- Taglines
- Dates
- Fine borders
- Small secondary text
That combination gives you impact without sacrificing readability. It also reduces the chance that your art team has to simplify the logo more than you're comfortable with.
If you're ordering for a business, that balance usually leads to a better result than trying to make the entire logo raised just because the technique looks premium.
Best Use Cases for 3D Puff Embroidery
When buyers ask whether 3D puff can go on “anything,” the honest answer is no. It performs best when the base material can support the extra foam and dense stitching.
Where 3D puff performs best
Structured hats are the clearest winner. The front panels give the design a firm surface, which helps the raised shape stay crisp. That's one reason you see puff used so often on snapbacks, baseball caps, and similar headwear.
This aligns with verified guidance from Zome Design's explanation of 3D puff embroidery, which notes that structured fabrics like those used in hats provide the stable base the 3D effect needs, while unstructured or flexible fabrics may collapse under the weight of thick foam and dense stitching.
Heavy jackets and sturdy patches can also work well. The key is support. The fabric has to hold shape instead of sagging under the logo.
If you're evaluating headwear styles, this look at 2ndShotMVP's quality golf hats is useful because it shows the kind of structured cap forms that pair well with raised embroidery.
Where it usually disappoints
Thin T-shirts, stretchy performance fabrics, and soft unstructured garments are usually poor choices for puff. The fabric can pucker, bow, or lose shape. Even if the stitching technically succeeds, the finished item may not look balanced.
That's especially important for businesses ordering uniforms. A puff logo on a sturdy cap can look sharp. The same logo on a lightweight polo front may feel too heavy for the fabric.
A quick visual example helps here:
The practical shortlist for small business orders looks like this:
- Best bets: Structured caps, snapbacks, trucker hats, heavyweight outerwear, custom patches
- Possible with caution: Heavy hoodies and sturdy workwear with simple artwork
- Usually avoid: Thin tees, stretchy athletic tops, very soft polos, delicate fabrics
If your order includes multiple garment types, it often makes sense to use puff on the hat program and flat embroidery elsewhere for consistency and fewer production risks.
Understanding Costs Timelines and Ordering Tips
The first thing most buyers notice is that 3D puff costs more than standard embroidery. That price difference isn't arbitrary. The process uses more thread, adds foam, demands more careful digitizing, and includes cleanup work after the machine stops.

Why the price is higher
There are direct production reasons behind the higher cost:
- More material use: Verified guidance earlier in this article notes that puff uses approximately twice the thread of flat embroidery.
- Extra consumables: Foam has to be added, handled, and trimmed.
- Specialized setup: The digitized file has tighter rules than a flat embroidery file.
- More labor: Cleanup and finishing take hand work.
There's also an overlooked issue for smaller orders. According to Merchology's explanation of the 3D puff process, a key business consideration is the financial impact of foam waste. The process requires trimming and discarding excess foam, which adds material and labor cost per unit. That matters more when you're placing a small-batch order and don't have large volume to spread setup cost across.
What slows production down
Turnaround isn't just about machine time. Puff projects often move slower because each stage needs more attention.
A shop may need to review whether your art is puff-ready, adjust line weights, prepare a special file, test the setup, stitch the order, trim the foam, and inspect the final edges. If you're working with a supplier such as Dirt Cheap Product, Inc. custom logo embroidery services, ask early about proofing, placement review, and whether your logo should use all puff or a mixed puff-and-flat approach.
A fast quote doesn't guarantee a fast production run. Artwork approval quality often determines how smoothly the job moves.
A better way to place your first order
You can save time and avoid redesign costs by preparing the order properly before requesting production.
Use this checklist:
- Bring the right artwork: Vector files are easiest for clean evaluation.
- Mark the hero element: Tell the embroiderer which part of the logo matters most.
- Accept simplification if needed: Tiny details often need to shift to flat stitching.
- Choose the right garment first: Start with structured caps if you want the most reliable result.
- Review the proof carefully: Look at size, placement, thread color, and readability.
- Ask about samples for important launches: If the order supports a major event or retail rollout, confirming the look before full production can prevent expensive disappointment.
For many small businesses, the smartest first puff order is simple: one strong logo, one stable hat style, one approved proof, and realistic expectations about cost and timeline.
Frequently Asked Questions About 3D Puff
Can I combine 3D puff and flat embroidery in one logo
Yes, and that's often the best solution. Use puff for the main word, initials, or icon. Use flat embroidery for small text, dates, or fine details that won't read well when raised.
Is 3D puff only for hats
No, but hats are usually the safest choice. Structured caps support the raised design better than soft or stretchy garments, so they're often where businesses get the cleanest result.
Is it a good choice for small orders
It can be, but small orders usually feel the cost more because setup, foam handling, and trimming still have to happen. If the order is limited, keep the art bold and simple so you're paying for a technique that will show clearly.
How should I care for 3D puff embroidery
Treat it gently. Wash the garment inside out in cold water and let it air dry when possible. The goal is to protect the raised stitching and avoid unnecessary abrasion.
What if my logo has a slogan or lots of tiny detail
That usually means you should use a mixed approach instead of all puff. The main brand element can be raised, while the smaller information stays flat and readable.
What's the biggest mistake first-time buyers make
They try to force a detailed logo into a technique built for bold shapes. Puff looks best when you respect its limits.
If you're planning branded hats, outerwear, or retail-style merch, Dirt Cheap Product, Inc. can review your logo, help identify whether it's a fit for 3D puff embroidery, and provide proofing for placement, color, and stitch detail before production.