
The loudest advice in heat pressing is also the weakest, a single temperature chart as if cotton, polyester, sublimation blanks, and specialty vinyl all want the same treatment. They don't. The job is to find the least aggressive setting that still bonds cleanly, then confirm the press is delivering it, because a display number is only useful when the platen and the garment surface agree with it.
A usable heat press temperature guide starts with material, not machine model. The same press can be right for one job and wrong for the next, because published guidance for apparel runs from roughly 270–400°F depending on transfer method and substrate, with DTF on 100% polyester commonly around 270–285°F for 15–20 seconds, cotton DTF often around 305–320°F for 12–15 seconds, and sublimation on polyester around 390°F for 35–45 seconds (DTF temperature and time chart). If you remember one thing, remember this, under-activation and scorching are the two guardrails that bracket every press decision.
Practical rule: if a chart gives you one number without naming the substrate, it's not a production setting, it's a rough starting point.
Table of Contents
- Why One Temperature Does Not Fit Every Job
- Pre-Press Habits That Make Every Chart Work
- Cotton Settings for HTV, DTF, and Plastisol Transfers
- Polyester and Blend Settings That Prevent Dye Migration
- Matching the Transfer Method to the Substrate
- Calibrating Your Press so the Numbers Are Real
- Troubleshooting the Most Common Failure Modes
- Heat-Sensitive Fabrics and Specialty Transfers
- Safety, Ventilation, and Press Maintenance
- Quick Reference and Decision Sheet
Why One Temperature Does Not Fit Every Job
A single setting sounds efficient, but it falls apart as soon as the transfer method changes. DTF, sublimation, and specialty vinyls react differently to heat, pressure, peel timing, and dwell time, so the chart has to follow the material and the chemistry, not the label on the press. For a process-focused overview of how garment decoration choices affect setup, see this shirt printing guide.
The primary distinction is between bonding and damage
The usable window is narrower than many charts make it look. On one side, the adhesive does not fully activate, or the dye does not move far enough into the substrate, so the transfer starts lifting too soon. On the other side, the fabric gets glazed, scorched, or distorted. That is why published charts separate cotton, polyester, and blends instead of handing every job the same “best” heat.
Cotton usually tolerates the hotter end of apparel settings, while polyester and other heat-sensitive synthetics call for a lighter touch. The press itself matters less than the setup behind it, because a capable machine still produces bad work if the platen runs hot, cold, or uneven and the operator treats every garment the same.
Use this order in practice. Start with the substrate, then choose the transfer method, then set the lowest temperature that still gives a full bond. If the image looks clean and the hand feel stays acceptable, that setting is usually the right operating window for that job.
Practical rule: temperature charts are not recipes, they are guardrails. The garment and transfer method decide how wide the lane is.
Pre-Press Habits That Make Every Chart Work
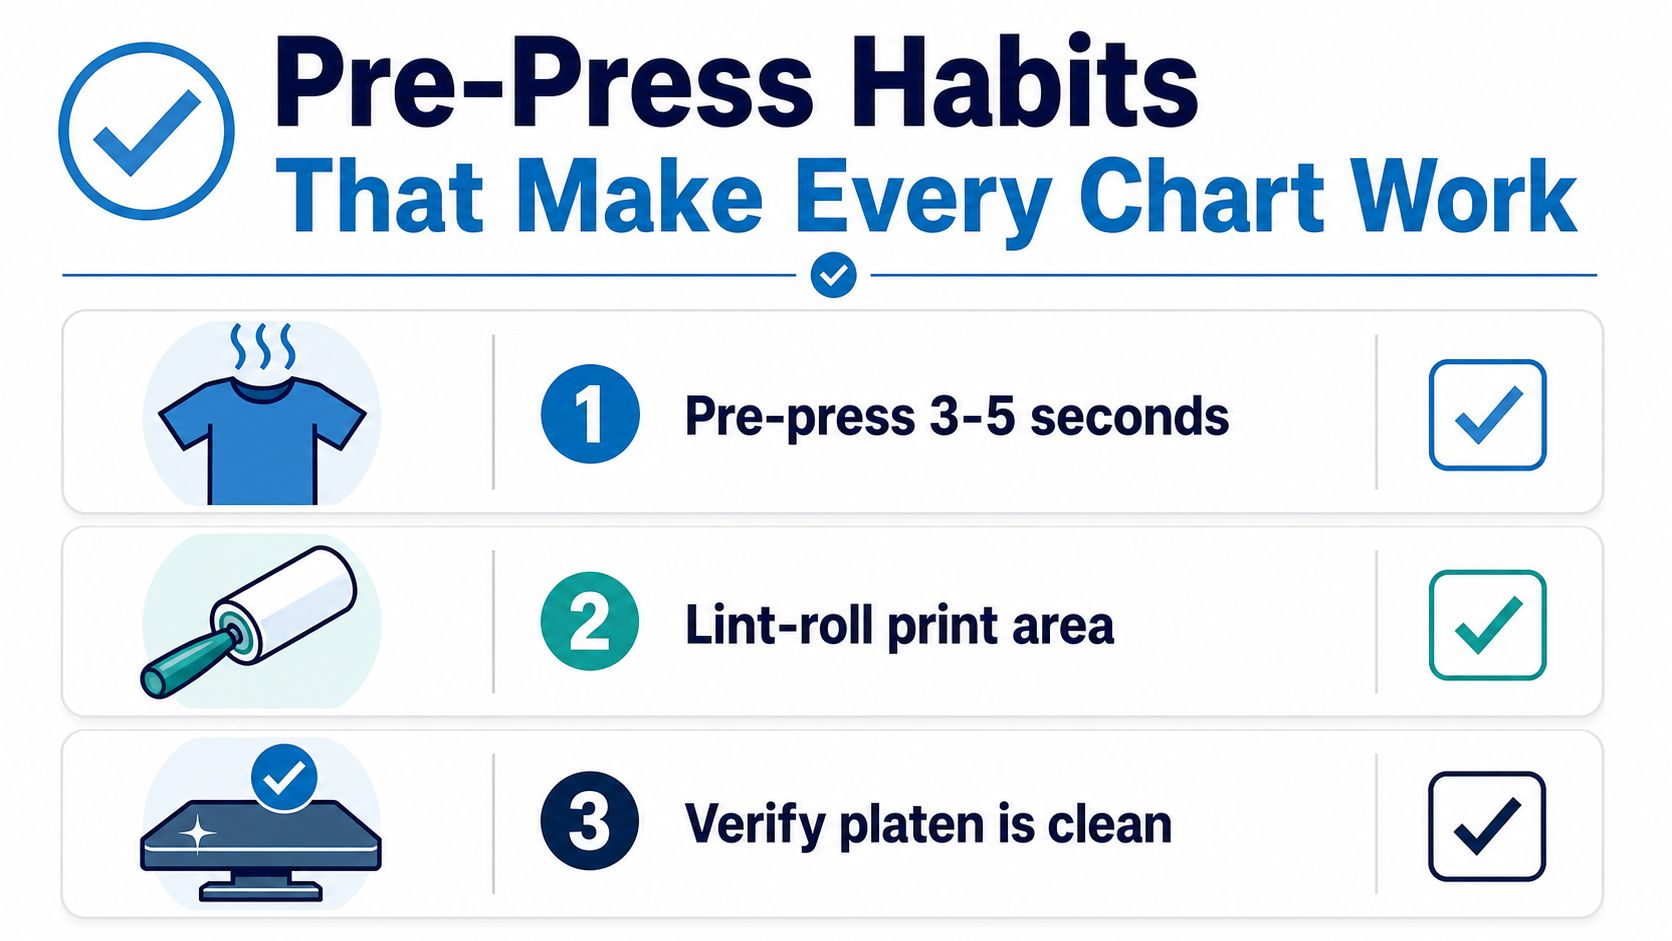
A temperature chart won't save a damp shirt or a dirty platen. Before any real run, the three habits that matter are moisture removal, lint removal, and surface verification. Skip one of them and the bond can fail even when the temperature number is correct.
Start by driving out moisture
A short pre-press of 3–5 seconds removes hidden moisture and improves bond consistency across garment lots (Scalable Press heat press material guide). Cotton and 50/50 blends are especially sensitive here, because moisture can sit in the fibers and interfere with adhesive activation. If a job keeps peeling or looking patchy in the same areas, moisture is one of the first things to eliminate.
Clean the print area before every impression
Lint under the transfer creates tiny high spots that can prevent even contact. A quick lint-roll takes seconds and pays back immediately in cleaner edges and fewer reworks. The goal isn't spotless perfection, it's removing the loose debris that breaks contact where the design needs full pressure.
Check the platen, then trust the chart
The platen must be clean and level, because a dirty surface or an uneven pad changes pressure across the print area. If the machine has been sitting open, wipe the platen cover, inspect the pad, and do a quick visual check before loading the garment. A press that looks calibrated but has residue or worn padding is still going to give uneven results.
For a basic garment workflow, a simple prep routine is enough: pre-press, lint-roll, place the shirt flat, and verify the platen face is clean. If you want a general shirt-printing walkthrough that matches that rhythm, this practical reference is useful: shirt printing basics.
Cotton Settings for HTV, DTF, and Plastisol Transfers
Cotton gives you the cleanest baseline for setting a press because it can take more heat than most synthetics and it shows setup problems fast. Standard HTV on cotton usually lands around 305–320°F for 10–15 seconds with medium pressure, and DTF on the same substrate can stay in that range when the transfer calls for a slightly different cycle (fypower heat press time and temperature chart, Scalable Press heat press material guide).
Cotton settings at a glance
| Transfer Method | Temperature | Time | Pressure | Peel |
|---|---|---|---|---|
| Standard HTV | 305–320°F | 10–15 seconds | Medium | Follow vinyl spec |
| DTF | 305–320°F on cotton | 12–15 seconds | Medium to heavy | Often hot or warm peel, then post-press |
| Plastisol transfers | 325–375°F | 5–7 seconds or 7 seconds | Heavy | Gently hot peel |
| Sublimation on polyester, not cotton | N/A for cotton | N/A | N/A | N/A |
DTF on cotton usually works better with a post-press of 5–10 seconds after peeling, because that extra hit helps the adhesive settle into the fibers and smooth the finish (HTVRont sublimation guide). If you want a cotton DTF workflow that matches real production handling, this DTF printing t-shirt guide is a useful companion. Lower pressure is enough for many standard garments, but large transfers and textured knits often need more force to make full contact across the print area.
Plastisol transfers behave differently from HTV. They usually run hotter and need heavier pressure, and some transfer types still want a quick hot peel followed by a short second press if the edges are not fully down. That heavier press load is one reason plastisol stays common in screen-print shops, because it is built for fast, repeatable apparel work and can tolerate a more aggressive setting than more delicate decoration methods.
Practical rule: on cotton, do not chase the highest temperature first. Start with the method-specific baseline and increase only if the transfer shows it needs more heat or dwell.
Polyester and Blend Settings That Prevent Dye Migration
Polyester is less forgiving than cotton on the press. Heat can pull dye out of the fibers and push it into the transfer layer, so the primary issue is not just adhesion, it is dye migration. For that reason, DTF on polyester usually belongs in a lower range, around 270–285°F for 15–20 seconds, rather than the hotter settings used on cotton (DTF temperature and time chart).
Drop the heat before you touch the dwell time
On 100% polyester, start by reducing temperature first, then extend time only if the transfer still needs help. Polyester HTV is also commonly run lower than cotton, around 285–300°F for 10–12 seconds with medium-firm pressure, because the fabric reacts sooner to heat than cotton does (Scalable Press heat press material guide). That difference matters in production, since a setting that looks fine on a cotton shirt can still haze, gloss, or bleed on polyester.
50/50 blends and many performance fabrics sit between the two, but they do not behave like cotton just because cotton is part of the mix. A blend can still show migration, sheen, or press marks if the heat runs too high or the pressure is heavier than the garment needs. Tri-blends and brushed performance fabrics are even less forgiving, so a lower-friction cover sheet or a press pillow helps keep the face smooth while still holding even contact.
Watch for migration before it becomes a bad run
The warning signs show up fast. A pink or gray cast creeping into white art, a halo around the edges, or bright areas turning dull usually means the fabric has been overheated. Once that starts, more time is rarely the answer.
Use the least aggressive setting that still gives you clean edge release and a solid bond, then hold that setting for that fabric family. If the job repeats, write down the blend, the exact press behavior, and whether the peel was clean, stubborn, or glossy, so the next run starts from a setting that already proved itself.
For the chemistry side of why polyester behaves this way, the dye sublimation process shows how heat can move color into the garment instead of just sitting on top of it.
Matching the Transfer Method to the Substrate
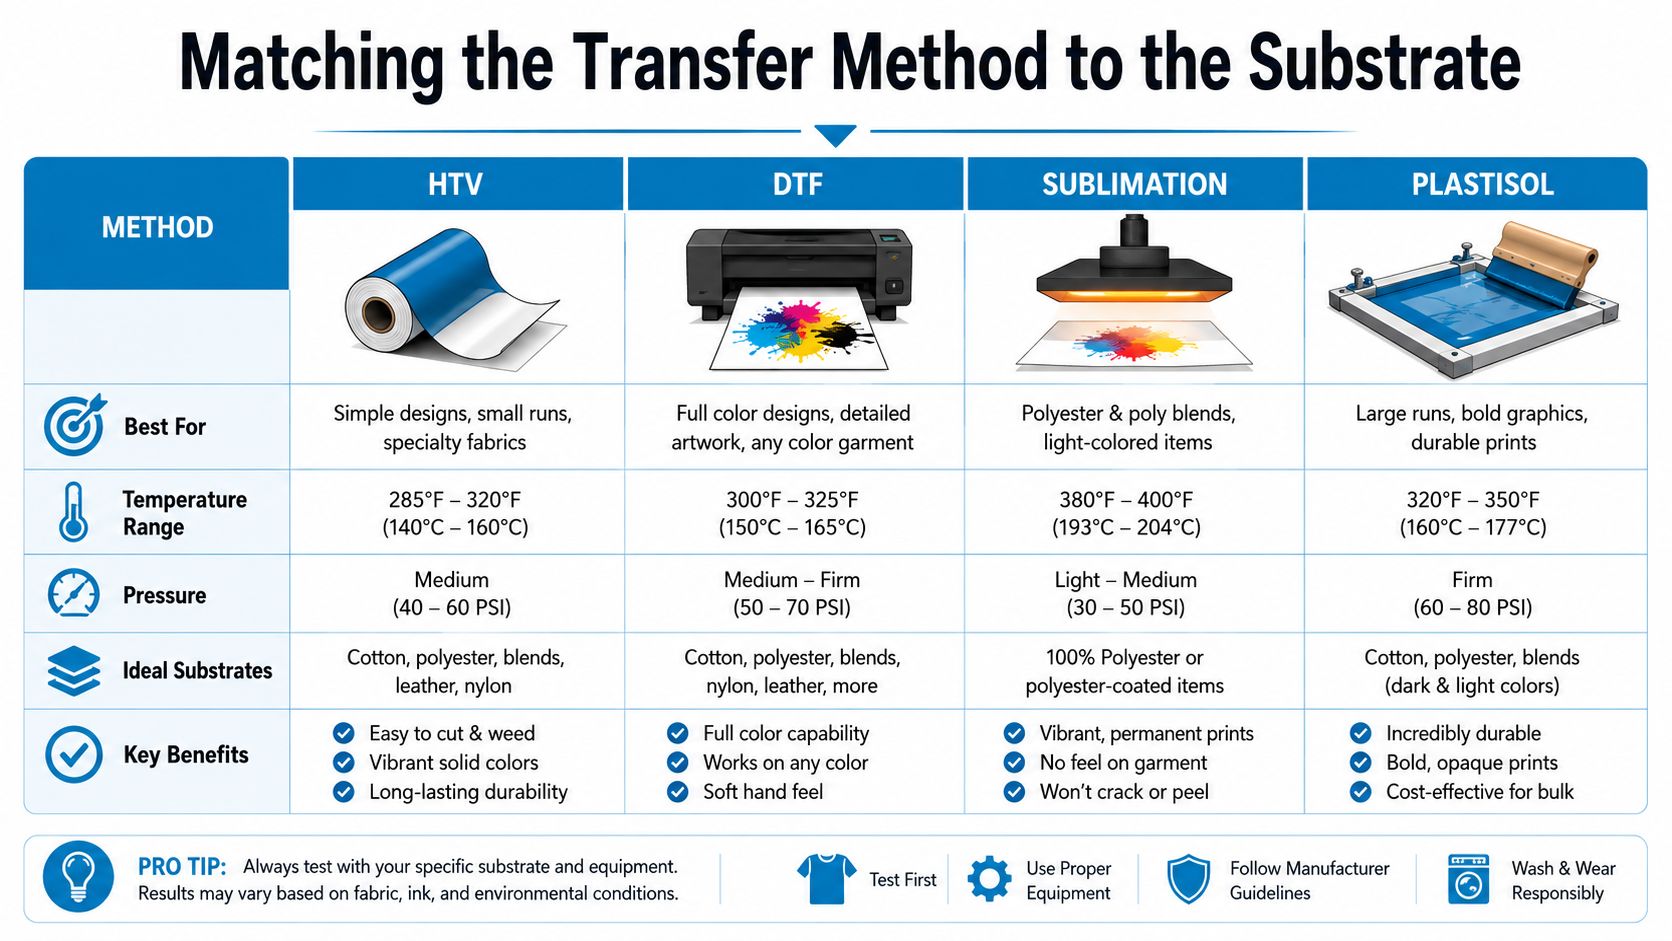
The fastest way to choose a press setting is to start with the method and the substrate, not the number on the screen. Sublimation belongs on polyester-based fabrics or polymer-coated hard surfaces, while HTV, DTF, and plastisol each solve a different production problem on apparel.
Side by side method comparison
| Method | Best For | Temperature Range | Pressure |
|---|---|---|---|
| HTV | Simple apparel graphics and lettering | 305–320°F on cotton, lower on polyester | Medium |
| DTF | Cotton, blends, and many garment runs | 270–320°F depending on substrate | Medium to heavy |
| Sublimation | Polyester and coated hard goods | 350–400°F, often higher than vinyl workflows | Medium |
| Plastisol transfers | High-volume screen-printed apparel | 325–375°F | Heavy |
Sublimation is the one method here that does not act like a surface adhesive. The dye has to turn into gas and bond with the polyester or coating, which is why cotton is not a valid target for the process. HTVRont sublimation guide lays out that limitation clearly, but in production terms the rule is simple, if the substrate cannot accept the dye, the transfer will not hold the way you want.
DTF earns its place because it handles a wider mix of garments with fewer surprises. It is useful on cotton, blends, and a lot of mixed apparel runs, especially where one method needs to cover more of the order without forcing a second workflow.
Plastisol stays the workhorse when throughput matters. It is built for repeatable garment production, and the transfer can be pressed later if the decorator wants to stage work ahead of time. HTV is still the most direct choice for small runs, names, numbers, and clean vector graphics when the fabric can take the heat.
Practical rule: if the order does not specify a method, choose by substrate first, then by finish. Cotton usually points to HTV or DTF, polyester opens the door to sublimation or cooler DTF settings, and coated hard goods point straight to sublimation.
Calibrating Your Press so the Numbers Are Real
A display reading is only a claim from the controller. The platen can run hotter, cooler, or uneven across the face of the press, and that gap is where good charts turn into bad jobs. Calibration belongs in the routine because the machine has to prove the number before the number can be trusted.
Test the platen, not the hope
Check the platen with an external thermometer strip or an infrared probe to see whether the surface reaches the set temperature. If the display and the measured surface do not match, the press needs adjustment. Cold spots also need a full check across the platen, not just a single reading from the center. A thermal sheet or similar test pattern can show whether the corners are lagging behind the middle.
Run a repeatable weekly check
Keep the routine simple. Warm the press, verify the reading, place scrap fabric, press a test transfer, and do a quick stretch or adhesion check. If the display is correct but the garment still feels under-bonded, adjust dwell time first before raising the temperature.
Practical rule: if the press is reading right but the garment result is wrong, change only one variable at a time.
That matters on the floor. A press that runs a little cold can push a job out of range, especially near the lower polyester settings or the upper sublimation settings. Published guidance already spans from roughly 285°F for polyester to 390°F for sublimation (brand guidance on DTF settings), so a misread machine can put you outside the safe window fast. The broader DTF temperature and time chart shows the same spread in practical use, which is why calibration is not optional if you want clean adhesion without burning through shirts.
Troubleshooting the Most Common Failure Modes
Most heat-press problems show up as a symptom long before they show up as a total failure. If a job starts going sideways, diagnose the symptom first, then make the smallest possible correction.
Adhesive peeling after cool-down
When a transfer lifts at the edges or peels cleanly off the garment, the likely issue is usually temperature too low, time too short, or pressure too light. The first move is to confirm the platen temperature with an external probe, then add a small amount of dwell time before raising heat. If the peel method is wrong for that transfer, no amount of extra heat will fully save it.
Scorching or a shiny finish on cotton
Scorching usually means the setting is too hot or the press sat too long. Cotton can handle more heat than many synthetics, but it still burns, and dark cotton often shows sheen before it scorches. Drop temperature first, then shorten dwell if the surface still looks glazed.
Ghosting from shifting transfers
Ghosting usually comes from movement during placement or peel, not from the garment itself. Heavy pressure can make it worse by causing the substrate to shift when you open the press. Fix the placement method first, then check whether a pillow or cover sheet would reduce movement on thicker garments.
Dye migration on polyester
If white artwork picks up a pink or gray tint, the cause is usually too much heat for the fabric. Lower the temperature before anything else, and keep pressure moderate rather than aggressive. Polyester is where patience pays off, because the right bond often comes from cooler settings and cleaner contact, not from trying to force the transfer.
A cleaner troubleshooting habit is to change just one thing per test piece. That's slower in the moment, but it stops you from chasing three variables at once and burning a whole run.
Heat-Sensitive Fabrics and Specialty Transfers
Nylon, spandex blends, performance mesh, canvas bags, and coated drinkware don't belong in the standard cotton playbook. They need tighter control, lower heat ceilings, and more attention to pressure because the material can deform before the transfer fully bonds.
Lower the temperature before you touch the fabric
For heat-sensitive synthetics, start at the lowest end of the method's valid range and verify on scrap if the supplier allows it. A press pillow helps on seams, zippers, and thick bags because it evens out pressure without crushing the whole item. For delicate surfaces, a low-friction cover sheet or silicone barrier reduces sticking and keeps the platen from leaving marks.
Stretch HTV and puff HTV are both less forgiving than standard vinyl. They need a narrower time and pressure window because too much force flattens texture and too much dwell can distort the finish. That's why vendor-specific caveats matter more here than memorizing a generic chart.
Treat coated and hard items separately
Mugs, metal panels, and other coated surfaces belong to sublimation-style settings, not apparel settings. The temperature and time are different because the substrate is different, and the coating has to accept the transfer cleanly. Don't assume a garment setting will behave on a hard blank just because the press can close on it.
Practical rule: when the material feels fragile, back off heat first, then pressure, then time. The order matters.
Safety, Ventilation, and Press Maintenance
A heat press is production equipment, not just a craft tool. Safe handling, clean surfaces, and decent ventilation all affect both output and operator comfort, especially when the shop runs sublimation or long shifts back-to-back.
Keep the area safe and the air moving
Sublimation releases more vapor than standard HTV work, so ventilation matters more on those jobs. Move the hot platen carefully, give it time to cool before maintenance, and never reach into the press without checking where the heat is. A burned hand or a warped cover slows the whole line more than a short pause ever would.
Clean the pad before it starts causing defects
Silicone pads and press covers should be cleaned without leaving residue that can transfer back onto garments. Residue, scorch buildup, and worn surfaces all change how pressure distributes across the platen. If a transfer starts showing uneven edges, random sheen, or pressure marks in the same spot every time, the pad is often part of the problem.
Replace worn padding before it ruins consistency
A pad needs retirement when wear becomes visible, pressure becomes uneven, or transfers begin ghosting in the same areas. That's not a cosmetic issue, it's a process issue. Once the pad compresses or breaks down, every temperature number becomes less trustworthy because the garment no longer sees even contact.
A simple maintenance routine helps keep the press predictable: wipe the platen cover, inspect the silicone pad, check for residue, and watch for hot spots during production. Consistency on the machine side is what keeps the chart numbers useful on the garment side.
Quick Reference and Decision Sheet
When an unfamiliar order lands on the table, the fastest route is still the same, fabric first, transfer method second, calibrated numbers third. A good heat press temperature guide doesn't try to replace judgment, it gives the operator a short path to a safe starting point.
One-page decision sheet
| Fabric | Best Starting Point | Watch For |
|---|---|---|
| Cotton | HTV or DTF at cotton settings | Scorching, sheen, overpressing |
| Polyester | Cooler DTF or polyester-safe HTV | Dye migration, gloss, distortion |
| 50/50 blends | DTF or blend-safe HTV | Migration, incomplete bond |
| Sublimation blanks | Sublimation settings only | Wrong substrate, dull transfer |
| Heat-sensitive synthetics | Lowest safe method range | Warping, shine, seam marks |
If the garment is cotton, start with the cotton method range already listed above. If it's polyester, step the temperature down before extending time. If it's a coated hard blank, move straight to sublimation logic instead of forcing an apparel recipe onto it.
That decision tree keeps the wrong settings from becoming a routine. It also gives new operators a usable first pass without making them guess at the machine or memorize every vendor sheet.
If you want apparel, promo items, or branded uniforms produced with the kind of temperature control that keeps rework low, visit Dirt Cheap Product, Inc. and talk to a team that lives in the world of fast-turn decoration. They handle end-to-end custom branding for shirts, hats, bags, and more, so you can get guidance that matches the job instead of a generic chart.