
You're probably staring at a hat mockup, a patch proof, and a deadline that's closer than you'd like. The logo looks fine on screen, but on a curved crown, that same artwork can turn into a bad fit, a stiff front panel, or a patch that just feels wrong once it's sewn on. That's the part first-time buyers miss. The core question isn't whether the design looks good. It's whether the patch fits the hat, survives the wear, and still looks clean after production.
Table of Contents
- Why Embroidered Patches on Hats Trip Up First-Time Buyers
- What Embroidered Patches Actually Are
- Patch Types and Attachment Methods Compared
- Sizing Patches to the Front Panel
- Why Hat Construction Matters More Than the Artwork
- When Embroidered Patches Are the Wrong Choice
- What the Ordering Process Actually Looks Like
- Ordering Checklist for Embroidered Patches on Hats
Why Embroidered Patches on Hats Trip Up First-Time Buyers
A buyer picks a snapback, sends over a logo, and gets back a proof that looks simple enough. Then the doubts hit. Will that patch sit flat on the front panel? Will the hat feel bulky? Will the backing hold after a few wears, or will it start peeling at the edges?
The problem usually shows up after the proof
Most first-time buyers focus on artwork and skip the hat itself. That's a mistake. Embroided patches on hats succeed or fail based on fit, panel shape, and how the patch is attached, not just on whether the logo is attractive.
A structured cap gives you more room and a flatter surface. A softer crown can distort a patch that looked perfect on a screen. If the hat is curved, a patch that is too large or too stiff can pucker, shift, or create a front panel that looks overworked.
Practical rule: approve the hat and patch together, not separately. A patch that works on paper can still fail on a soft crown or a heavily curved front.
The other trap is durability. A heat-applied patch may look fine on day one, but the wrong fabric, press settings, or wear pattern can shorten its life. Sewn attachment is usually the safer call when the hats will see repeated use, laundering, or rough handling.
The simplest way to think about it is this, your first approval is not the artwork. It's the hat profile, the patch size, and the attachment method. Get those wrong, and the best-looking logo in the world won't save the order.
What Embroidered Patches Actually Are
An embroidered patch is a decorative cloth badge made by stitching thick, colorful threads onto a fabric base. That sounds basic, but the mechanic matters. The raised thread structure gives the patch texture and edge definition that printed decoration can't match, especially on small front-panel placements where visual clarity has to do a lot of work.
Why the construction changes the look
Unlike print, embroidery builds the image out of thread. That means the final result depends on stitch density, thread coverage, and the backing underneath it. On a hat, that matters because the patch isn't just a picture, it's a separate object being mounted onto a curved surface.
That separate construction creates advantages and trade-offs. It can look crisp and tactile. It can also feel thicker and stiffer than a flat printed design. On a cap front, especially a smaller one, the patch has to stay readable without overwhelming the panel.
A lot of buyers assume embroidery is just a style choice. It isn't. It's a physical build choice. The thread sits above the base, the base sits above the hat, and that extra structure changes how the patch handles light, wear, and edge visibility.
What that means on a cap
On hats, you're not decorating a wall or a flat back panel. You're dealing with a curved crown, seams, and fabric tension. That means the patch has to be engineered for a specific shape, not just a general logo application.
The patch has to be readable at a distance and still behave on a crown that moves, flexes, and gets handled all day.
That's why the same logo can look strong on a jacket and clumsy on a cap. Hats are smaller, more curved, and less forgiving. If you treat them like flat apparel, you'll approve the wrong patch.
Patch Types and Attachment Methods Compared
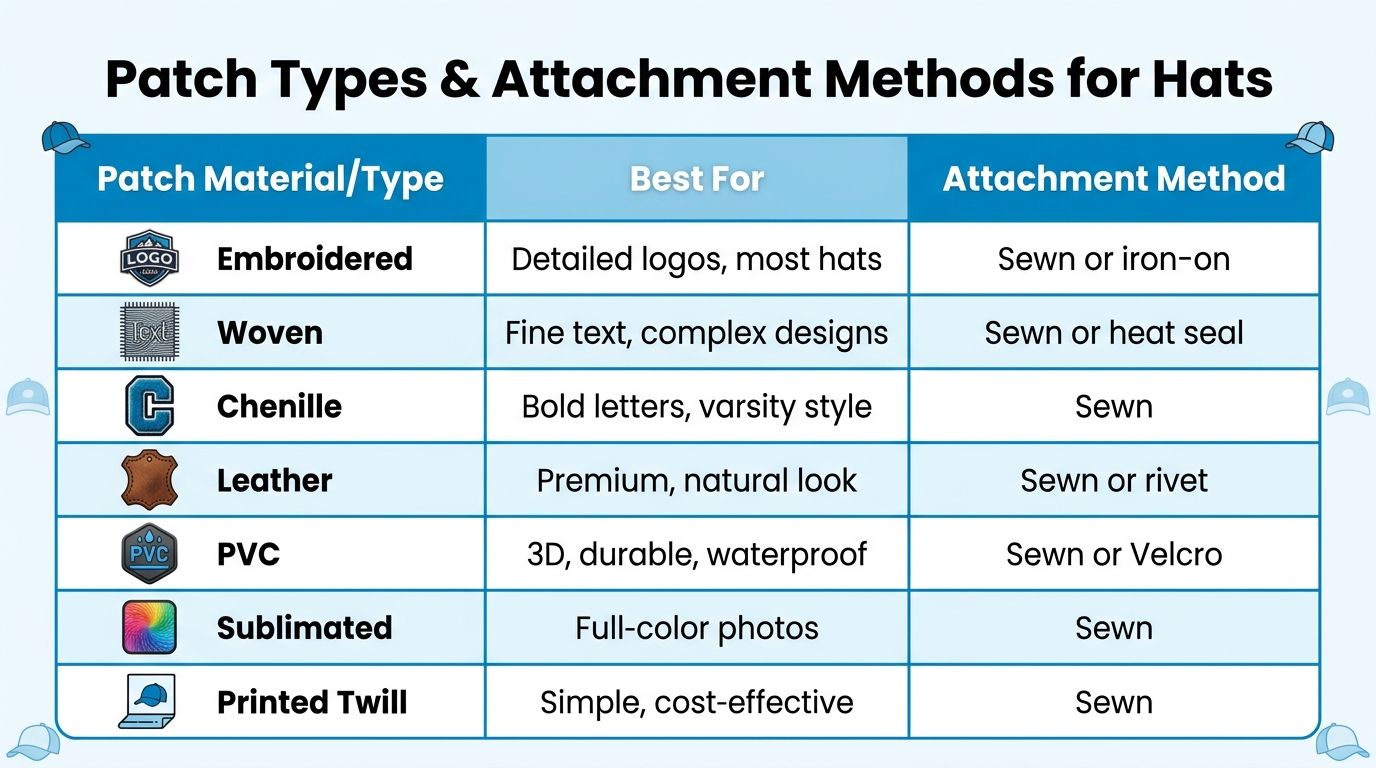
The patch material should match the job. That's the plain truth. A bold logo on a structured cap does not need the same construction as a fine-text trade show mark or a premium retail hat.
Match material to use case
Embroidered patches are the familiar choice for texture and a classic branded look. They make sense for most hats when the logo is bold and the front panel can handle a little structure.
Woven patches are better when the artwork has fine text or tighter detail. They read flatter and cleaner when embroidery would get muddy.
Chenille belongs in varsity-style or statement pieces. It's loud by design, so don't use it for a subtle brand mark.
Leather gives a more natural, premium feel. It works well when the hat itself has a rugged or refined look.
PVC is the practical pick when you want a durable, modern look with a bit of dimension. It's also a strong option for hats that need a tougher surface.
Sublimated and printed twill are more useful when the artwork is image-heavy or when the design needs color complexity that thread can't reproduce cleanly.
Attachment matters just as much
Industry guidance separates satin-stitch border, merrowed edge, heat press, direct sew, rivets, Velcro, or adhesive plus perimeter stitch as distinct production choices, and that split is important for hats (hat patch spec guide). For hats, sewn attachment is usually the most dependable when the goal is long-term wear. Heat press is faster, but it depends more on fabric compatibility and press control. Velcro makes sense for modular branding. Rivets and specialty attachments are more niche, but they can work in the right design system.
If you're ordering for staff, retail, or repeat use, lean toward sewn attachment. If the order is a short-run event piece and speed matters more than lifespan, heat-applied options may be acceptable. The wrong attachment won't just look off. It can fail earlier than it should.
Sizing Patches to the Front Panel
The hat should set the size, not the artwork file. That's the rule buyers ignore most often. A structured snapback or baseball cap typically supports a front patch around 2 x 2.5 to 2.5 x 3 inches, while the smallest practical embroidered patch is about 1 x 1 inch and text should be at least 0.25 inches tall to remain legible (size guide).
Use the panel, not the logo, as the starting point
A front patch has to fit the available front-panel geometry. On a structured cap, the panel is flatter and more tolerant of a larger patch. On a softer cap, the usable area is smaller in practice because the crown bends and moves.
That's where a lot of approvals go wrong. A logo might technically fit the width, but if the patch crowds seams or reaches too far into the curve, it can start to warp. That's not a design issue, that's a placement issue.
Sizing rule of thumb: if the front panel looks busy before the patch is even sewn on, the patch is too large.
As the patch gets smaller, stitch density has to compress. That makes thin lettering more likely to fill in or lose its edge. Text that seems fine in a proof can vanish once the machine has to translate it into thread.
The safest approach is to judge size by hat style first and by artwork second. A structured baseball cap can usually carry a more assertive front patch than an unstructured cap. The flatter the application zone, the more forgiving the result.
If you need a placement reference while reviewing your proof, a practical embroidery placement guide can help you think through the front-panel layout before you sign off. That's a lot smarter than guessing from a single mockup.
Why Hat Construction Matters More Than the Artwork
The artwork gets attention, but the hat construction decides whether the patch works. A structured cap, a soft dad hat, a curved crown, and a foam-front style all behave differently. That changes how the patch sits, how the edge reads, and how much stress the attachment has to absorb.
Structured and unstructured hats do not behave the same
A structured front panel gives the patch a flatter, more stable landing zone. That helps larger patches stay clean and readable. An unstructured cap is softer, so the same patch can buckle the front, lift at the corners, or look too rigid for the hat.
Curvature matters just as much. A flat-looking proof can be misleading if the hat has a strong curve. Once the patch follows the crown, the edges have to work against the panel shape. That is where puckering shows up, especially if the patch is thick or oversized.
The practical issue is comfort as much as appearance. A stiff patch on a soft crown can make the front feel heavy and awkward. Buyers notice that immediately, even if they cannot explain why it feels off.
A hat-specific guide points out that buyers often ask the wrong question. They ask what the patch looks like, not how it will sit on the crown or hold up under wear (hat-specific design notes). That criticism is fair. Fit-by-construction is the primary decision driver, not just the artwork. For a detailed look at a common construction style, see our guide to the 6-panel hat.
Wear conditions should shape the spec
If the hats are for staff, outdoor use, or repeated handling, sewn attachment is the safer choice. Repeated laundering and abrasion punish weaker finishes first. If the hat will mostly live at an event table or in a merch box, you can be more flexible.
Bottom line: a good patch on the wrong hat can still be a bad order.
If you are ordering bulk headwear and want a practical ordering partner, Dirt Cheap Product, Inc. handles custom patches for hats and can coordinate hat style, patch material, and placement with the rest of the decoration workflow. That matters because the hat body and the patch need to be approved together, not treated as separate purchases.
When Embroidered Patches Are the Wrong Choice
Embroidery isn't the answer every time, and anyone selling it that way is oversimplifying. It loses ground fast when the logo gets too small, the detail gets too fine, or the deadline gets too tight for a slower production path.
Small detail is where embroidery starts to fail
Very small copy is the first warning sign. When text gets tiny, thread can blur the edges and reduce legibility. If the logo depends on fine lines, hairline shapes, or subtle color transitions, a woven or printed method will usually behave better on a hat front.
That's why mixed-process decoration has become more common on hats. Some programs use embroidery plus sublimation, embroidery plus adhesive elements, or a completely different patch material when the artwork needs a cleaner result. A recent mixed-method demo on hats shows that buyers are increasingly open to non-embroidered solutions when the design and timeline fit better (mixed-method hat decoration demo).
Speed and fit can outweigh the classic look
Embroidery also isn't the fastest option for every job. If you need a clean visual on a short timeline, woven, leather, PVC, or printed twill may be a smarter choice depending on the design. A patch that looks slightly flatter but gets delivered on time is better than a premium option that misses the event.
Here's the blunt decision rule:
- Choose embroidered when the logo is bold, the hat is structured, and you want texture.
- Choose woven when the artwork has fine text or tighter detail.
- Choose leather or PVC when the brand look matters more than thread texture.
- Choose mixed methods when the hat design needs speed, contrast, or a cleaner finish than embroidery can deliver.
If the design only works when enlarged beyond what the hat can hold, the problem isn't the decorator. It's the format.
That's the part buyers need to accept early. Sometimes embroidered patches on hats are the right move. Sometimes they're the wrong one, and the smarter answer is a different patch type.
What the Ordering Process Actually Looks Like
A first order for embroidered patches on hats usually takes more coordination than people expect. You send the art, review the proof, check how the patch sits on the crown, approve a sample if the job calls for one, and then production starts. That process is normal. Hat work is handled through back-and-forth with a real person, not instant checkout, so you need to build in time before the event date.
The order usually moves in a fixed sequence.
Start with vector artwork and give the vendor the exact patch size, edge finish, backing choice, and hat style. That gives them the information they need to set the stitch path, border thickness, and placement tolerance before anything goes to production. If the art file is messy, the proof will be messy too.
Next comes the digital proof. Use that stage to catch scale problems, spacing issues, and awkward placement near seams, vents, or a curved front panel. For a critical order, a physical sample is worth the extra time because hats reveal fit problems that flat artwork proofs hide. A patch can look fine on a screen and still sit wrong on the crown.
Then production starts after final approval. After that, quality control still matters. Check thread tension, color consistency, edge finish, and how the patch sits once it is attached. Do that before shipping, not after the box shows up.
A supplier page for hat patches lists a business-hours service window of 8:30 to 5:00 PST, Monday through Friday, which is a good reminder that patch orders are managed through coordination, not instant checkout (supplier contact details). That is normal in this category.
Buyers should plan around proofing time
If the hats are for a launch, campaign, or event, do not wait until the last minute. Proofing and placement checks are part of the job, and they are where bad hat decisions get caught. Rush that stage, and you are more likely to approve a patch that fits badly on the crown or lands in the wrong spot for the hat construction.
If you want to compare decoration methods before you place a bulk order, use a production partner like WearView to see how different headwear styles present a patch visually before you commit. Use that check as a practical screen, not as a replacement for a real proof.
When you are ready to move forward, our custom hats bulk order page outlines the next steps.
Ordering Checklist for Embroidered Patches on Hats
Before you approve the order, confirm the vector artwork, the exact patch size, and the text height. Then verify the hat model, hat color, front-panel shape, edge finish, backing type, and attachment method. If the patch has to be readable and wearable, those details matter more than a flashy mockup.
Confirm these items before signoff
- Artwork file: send clean vector art so the stitch path can be built correctly.
- Patch size: match it to the front panel, not to a generic logo dimension.
- Text legibility: keep small text honest, because tiny lettering gets weak fast.
- Hat construction: know whether it's structured, unstructured, curved, or otherwise shaped.
- Backing and attachment: choose sew-on, iron-on, or Velcro based on wear, not convenience alone.
- Placement: define where the patch sits on the hat before production starts.
- Timeline: leave room for proofing and revision.
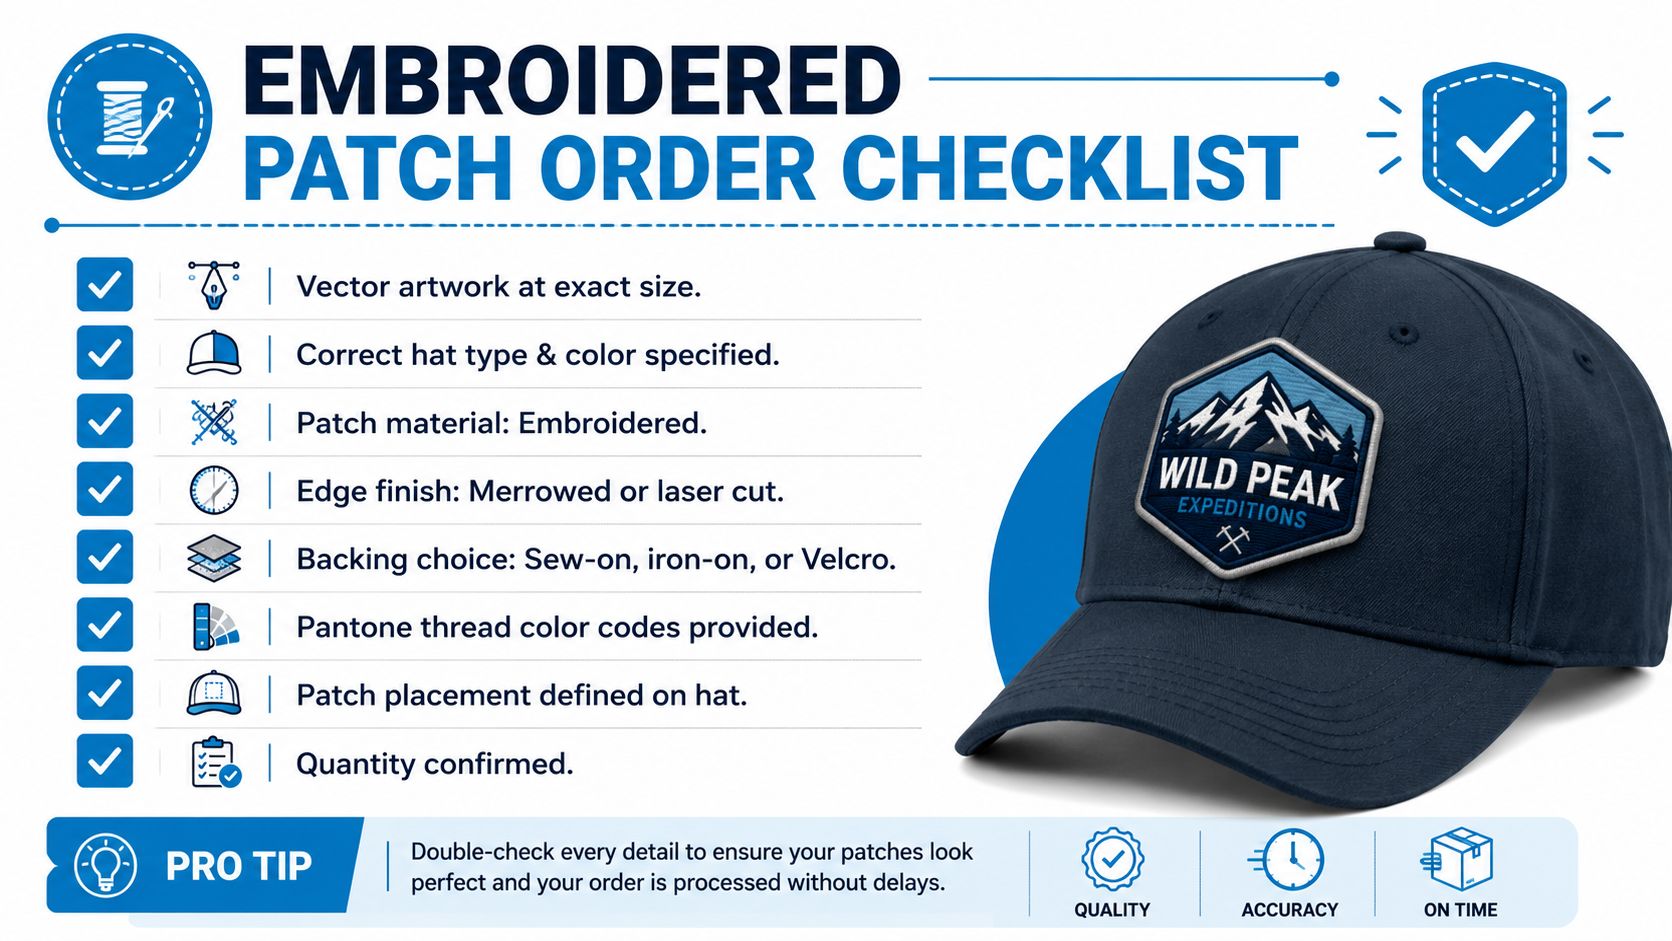
The best patch isn't the one with the most thread. It's the one that fits the hat, survives the wear, and lands on time.
For a practical next step, send your hat style, patch art, and quantity to a shop that can handle the full decoration workflow. Dirt Cheap Product, Inc. produces custom apparel and hats with embroidery, DTF, sublimation, and custom patches, so if you're ready to order branded caps for a team, event, or retail run, visit Dirt Cheap Product, Inc. and start with the hat details that matter most.