
You're probably here because a plain short sleeve tee doesn't fit the job.
Maybe you need staff shirts for a trade show where the room runs cold all morning. Maybe your crew needs branded uniforms that look more put together than giveaway tees. Maybe you're ordering merch for an event and want something people will keep wearing after the day is over. Long sleeve shirts sit in that useful middle ground. They feel more substantial than a basic tee, but they're still easy to size, easier to layer, and far less expensive than outerwear.
That's also where many first orders go sideways. Long sleeve t shirt printing looks simple until sleeve seams throw the artwork off, heavy fabric changes how ink sits, or a great-looking proof starts fading early because nobody talked about wash friction on the forearm and elbow. Most buying guides stay general. Real orders need specifics.
Table of Contents
- Why Custom Long Sleeve Shirts Matter for Your Brand
- Choosing Your Long Sleeve Printing Method
- Selecting the Right Fabric and Ink
- Mastering Artwork Placement on Long Sleeves
- Preparing Your Artwork for Flawless Printing
- Understanding Pricing and Production Timelines
- Ensuring Longevity with Quality Checks and Care
Why Custom Long Sleeve Shirts Matter for Your Brand
A business owner usually doesn't order long sleeves just because they like the look. They order them because they need apparel that works harder. A landscaping company wants sun coverage for the crew. A brewery wants fall event merch that feels more premium than a basic tee. A nonprofit needs volunteer shirts that still make sense when the event starts at sunrise and ends after dark.
Long sleeves solve a branding problem and a practical one at the same time. You get more printable space, especially on the sleeves and upper back, and the garment itself feels more intentional. That matters when you want branded apparel to look like part of the brand, not an afterthought.
There's also a clear business reason custom apparel keeps getting attention. The global custom t-shirt printing market is valued at USD 6.57 billion in 2026 and is projected to reach USD 17.22 billion by 2034, growing at a CAGR of 12.81%, driven by demand for personalized apparel for events and corporate programs, according to Fortune Business Insights market outlook. Long sleeve shirts sit right in that demand curve because they work for staff uniforms, promo drops, branded retail, and seasonal campaigns.
If you're building the design side of that order, it helps to think beyond the shirt itself. Logos, team photos, product shots, and booth graphics all need to look consistent. A solid expert guide to visual assets can help you tighten that side before the apparel proof even starts.
Practical rule: A long sleeve shirt earns its keep when the garment solves a real use case first, then carries the brand well. If it only does one of those jobs, it's usually the wrong pick.
The best long sleeve orders aren't the ones with the fanciest print. They're the ones where the garment, artwork, and use case line up from the start.
Choosing Your Long Sleeve Printing Method
A long sleeve order can look fine on paper and still go wrong on press. Sleeve seams shift placement, cuffs limit usable space, and prints near high-flex areas tend to show wear first. The right method is the one that fits the garment, the artwork, and the way the shirt will be used after delivery.
Start by deciding what has to go right. Bulk pricing, soft hand feel, sharp detail, mixed garment types, sleeve printing, and wash durability rarely point to the same method.
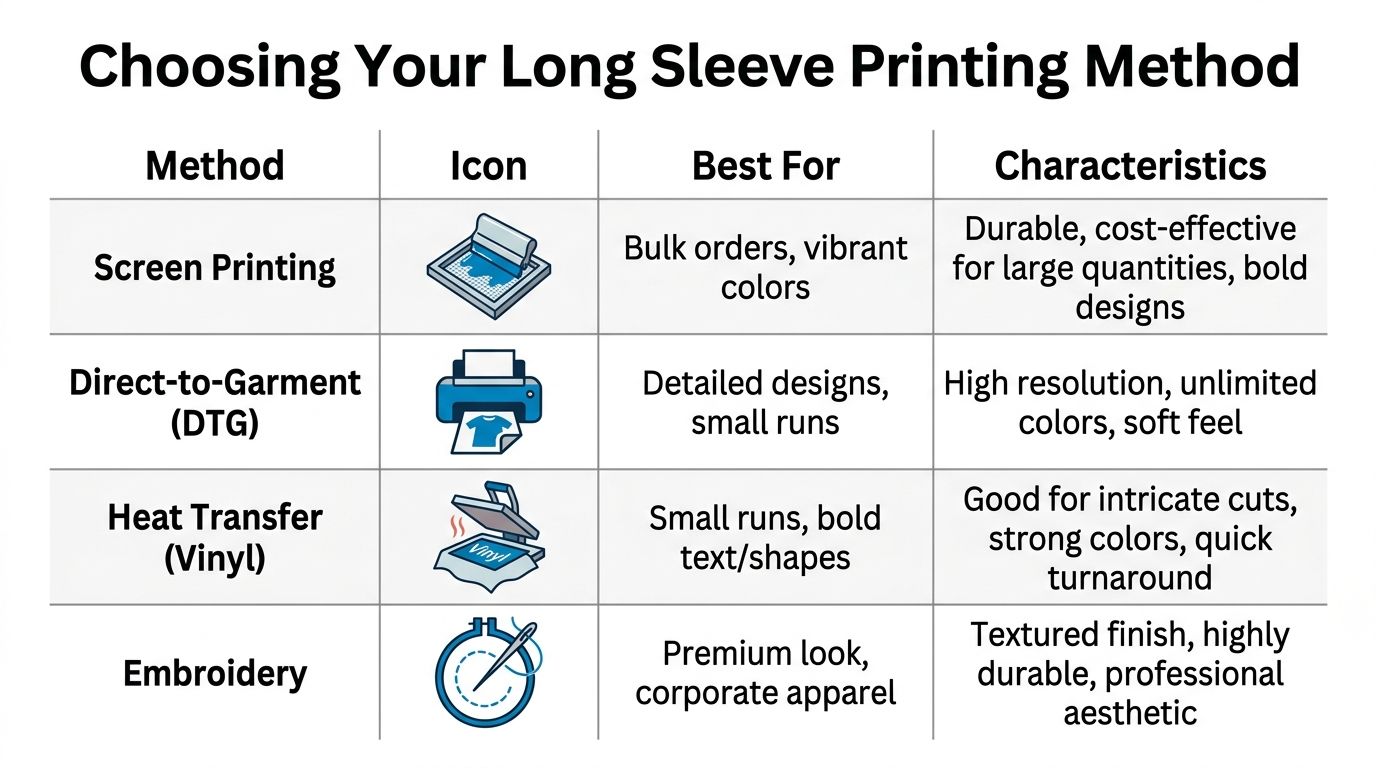
What works best at different order sizes
Screen printing is still the workhorse for larger runs with simple art. If the design is a one-color chest print, a two-color back print, or clean sleeve text repeated across a full staff order, screen printing usually gives the best cost per shirt once setup is spread across the run. It also holds up well in washing, which matters on long sleeves because the forearms and cuffs get more friction than a standard tee.
DTF earns its place when the order gets messy in a practical way. Mixed garment brands, cotton-poly blends, detailed artwork, and small sleeve graphics are common reasons shops move to transfers. It gives more flexibility across fabrics and handles color-heavy art without building a separate screen for every color. If you want a clearer side-by-side on the digital options, this guide to DTG vs DTF printing differences helps explain where each one fits.
DTG works best on smaller cotton-rich orders where image detail matters more than broad fabric compatibility. It can produce a soft print and strong detail, but long sleeves expose its weak spots faster. Sleeve seams, fabric variation, and the narrower print zone make setup less forgiving than a standard front print.
| Method | Best fit for long sleeves | Main trade-off |
|---|---|---|
| Screen printing | Bulk runs, bold logos, limited colors | Setup cost rises with each color |
| DTF | Complex graphics, mixed fabrics, sleeve locations | Print feel depends on transfer size and coverage |
| DTG | Small runs on cotton-rich garments with detailed artwork | More sensitive to fabric and placement consistency |
| Sublimation | Polyester performance garments where dye-based decoration is needed | Only works on the right fabric type |
| Embroidery | Left chest, cuff, or sleeve branding with a premium look | Not suited to large full-front graphics |
How the main methods compare on long sleeves
Screen printing does its best work on stable, repeatable placements. Full back prints, left chest logos, and straight sleeve copy are all solid candidates. Where buyers get into trouble is trying to force screen printing into short runs with lots of colors, frequent design changes, or tiny sleeve placements that sit too close to a seam. A one-inch shift is much more visible on a sleeve than on a back print.
DTF solves several long-sleeve-specific problems that general t-shirt guides skip. It can be positioned more precisely on narrow sleeve areas, and it handles mixed-fabric orders without splitting the job into separate print methods. It also gives shops a better option for artwork that crosses from simple branding into photo detail or color gradients. The trade-off is feel. A small sleeve logo transfer usually feels fine. A large, solid transfer across the forearm will feel heavier, and that should be discussed before approval.
Here's a quick process view if you want to see decoration in motion:
DTG can produce excellent results, but only if the garment and placement cooperate. On long sleeves, that means avoiding seam-adjacent art, keeping the print area realistic, and expecting more variation on lightweight or stretchy shirts. For a small brand run on ring-spun cotton, DTG may be the right call. For a uniform order where every sleeve has to match, it is often not the first method I would choose.
Sublimation is the specialist option. On polyester performance long sleeves, it gives a durable print that becomes part of the fabric, which is useful for athletic wear and sun shirts. On cotton or dark blended garments, it is the wrong tool.
Embroidery belongs in its own lane. It works for left chest logos, cuff marks, and small sleeve branding where the goal is a polished, corporate finish. It does not replace printing for large graphics, and heavy stitching on lightweight sleeves can distort the fabric if the design is too dense.
One practical rule helps most first-time buyers. Choose the method based on the hardest part of the job, not the easiest one. If sleeve alignment and repeated washing matter most, pick the method that handles those stresses well. If photo detail matters most, accept the limits that come with that choice.
For most business orders, the shortlist is straightforward. Use screen printing for larger runs with clean graphics. Use DTF for mixed garments, detailed art, or tricky sleeve placements. Use embroidery for small premium logo placements. Use DTG when the run is small, the shirts are cotton-rich, and the artwork needs that level of detail.
Selecting the Right Fabric and Ink
A long sleeve shirt can print beautifully or fight you the whole way, and fabric is usually the reason. Buyers often focus on color and price first. In production, the shirt's fiber content and surface matter just as much as the artwork.
Match the shirt to the job
If you want a classic print look, 100% cotton is still the safe choice for many orders. Cotton gives ink a familiar surface, works well for many decoration methods, and tends to satisfy buyers who want a natural hand feel.
Cotton-poly blends are often the better business decision. They hold shape well, feel soft, and give you more flexibility across decoration methods. For a staff uniform or event shirt where comfort matters and not every size behaves the same way, blends usually make life easier.
Tri-blends can feel great, but they need more care in planning because the surface is softer and the shirt can read more fashion-forward than uniform. That's a good thing for retail merch. It's not always the right thing for heavy-duty use.
Performance synthetics belong in a separate category. If the shirts are for sports, outdoor crews, or active events, use garments designed for that environment instead of trying to make a standard cotton tee do that job.
Ink choice changes the final feel
Ink isn't only about color. It changes softness, coverage, and how noticeable the print feels on the sleeve and chest.
- Water-based feel matters: If your priority is a softer result, learn how water-based ink printing behaves before locking in your garment choice.
- Heavier coverage has a purpose: Some graphics need stronger opacity and bolder color, especially on darker shirts.
- Sleeve location changes the decision: Prints on forearms and elbows go through more flex and friction than center chest prints.
A good match usually looks like this:
| Fabric type | Usually works well with | Why it makes sense |
|---|---|---|
| 100% cotton | Screen printing, DTG | Familiar print surface and strong graphic presentation |
| Cotton-poly blend | DTF, screen printing | Flexible, comfortable, and easier across mixed order needs |
| Performance polyester | Sublimation or compatible transfer method | Better fit for activewear use |
| Premium uniform shirt | Embroidery for logos | Clean, professional finish |
Buy the shirt for how it'll be worn. Then choose the ink and method that fit that fabric. Doing it in the reverse order is where many disappointing orders begin.
Mastering Artwork Placement on Long Sleeves
Sleeve placement is where long sleeve t shirt printing stops being basic. A chest logo can often survive a rough proof if the art is decent. Sleeve graphics can't. The shape narrows, the seam curves, the fabric twists, and the wearer bends their arms all day. That's why artwork that looks centered on a flat mockup can look crooked once the shirt is on a person.
The biggest mistake is trusting generic measurements. “Three inches down” sounds clear until the seam shifts the visual center.
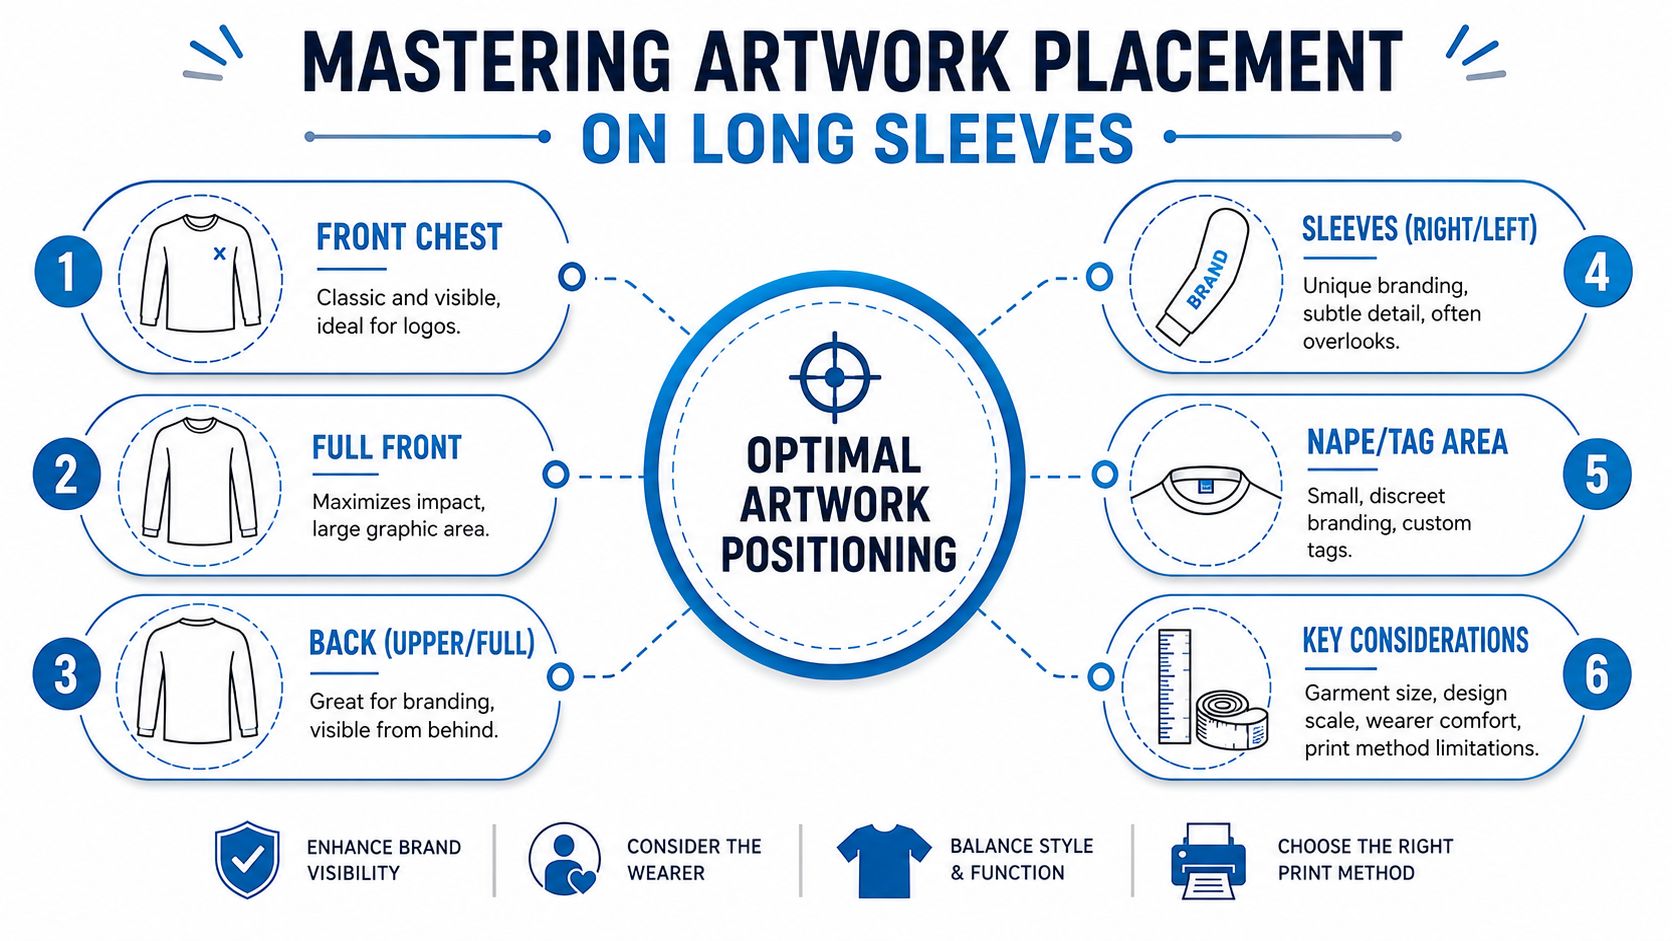
Why flat measurements fail on sleeves
This is one of the few places where the technical detail matters because it changes the result. Sleeve print placement relative to seam curvature causes misalignment in 40% of trial runs, and standard measurements fail to account for the sleeve seam's curve, especially on fabrics over 220 GSM, according to Original Favorites guidance on printing blanks.
That tracks with what shops see in practice. A sleeve isn't a flat rectangle. It tapers, and the seam doesn't visually behave like a straight ruler line when worn. If you center art off the wrong reference point, the print will rotate toward the front or back of the arm.
One helpful reference for logo positioning on stitched decoration is this embroidery placement guide. The same thinking applies here. Placement has to be read on the body, not only on the table.
Shop-floor advice: If the sleeve design matters enough to mention in the kickoff call, it matters enough to test on an actual garment size before full production.
Placement zones that usually work
Not every sleeve graphic should run wrist to shoulder. A lot of sleeve prints look better when they respect the garment's shape.
Upper sleeve or bicep area works well for small logos, event marks, and secondary branding. It's visible without fighting cuff movement, and it avoids the narrowest part of the sleeve.
Forearm prints are popular for vertical text and repeated marks. They can look sharp, but the sleeve's taper becomes apparent. Long narrow art has to be scaled carefully or it will feel crowded on smaller sizes.
Full sleeve graphics can be strong on merch and streetwear-style work, but they need discipline. Dense artwork crossing seam influence, folds, and taper can look distorted fast.
A practical planning checklist helps:
- Check the seam first: Don't assume the visual center equals the measured center.
- Scale by garment size: A design that feels balanced on a large may overpower a small.
- Respect printable height: Sleeve art that runs too long can drift into distortion zones.
- Review on-body appearance: Flat proof approval isn't enough for sleeve-heavy layouts.
When to test before full production
Some jobs need a pre-production sample more than others. If the fabric is heavy, the sleeve print is long, or the design has to line up tightly, test first. That's especially true when your order includes multiple sizes and you want the same visual effect across all of them.
Use a sample when:
- The artwork runs vertically down the sleeve.
- The shirt has heavier fabric or stronger structure.
- The sleeve seam sits unusually forward or backward.
- The client cares about exact mirror placement from left to right sleeve.
A well-placed sleeve print looks effortless. That's because someone put extra effort into the template before production started.
Preparing Your Artwork for Flawless Printing
Most print delays don't happen because the press went down. They happen because the art file wasn't ready. The logo is pulled from a website, the font is missing, the colors are undefined, or the design was approved at one size and sent at another.
Clean artwork saves time, protects print quality, and cuts down on proof revisions.

The file checklist that prevents delays
For logos and text, vector files are the standard. AI, EPS, and print-ready PDF files keep edges clean when the art is resized. That matters on left chest prints, sleeve text, and any logo with sharp geometry.
Raster files can still work, but they need to be high quality at the final print size. If a file looks soft on your screen before production, it won't magically sharpen on fabric.
Use this checklist before sending art:
- Vector for logos: AI, EPS, or PDF is best for marks, icons, and type-heavy designs.
- High-resolution raster for photos: If the artwork is photographic, make sure it's built at print size and not stretched up from a small file.
- Fonts outlined: Convert text to outlines so the design doesn't change if the font isn't installed.
- Color decisions locked: Decide whether the print should match brand values closely or look visually close on fabric.
- Placement notes included: Sleeve, back, and chest locations need clear instructions, not assumptions.
Common artwork mistakes that hurt print quality
The most common problem is tiny detail that looks good in a digital proof but fills in or disappears on fabric. Thin lines, small reversed text, and tightly packed design elements are all harder on apparel than on paper.
Another problem is approving a mockup that doesn't match the actual garment. A design that feels balanced on a blank front image can sit too low once the collar, sleeve shape, or pocket enters the actual shirt.
“Send the file you use for your sign shop” is not always safe advice. Apparel art needs to be checked for garment color, fabric texture, and print method before it goes to press.
A good art handoff doesn't have to be complicated. It just has to be complete. Clean files, clear placement notes, and realistic expectations solve most production issues before they start.
Understanding Pricing and Production Timelines
A long sleeve quote often looks reasonable at the start, then climbs once the actual decoration plan is on paper. The usual pattern is simple. A business asks for a left chest logo, adds sleeve prints for visibility, then adds a back print after seeing the mockup. On long sleeves, those added locations do more than raise the unit price. They also increase handling time, setup time, and the chances of placement problems if the shop is rushing.
That last point gets missed in a lot of buying guides. Sleeve printing is slower than front-only work because each sleeve has to be loaded consistently, checked against the seam, and kept straight from piece to piece. If you want clean alignment and good wash durability, the shop needs enough production time to do that work properly.
What changes the price
The first major cost driver is the print method. Screen printing usually gives the best value on larger runs with simple color counts. DTF can be a better fit for small orders, detailed artwork, or mixed garment styles. Embroidery follows a different pricing model because stitch count, backing, and sew time affect cost more than ink colors.
The second driver is how many places you decorate. A front print is one setup. Add a sleeve hit and production gets slower because sleeve placement is less forgiving, especially on smaller sizes where the seam and cuff reduce the printable area. Add a back print and the order needs more press cycles, more curing time, and more quality checks.
Garment choice matters too. Better blanks cost more, but they can also print more cleanly and hold up better in the wash. That is often a smart trade if the shirts are meant for staff uniforms, merch, or repeat wear.
A practical way to estimate cost is to look at these five factors:
| Cost factor | Why it raises or lowers price |
|---|---|
| Quantity | Larger orders spread setup labor across more units |
| Number of colors | More colors usually add setup work in screen printing |
| Print locations | Each extra location adds handling, alignment, and production time |
| Garment choice | Higher-quality blanks cost more before decoration starts |
| Method selected | Different processes require different setup, production, and finishing steps |
The broader demand for branded shirts helps explain why so many companies still invest in them. According to ApparelnBags market analysis, the United States generated $10.78 billion in t-shirt market revenue in 2024, with sports and corporate events helping drive demand. That does not make every long sleeve order inexpensive. It does show why businesses keep buying apparel that people will wear more than once.
How to avoid timeline problems
Production delays usually come from a few repeat issues. Art changes after approval. The chosen blank is out of stock in one or two key sizes. A sleeve print gets added after the quote. The event date stays fixed, but the order is placed too late for normal production.
Long sleeves also need more schedule protection than short sleeve jobs. Sleeve alignment takes more care. Prints near seams can require test placement. Heavier garments may need longer drying or curing time depending on the method. If a shop promises the same timeline for a complex long sleeve order as a basic front-print tee run, ask more questions.
Use this process to keep the order on schedule:
- Approve artwork early: Sleeve placements, size scaling, and print direction should be settled before production starts.
- Confirm stock before proof approval: A proof on one blank does not solve a supply problem on the actual garment.
- Keep the decoration plan stable: Late changes to sleeve or back prints often reset part of the production workflow.
- Leave time for a sample or press check: This is especially helpful for sleeve graphics where seam position can change the visual result.
- Share the in-hands date first: A good shop will build backward from that date and tell you whether the scope fits the timeline.
Rush service exists, but it usually means higher cost and less room for correction. If the order includes sleeves, multiple print locations, or premium placement, extra time is not padding. It is what gives the shop a fair chance to produce consistent shirts that still look good after repeated wear.
Ensuring Longevity with Quality Checks and Care
A long sleeve shirt isn't done when it comes out of the box. You still need to know whether the order was produced well and how to keep it looking good after the first few washes. This matters more on sleeves than buyers expect because sleeves live in a high-friction zone. Desks, elbows, jacket layers, and repeated arm movement all work against the print.
That's why long sleeve care can't be reduced to “wash inside out” and left there.
What to inspect when the order arrives
Start with the obvious things first. Lay out a few pieces from different sizes and check consistency.
Look for these signs of a solid order:
- Edges are clean: Text and logos should look sharp, not fuzzy or broken.
- Placement is consistent: Sleeve hits should sit in the same visual position from shirt to shirt.
- Color is stable: The print should match the approved direction closely across the run.
- No premature distress: You shouldn't see lifting, cracking, or obvious weak adhesion right out of the box.
Then check what many buyers skip. Put a shirt on a person. Sleeve prints can look fine flat and wrong when worn. If the art rotates awkwardly or lands too close to a seam, you'll notice it immediately on-body.
How to wash long sleeves so the print lasts
Discipline proves its worth. Long sleeve prints can lose 35% more color saturation after 20 washes than short sleeves, and 62% of customers report sleeve print issues within 3 months, according to Bridge Printing's overview of garment print problems and solutions. That's the reason care instructions should be specific, not generic.
The safest care routine is simple:
- Turn the shirt inside out before washing.
- Use cold water.
- Use a neutral detergent.
- Skip harsh wash conditions.
- Air-dry when possible.
Best habit: Treat sleeve prints like the highest-wear part of the garment, because they are.
If you're ordering for staff, volunteers, or resale, include care instructions with the handoff. A strong print can still wear out early if people wash it hot and toss it straight into high heat drying. Good production helps. Good care finishes the job.
If you need branded long sleeves that are proofed carefully, produced fast, and decorated with methods that fit the garment instead of fighting it, Dirt Cheap Product, Inc. is a practical place to start. Their team handles screen printing, embroidery, DTF, sublimation, and more for businesses, events, and retail programs, with responsive support and quick proofs that help catch color and placement issues before production begins.