
You've got two patch jobs on the table. One is a logo for work jackets that will face weekly industrial laundering. The other is a one-off enamel-style badge for a denim vest that will see occasional hand washing. Both buyers search for how to make custom patches for clothing, but they shouldn't make the same decisions.
The finished result depends on more than artwork. Patch construction, backing, attachment method, garment fabric, wash routine, production route, and required lifespan all affect what you'll see after months of use. A design that looks sharp on a screen can become unreadable on a small woven patch, lift at the corners on a tote, or lose its bond when applied with insufficient heat.
The practical approach is to begin with the garment and its working conditions, then choose the patch and production method around them.
Table of Contents
- What You Are Really Choosing When You Order a Patch
- Patch Types Matched to Real Garments
- Preparing Artwork and Digitizing for Production
- DIY Production Versus Working with a Manufacturer
- Attachment Methods That Hold Up
- Quality Checks, Care, and Long-Term Durability
- Cost, Lead Time, and Supplier Communication
What You Are Really Choosing When You Order a Patch
A patch ordered for a canvas work jacket has a different job from one made for a denim vest or a soft tote. Start with the garment, then assess abrasion, washing, flexibility, and the smallest detail that must remain readable. Those conditions determine whether appearance, longevity, or easy replacement should lead the decision.
A retail jacket may need clean lettering and a backing that survives repeated washing. A decorative vest patch may justify more texture or an unusual outline, even if it is harder to replace. There is no universal best construction. The right choice balances appearance, durability, flexibility, and cost.
The decisions behind the finished patch
Four connected choices shape the result:
- Construction: Embroidered, woven, PVC or rubber, chenille, and printed patches use different surfaces and production methods. They do not handle detail, abrasion, or washing in the same way.
- Backing: Sew-on, iron-on, heat-seal, and hook-and-loop options suit different fabrics and attachment needs. A backing that holds on a stable jacket may perform poorly on a stretchy hoodie.
- Production route: Home production gives control for a small personal run. A manufacturer provides specialized equipment, repeatability, sampling, and finishing options, which can reduce waste when several pieces must match.
- Care expectation: A patch worn occasionally allows more compromises than one fixed to a frequently washed uniform.
Custom patches have a long history. The history of embroidered patches places early patch-making in China between the 5th and 3rd centuries BC, when embroidery was used first to mend and later to decorate cloth. In 1863, Isaak Groebli is credited with inventing the Schiffli embroidery machine in Switzerland, helping identical embroidered designs become easier to reproduce efficiently and at scale.
Practical rule: Decide how long the patch must last before deciding how it should look.
Material choice also changes the decision. If the mark will be heat-pressed onto leather goods rather than sewn onto fabric, a molded or debossed treatment behaves differently from thread. The embossed leather logo guide helps assess when a pressed leather mark suits wallets, belts, or a brand system better than textile stitching.
Before approving artwork, record the garment, expected abrasion, wash method, desired texture, smallest important detail, and whether removal matters. Those answers narrow the options before you pay for digitizing, samples, or a production run.
Patch Types Matched to Real Garments
Patch construction determines how the design feels, how much detail survives at its finished size, and how the surface reacts to washing and abrasion. Buyers often choose by appearance alone, then discover that a fuzzy chenille patch doesn't suit fine logo text or that a smooth printed patch doesn't deliver the dimensional look they wanted.
| Patch Type | Best For | Minimum Detail | Typical Garment | Wash Durability |
|---|---|---|---|---|
| Embroidered | Bold logos and textured decoration | Medium detail, with open spacing between elements | Jackets, caps, uniforms | Strong when stitched and attached correctly |
| Woven | Small lettering and thin lines | Fine detail and compact text | Shirts, jackets, hats, bags | Good, though edges and backing still matter |
| PVC or rubber | Weather exposure and abrasion | Defined shapes and raised or recessed detail | Outdoor gear, hats, hi-vis apparel | Strong against moisture and frequent wear |
| Chenille | Varsity lettering and high texture | Large letters and simple artwork | Varsity jackets, heavyweight knits | Moderate to good, depending on washing and attachment |
| Printed | Gradients, photographs, and full-color artwork | Very fine visual detail | Promotional tees, totes, lightweight apparel | Depends heavily on print method and backing |
Embroidered patches
Embroidery remains the natural choice when texture is part of the design. It works well on a jacket chest, sleeve, or cap where a raised thread surface gives a logo a traditional branded appearance. Medium-detail marks, bold shapes, and readable lettering generally translate better than tightly packed illustrations.
The trade-off is resolution. Thread occupies physical space, so tiny text and thin lines can close up or lose clarity. Embroidered patches also need a stable base and a properly finished border. A merrowed edge gives a classic look, while a hot-cut or laser-cut edge can suit an irregular silhouette.
Woven patches
Woven patches use colored yarns woven together on a loom rather than stitched with a needle. That construction allows finer detail than many embroidered designs, making woven patches a practical option for small text, narrow outlines, and compact logos, as described by American Patch's product information.
The surface is flatter and smoother than embroidery. That's helpful on caps, shirts, lightweight jackets, and bags where a clean graphic matters more than a raised texture. Woven patches can still wash well, but you'll need to inspect the edge finish and attachment method rather than assuming the flatter surface guarantees longevity.
PVC or rubber patches
PVC and rubber patches suit outdoor gear, work hats, and hi-vis garments where moisture resistance and abrasion tolerance matter. Their molded surface can provide raised lettering, recessed details, and a modern technical feel. They're less dependent on thread coverage, but the design still needs clear shapes that can be molded cleanly.
Chenille and printed patches
Chenille belongs on varsity jackets and heavyweight knits. Its fuzzy, dimensional pile makes large letters and simple emblems stand out, but it isn't the right tool for delicate text or intricate linework.
Printed patches are the better fit for gradients, photographic artwork, and full-color promotional graphics on tees or tote bags. They reproduce visual detail that thread-based methods may simplify, though the print surface and backing need testing if the item will be washed often.
For buyers comparing placement and sizing options, this custom patches for hats resource provides a useful garment-specific reference. A patch that works across the front of a jacket may need a simpler design and different proportions to sit cleanly on a curved hat panel.
Preparing Artwork and Digitizing for Production
Good patch production starts with artwork that has already been prepared for the chosen construction. Don't send a flattened logo and expect the supplier to guess which details matter. Tell the production team what must remain readable, what can be simplified, and where the patch will be applied.
Prepare the master file
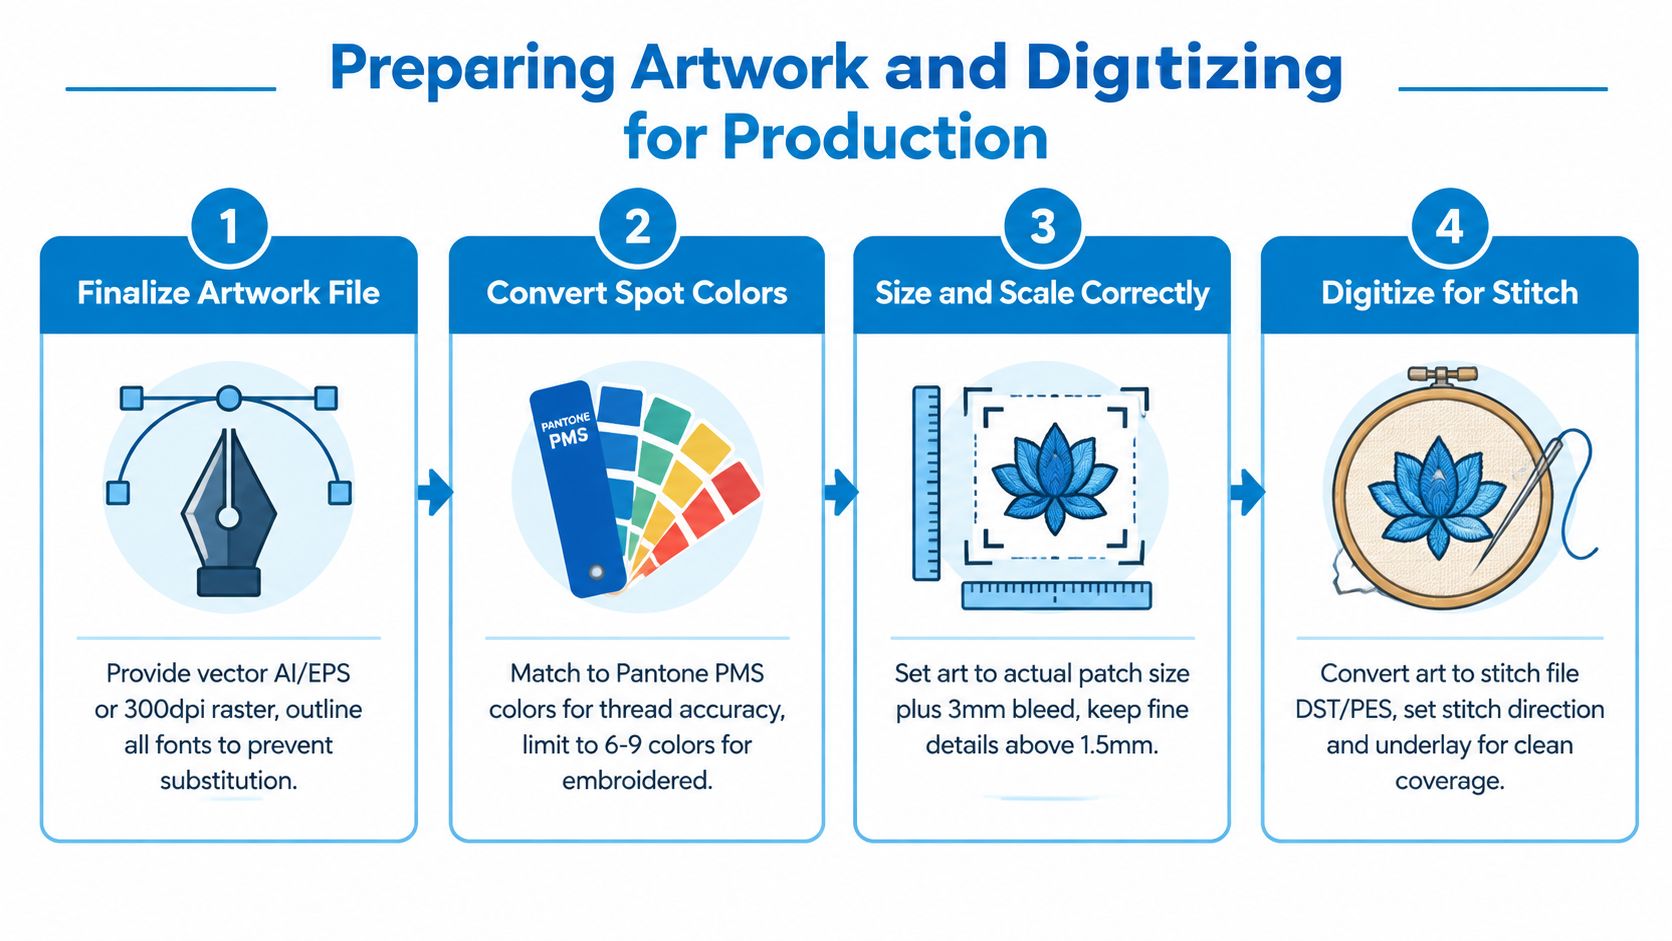
Begin with a vector file such as AI or EPS when possible. A high-resolution raster file can work, but the artwork should be clean enough for the supplier to trace or convert accurately. Outline fonts so substitutions don't change letter shapes, and separate the elements that need different thread, print, or molded-material treatments.
Convert spot colors into a production palette. Digital color on a monitor is only a reference. For embroidery, thread has its own sheen and visual behavior, so approve a physical color match where color accuracy matters.
Choose the border before digitizing. A merrowed border, hot-cut edge, and laser-cut edge each affect the silhouette, edge protection, and space needed between design elements. Specify the finished size in inches or millimeters, not just the artwork's proportions.
Build the production file
Embroidery digitizing converts artwork into machine instructions. The file needs stitch direction, underlay, density, pull compensation, and registration decisions. Those settings control whether a curved letter stays smooth, whether fills leave gaps, and whether the design holds its shape on a structured garment.
The most common avoidable errors are rushing color matching and cramming detail below the construction's resolution floor. A manufacturer may recommend simplifying small text, opening narrow gaps, or changing a border so the patch remains legible at its actual size. That isn't needless alteration. It's a response to the physical limits of thread, yarn, molded material, or print coverage.
Send the supplier:
- Production artwork: Vector AI or EPS, or the cleanest available high-resolution raster.
- Finished dimensions: Width, height, shape, and intended placement.
- Color direction: Spot colors, approved physical references, or a defined production palette.
- Construction notes: Embroidered, woven, PVC, chenille, or printed.
- Finishing details: Border type, backing, corner shape, and any cut lines.
- Garment information: Fabric type, expected washing, abrasion, and whether the patch must be removable.
If the logo needs machine-ready embroidery instructions, review the practical requirements in digitizing logos for embroidery before approving the file. The goal is a patch that reproduces the important visual information, not a design that merely resembles the original when viewed large on a screen.
DIY Production Versus Working with a Manufacturer
A small run of patches can justify making them at home, especially when the embroidery machine, stabilizer, threads, and cutting tools are already available. DIY production suits prototypes, personal projects, and limited creative runs. It also gives direct control over sampling, though you must handle hooping, stabilizer changes, trimming, edge finishing, and variation between pieces.
A manufacturer becomes more practical when you need repeatable results, specialized construction, or enough units for setup and labor to dominate the decision. Commercial equipment supports consistent registration, molded PVC, specialized borders, standardized files, and batch inspection with less hands-on work per patch.
Compare the variables that move cost
| Variable | DIY Production | Working with a Manufacturer |
|---|---|---|
| Cost per patch | Materials and hands-on labor rise with design complexity | Quantity can reduce the unit rate, but include setup and finishing |
| Finish | Strong control for handmade or experimental work | More consistent borders, color matching, molding, cutting, and inspection |
| Lead time | A familiar design can be completed quickly if equipment is ready | Common production schedules run 7 to 21 days plus shipping based on quoted supplier timelines |
| Minimum order | You can make only what you need | Suppliers may set minimums or offer pricing tiers |
| File preparation | You manage artwork changes and digitizing | The supplier can review, redline, digitize, sample, and approve files |
| Repeatability | Operator skill and machine settings affect consistency | Standardized files and inspection support repeat orders |
For a run from 1 to 25 patches, DIY often wins when the equipment is already paid for. Count thread, twill, stabilizer, backing, cutting, and your own production time. Setup, hooping, trimming, failed samples, and edge finishing can make a low material cost misleading.
Supplier quotes often use quantity breaks such as 50, 100, 500, or 1000 pieces. These are not universal price promises. Request the actual breakpoints for your patch size, construction, backing, and stitch count, then compare the delivered total rather than the headline unit price.
Track your own hourly cost across one batch. Once labor plus materials exceed the supplier's per-unit quote at your quantity breakpoint, supplier production is the lower-cost option.
A home setup may also struggle with consistent commercial finishes. Pantone-matched thread selection, merrowed borders, molded PVC detail, dye-sublimation on twill, and consistent 0.5 mm laser cutting require equipment or process control that hobby machines may not provide. Decide whether that finish is part of the product requirement or merely a visual preference.
For broader apparel planning, the guide by Pandemonium Millinery provides context for coordinating decorated garments with a wider branded range. If patches will identify staff or crews, review custom patches for uniforms alongside the garment type, placement, washing conditions, and production requirements.
Decision point: Choose DIY when existing equipment, a short run, and acceptable variation keep total labor below the supplier quote. Choose a manufacturer when repeatability, specialized finishing, or batch volume makes that threshold easier to meet.
Attachment Methods That Hold Up
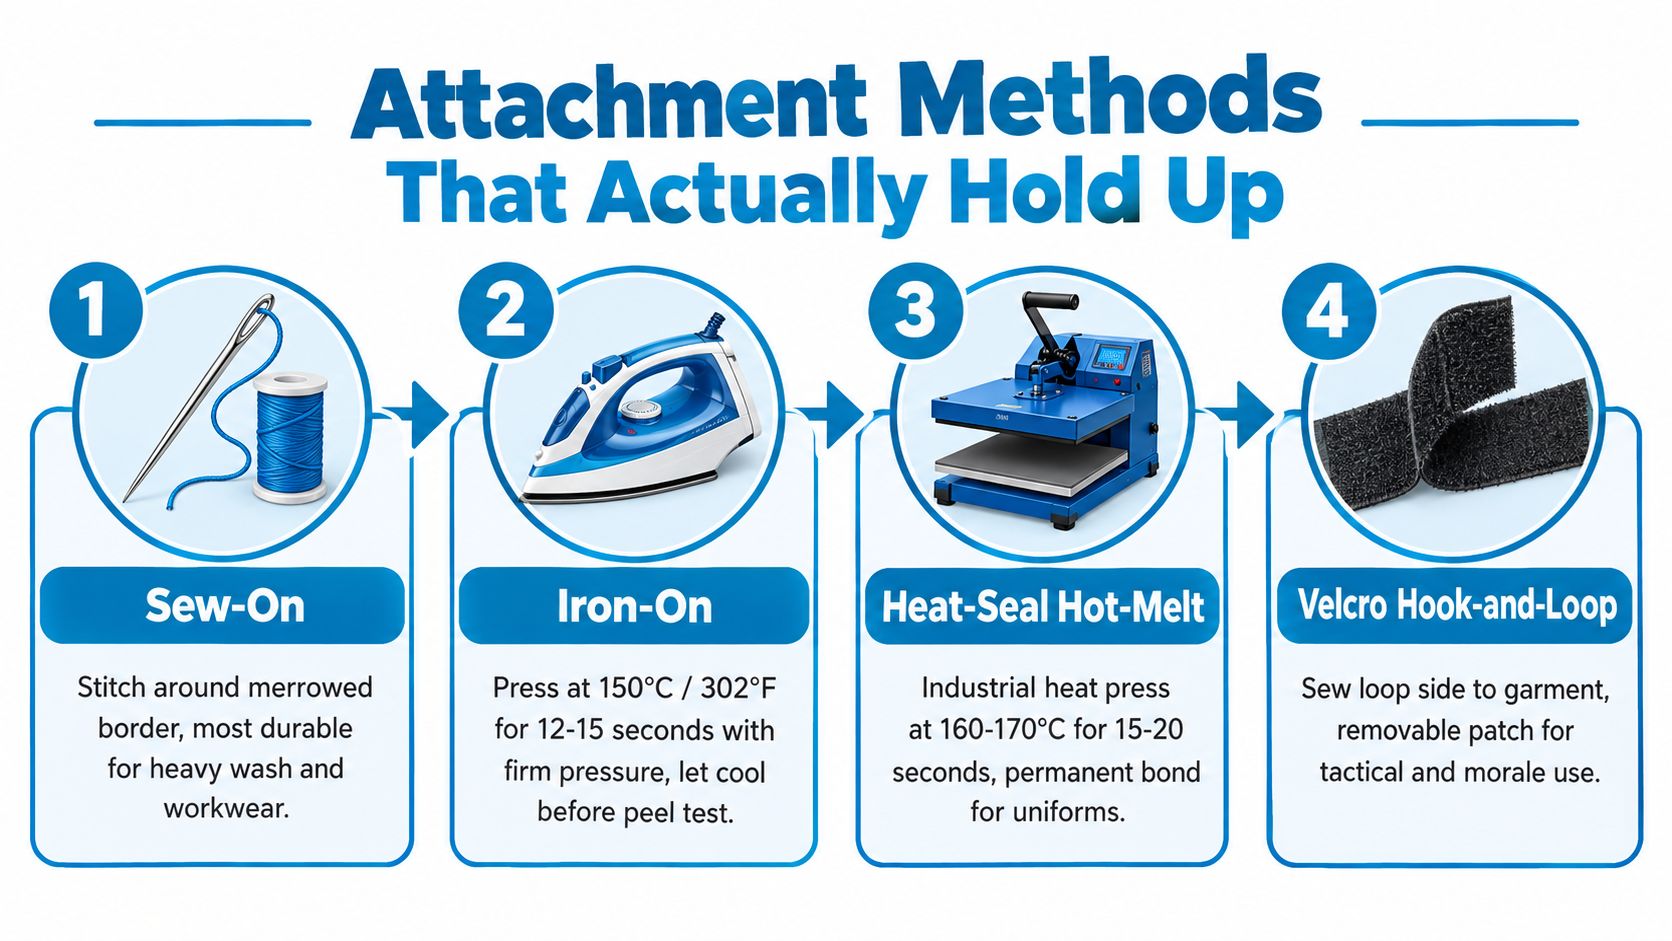
A patch may leave production in perfect condition and still fail on the garment. Sew-on, iron-on, heat-seal, and hook-and-loop backings suit different fabrics, wash routines, and placement demands. Check the garment's weight, stretch, cleaning exposure, and whether the patch must come off before choosing the attachment.
Sew-on attachment
Sewing is the reliable option for heavy-use workwear, thick denim, canvas, and garments that face repeated washing. Position the patch, hold it temporarily, then stitch around the border instead of relying on a few isolated tacks.
For a merrowed edge, keep the stitch line about 2 mm from the border and use a 3 mm stitch length with polyester or poly-core thread. Reinforce each corner, since lifting often starts where the patch changes direction or the garment flexes. A machine keeps tension consistent, while hand sewing remains suitable for a one-off when the stitches stay close and even.
Iron-on attachment
With a home iron, set the temperature around 160 to 170°C, apply firm pressure for 15 to 20 seconds, and let the patch cool for about 30 seconds before checking the carrier film. Protect the garment with a pressing cloth. Avoid sliding the iron unless the instructions call for it, because movement can shift the patch before the adhesive sets.
A heat-sealing instruction sheet for repair-style patches gives another benchmark, 204°C for 12 to 16 seconds at about 0.5 kg/cm² pressure. The difference shows why the adhesive manufacturer's specification should control the setting. Temperature, pressure, and time must work together.
Heat-seal and hook-and-loop
A heat press applies more even pressure than a household iron. A common working window is 160 to 170°C for 10 to 15 seconds with medium pressure, but peel timing still depends on the adhesive specification. Test the actual patch on a fabric offcut before pressing the finished garment.
Hook-and-loop suits tactical, morale, collectible, and removable patches. Sew the loop side to the garment and the hook side to the patch, leaving the softer surface against the wearer. Use a 2 mm seam allowance and add a bartack at each end.
Failure pattern: Light pressure or insufficient heat can produce a bond that looks finished at application but starts separating during washing.
For artwork better suited to a printed transfer than a constructed patch, pre-made DTF designs for clothing offer a different application route.
The application video helps compare the pressure and motion used across attachment methods.
Quality Checks, Care, and Long-Term Durability
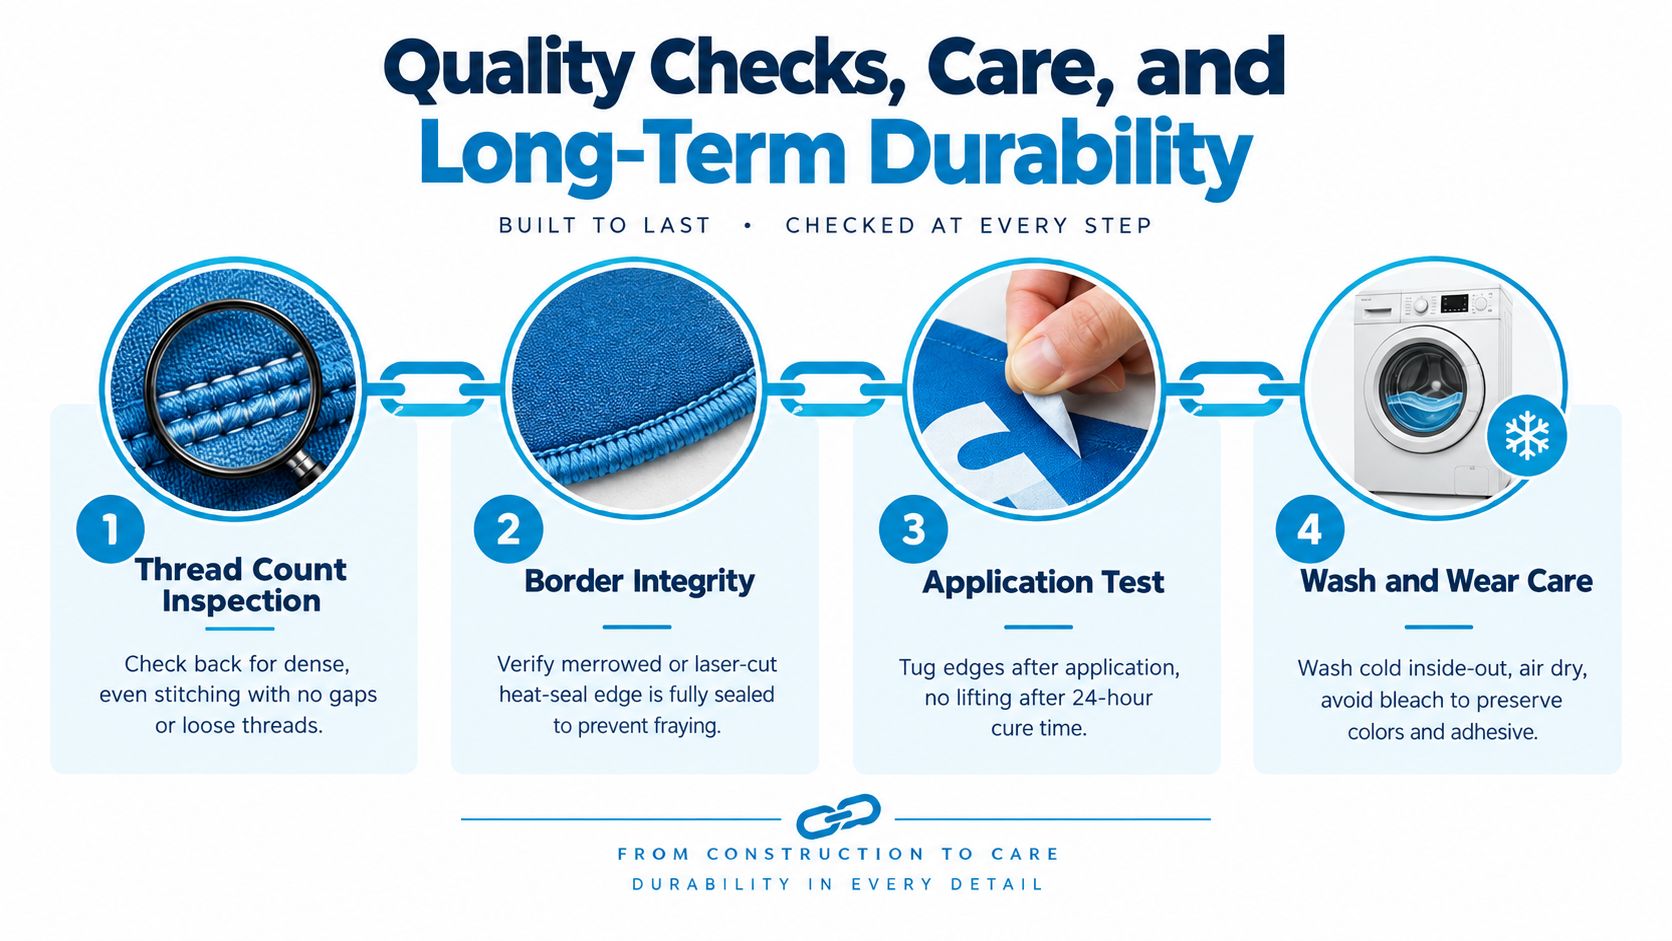
Durability is a chain. The patch construction, edge finish, backing, press settings, garment substrate, washing method, and storage conditions all contribute to the final result. A strong embroidered face won't compensate for a weak adhesive bond, and a durable PVC surface won't solve poor stitching at the garment interface.
Inspect before the patch leaves production
Turn an embroidered patch over and inspect the thread coverage. Look for dense, even stitching without loose tails, open gaps, or areas where the backing shows through unexpectedly. On the face, check that the border is smooth and that a merrowed edge doesn't scallop or loosen.
Approve color under consistent lighting. A physical Pantone reference checked under D65 light is more reliable than judging a photographed sample on different screens. For printed, woven, and molded patches, also inspect fine text at the actual finished size rather than enlarging a proof until every detail appears clear.
Test the entire system
Use one production sample on the actual garment fabric. A practical wash test can use 40°C, tumble drying on low, and inspections after 1, 5, 10, and 25 cycles. Check for edge lift, color bleed, surface fuzzing, stitch breakage, adhesive failure, and distortion around the garment placement.
Care instructions should protect the weakest part of the system:
- Turn garments inside out: This reduces direct abrasion against the patch surface.
- Wash cold: Lower temperatures place less stress on adhesive and dyed surfaces.
- Avoid chlorine bleach: Bleach can yellow white twill and alter colored surfaces.
- Skip the dryer when possible: High heat can soften or melt hot-melt adhesive.
- Use a pressing cloth: Don't place a hot iron directly on the patch face.
Aggressive agitation often exposes weak corners first, especially where stitch spacing or edge coverage is inconsistent. If the garment must survive demanding laundering, sewing is usually a safer attachment choice than relying on adhesive alone.
Cost, Lead Time, and Supplier Communication
A patch quote is a system, not just a unit price. Ask whether the total includes digitizing or tooling, artwork revisions, a sample, backing, border upgrades, color matching, thread, packaging, freight, duties, and rush handling.
Request these details in writing:
- Order quantity: Confirm the minimum and the price breaks at the quantities you're considering.
- Proofing: Ask whether the digital proof shows stitch boundaries, finished dimensions, and placement, not only a polished rendering.
- Sampling: Confirm the sample charge, sample timing, and whether the approved sample is used as the production reference.
- Schedule: Separate artwork approval, sample production, bulk production, inspection, and shipping.
- File ownership: Ask who owns the digitized production file and whether future revisions cost extra.
- Inspection remedy: Confirm what happens if the finished patches fail agreed checks for size, color, construction, or attachment.
Build backward from the garment deadline. Allow time to submit the brief, review artwork redlines, approve the proof, inspect the sample, release production, and receive the shipment. A schedule that leaves no room for transit disruption or replacement work is already too tight.
Your supplier brief should contain the logo, finished size, patch type, colors, backing, border, quantity, garment fabric, wash expectations, target date, and delivery address. For a critical uniform or launch, order a pre-production sample. For a repeat order with a proven file, a production photo or inspection report may be sufficient.

Dirt Cheap Product, Inc. handles custom patches alongside decorated apparel and accessories, using submitted design details, digital proofing, and options such as embroidered, chenille, and PVC patches. If you're comparing production routes for uniforms, event merchandise, or retail apparel, Dirt Cheap Product, Inc. can review the logo, garment type, placement, quantity, and finish you need, then help turn those decisions into a production-ready patch order.