You're probably in the same spot most first-time hat buyers are. You want custom embroidered hats that look polished, fit your brand, and don't turn into a box of expensive compromises. But once you start comparing hat styles, placements, thread colors, puff embroidery, and logo files, the whole thing gets muddy fast.
That confusion is normal. A good embroidered hat sits at the intersection of design, garment construction, and production discipline. If any one of those is off, the finished result looks amateur, even if the idea itself was strong.
That's why smart hat planning starts earlier than many realize. Before you approve art, you need to know what kind of hat will carry it well, what details embroidery can hold, and what choices make sense for bulk ordering. Embroidery isn't new, either. It's one of the oldest known decorative textile techniques, with archaeological evidence dating back roughly 30,000 years, and headwear has long been part of that tradition across regions including China, Northern Europe, Egypt, and the Middle East according to historical embroidery references collected here. A branded cap is modern merchandise, but it also follows a very old rule: the stitching has to suit the surface.
If hats are going to be part of your launch, event, staff uniform, or merch drop, they should also fit into the bigger marketing system. A hat that photographs well and reads clearly from a distance works better alongside a broader social media strategy for growth, especially if your team plans to use customer photos, event recaps, or retail content to extend the life of the order.
Table of Contents
- From Idea to Iconic Headwear
- Choosing the Right Hat Style and Placement
- Adapting Your Artwork for Flawless Stitching
- Understanding Threads Stitches and Special Effects
- From Digital Proof to Final Product
- Frequently Asked Questions About Hat Embroidery
From Idea to Iconic Headwear
Most weak hat orders fail before the machine ever starts sewing. The problem usually isn't effort. It's that the buyer is making creative decisions without production context. They choose a detailed logo for a soft cap, put tiny wording across a seam, or approve a mockup that looks good on screen but won't hold up in thread.
A better process starts with one question. What is this hat supposed to do for your business? Staff uniform hats need clean recognition. Retail merch needs shelf appeal. Event hats need broad wearability. A golf tournament cap needs to feel brand-right without becoming too busy to stitch cleanly.
Practical rule: The best embroidery hat ideas aren't the most complex ones. They're the ones that stay recognizable after thread, curvature, and wear all take their turn.
Businesses often treat hats like miniature billboards. That's a mistake. A hat front is a small, curved, seam-interrupted surface. It rewards restraint. The strongest orders usually come from clients who simplify early and commit to one clear visual priority.
Creative Concepts Beyond Just a Logo
A standard front logo still has a place. It's useful for uniforms, trade shows, and company vehicles where consistency matters more than fashion. But if every hat starts and ends with a centered corporate lockup, you'll miss better options for retail appeal, gifting, and repeat wear.
Recent 2026 trend coverage points toward minimal line drawings, high-contrast black-and-neon combinations, cream and tan vintage-wash palettes, food motifs, and retro badge-style looks, while commercially viable bulk choices still tend to be designs that read quickly, such as simple icons and nature motifs in this 2026 hat embroidery trend roundup. That tracks with what works in production. Fast-reading art usually sews cleaner and sells wider.

Start with the brand asset that survives reduction
Many logos contain too much information for a hat. A long business name, tagline, icon, and web address may work on a brochure or storefront, but not on a cap.
Try one of these instead:
- Use the icon only. If your mark includes a strong emblem, that may outperform the full logo on headwear.
- Pull one memorable element. A coffee bean, crossed tools, wave line, mountain shape, or monogram often reads better than an entire lockup.
- Build a badge. Circular and patch-inspired compositions often feel more intentional on hats than a standard horizontal logo.
For brands in golf, hospitality, or events, market-specific inspiration helps. If you want examples of hats designed to feel more collectible and less generic, this piece on how to find unique golf headwear is useful for understanding the difference between standard branded caps and more wearable concept-driven designs.
Match the concept to the business goal
Different ideas solve different business problems.
- Retail merch: Minimal line art, simple icons, and retro badges tend to feel less corporate.
- Team identity: Monograms, shorthand marks, initials, and local references work well for internal wear.
- Events: Date-based designs, location motifs, and commemorative art give people a reason to keep the hat.
- Hospitality and lifestyle brands: Nature motifs, food elements, and understated symbols often get worn more often than overt logos.
A hat people choose to wear on their own time does more for a brand than one they only wear because someone handed it out.
Keep trend ideas grounded in stitch reality
Black with neon can look sharp. So can cream and tan on a vintage-wash cap. But the best trend choices are the ones that still make sense when stitched. Fine line art can be excellent if the lines are built for embroidery. Puff can be strong if the design is bold enough. Retro badges can work well if text doesn't become the main event.
The best embroidery hat ideas in bulk orders usually share one trait. They know when to stop.
Choosing the Right Hat Style and Placement
Clients often spend too much time on the artwork and too little on the hat body. That's backwards. The same design can look crisp on one cap and disappointing on another because the hat's shape, structure, and surface tension control how the stitching behaves.
A soft, relaxed dad hat won't support detail the way a structured front cap will. A trucker front gives you a firmer stage for bolder decoration. A beanie asks for a different scale and different expectations entirely.
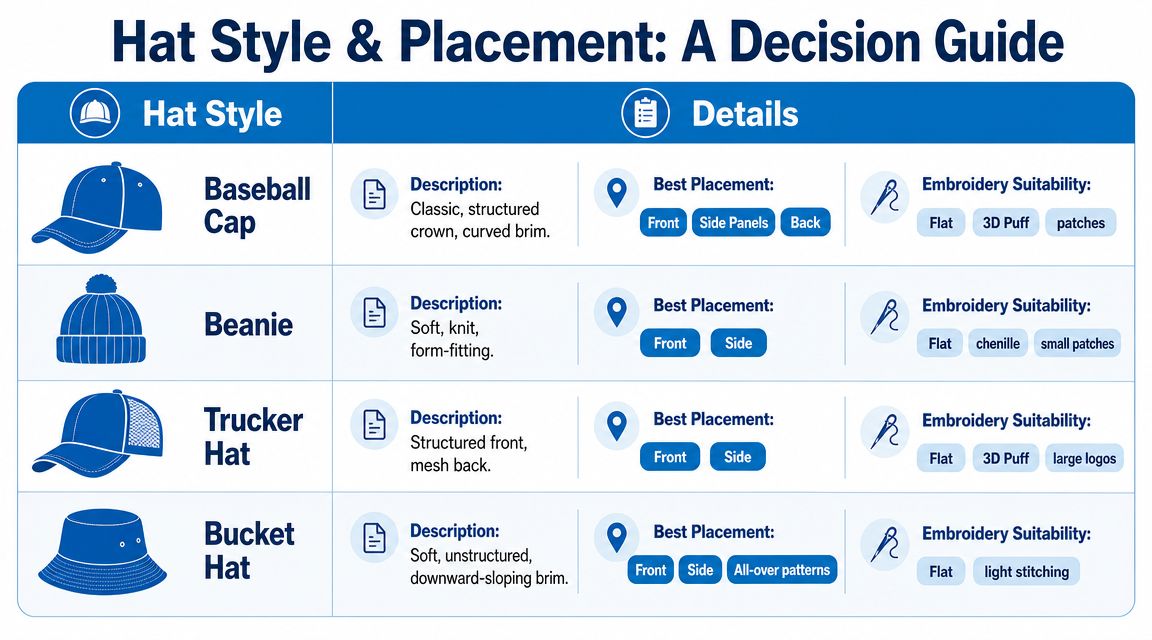
How structure changes the result
One practical guide puts it plainly: structured hats support intricate detail better, while unstructured hats reward simplicity. It also advises that flat embroidery needs at least 0.05 inches of line thickness, while 3D puff needs 0.2 inches, and that keeping designs under 15,000 stitches and 6 thread colors helps reduce tension issues on the curved cap surface in this hat embroidery production guide.
That isn't a style opinion. It's a production reality.
If your design depends on small internal spaces, thin outlines, or layered text, a structured cap gives you a much better chance at a clean result. If the hat is soft and relaxed, simplify the art and let the garment do more of the aesthetic work.
For buyers comparing cap profiles for front embroidery, hat shape references also help. If you're deciding whether a higher-profile structured silhouette fits your logo better, this overview of a 6-panel hat gives useful context on the kind of crown that usually supports front embroidery more reliably.
Structured vs. Unstructured Hats for Embroidery
| Attribute | Structured Hats (e.g., Baseball Caps) | Unstructured Hats (e.g., Dad Hats) |
|---|---|---|
| Front panel firmness | Holds shape and supports denser stitching | Softer face can show more distortion |
| Detail tolerance | Better for finer detail and cleaner edges | Better for simple marks and lighter stitching |
| Best visual style | Corporate logos, badges, bold front art | Casual marks, minimal icons, understated branding |
| Puff suitability | Usually a stronger option | Often less forgiving |
| Overall feel | More formal, more promotional, more athletic | More relaxed, more lifestyle-oriented |
Placement decisions that help instead of hurt
Front-center placement is still the default, but it isn't always the smartest choice.
Use front placement when:
- The mark is simple and bold
- You need immediate brand recognition
- The hat style has enough structure to carry the design
Consider side or back placement when:
- The front logo is too wide or complicated
- You want a quieter retail look
- The main logo belongs elsewhere and the hat needs a supporting element
Golf and lifestyle brands often do this well by balancing front, side, and rear branding instead of overloading the cap face. For a market-specific perspective, Dartee Golf's golf hat insights are helpful because they show how profile, closure style, and use case affect wearability, not just appearance.
Don't choose placement based on habit. Choose it based on where the design can stay readable and stable.
Adapting Your Artwork for Flawless Stitching
Embroidery doesn't reproduce artwork the way a printer does. It interprets artwork through stitches, direction, density, compensation, thread tension, and the shape of the cap. That means a file that looks perfect on a laptop can still produce muddy text, awkward fills, and broken detail once digitized.
The easiest way to avoid that is to simplify before the file reaches production.
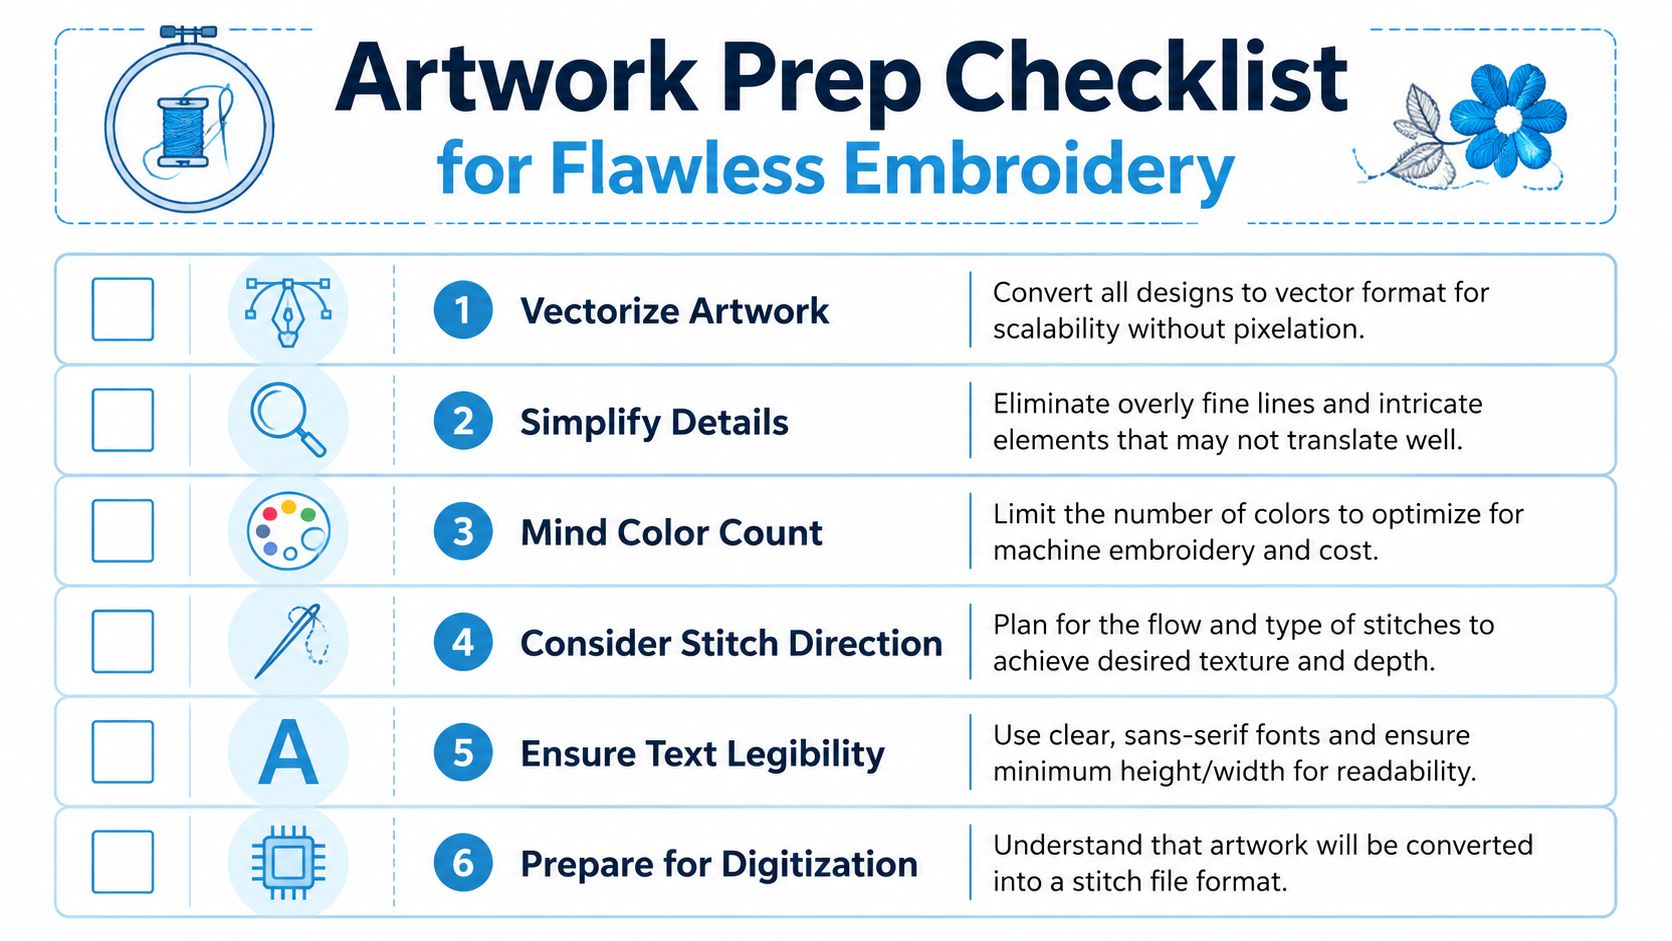
What to remove before digitizing
If your logo has gradients, glow effects, distressed textures, tiny legal copy, or overlapping thin outlines, expect changes. Thread can create contrast and texture, but it can't behave like a screen.
A practical limit for most cap fronts is about 2.25 inches of vertical design height to avoid distortion as the design climbs the crown curve, according to commercial cap embroidery guidance here. The same guidance warns against placing important details too close to seams and eyelets because those areas are common trouble spots for registration errors and thread breaks.
That one point solves a lot of failed layouts. Buyers often try to make hats “worth it” by scaling up the art. On caps, bigger isn't always better. Once the design climbs too high, the curve starts fighting the stitch path.
A practical artwork check before approval
Before you send art for digitizing, run this quick filter:
- Check text first. If the smallest wording isn't critical, remove it.
- Combine shapes. Separate tiny pieces often create messy travel paths and uneven stitching.
- Reduce the palette. Fewer thread colors usually produce a cleaner, more cohesive cap.
- Choose one focal point. If the eye doesn't know where to land, the hat will feel crowded.
- Respect the cap landmarks. Seams, eyelets, and strong crown curvature need breathing room.
If you're still deciding whether embroidery is the right decoration method for the logo you have, this guide on how to choose logo decoration method is a practical checkpoint before you commit.
Small design fixes done before digitizing are cheap. Fixes after production starts are not.
Understanding Threads Stitches and Special Effects
A lot of client frustration disappears once they understand that embroidery is not one stitch applied everywhere. Different areas of a design need different stitch behavior. That's what gives a hat depth, clarity, and durability.
This visual gives a quick reference for how embroidery materials and stitch approaches differ in appearance.
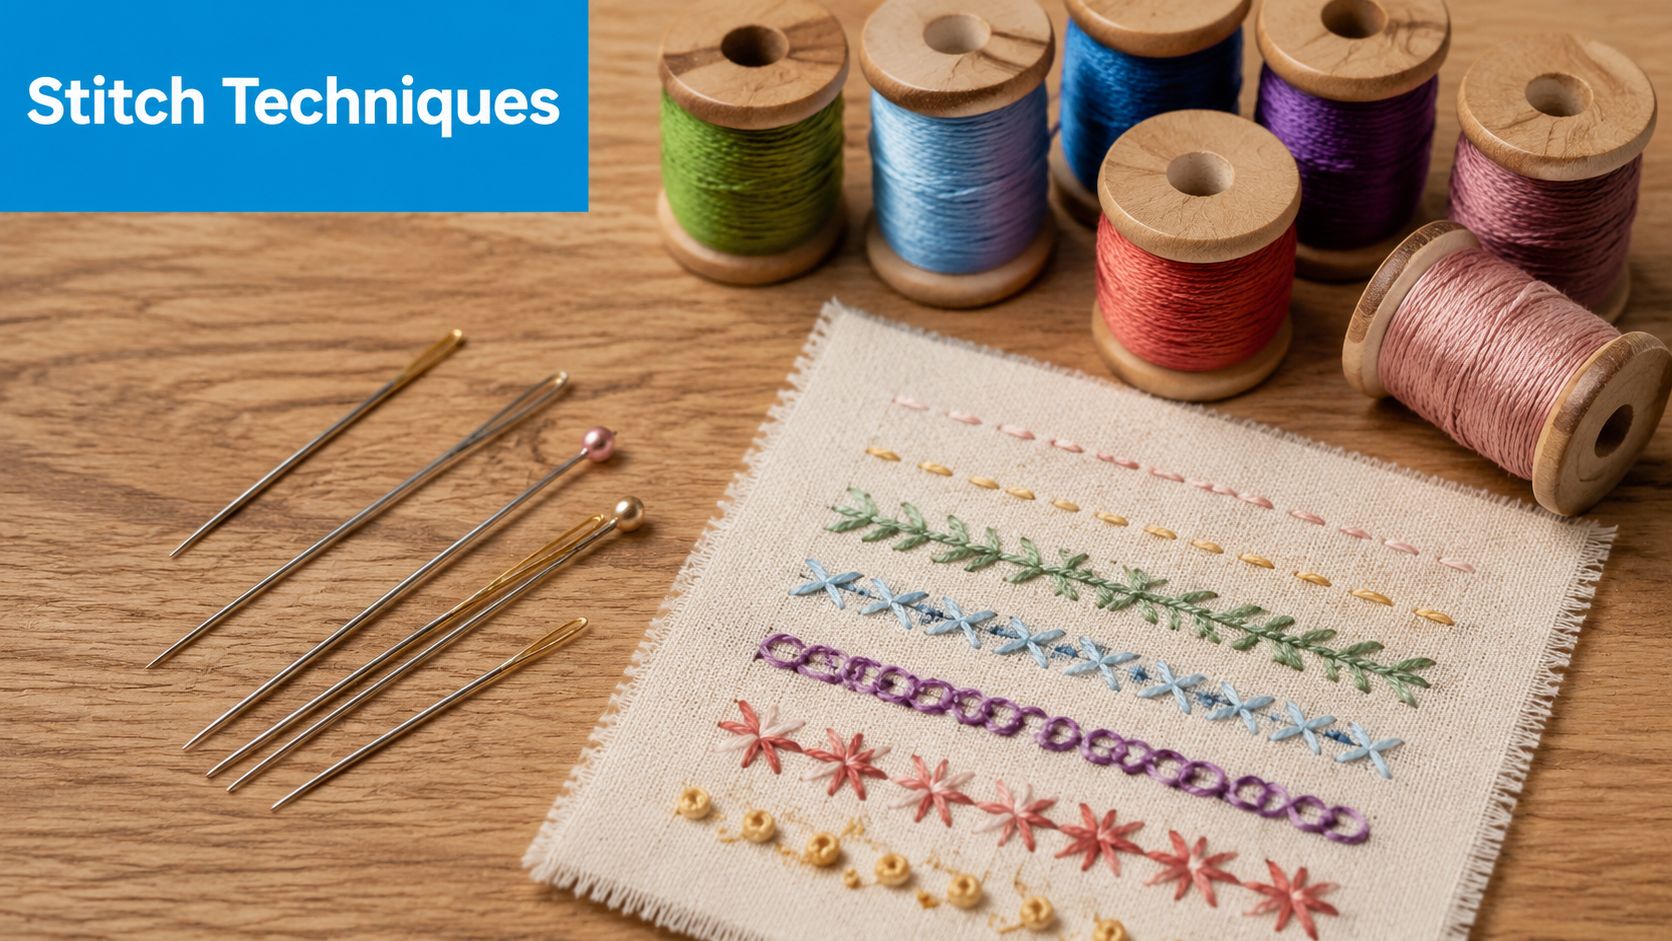
The stitch types clients should understand
Two stitch families matter most on hats.
Satin stitch is what you'll usually see on text, borders, and bold narrow elements. It gives a clean, slightly raised look and catches light well. It's often the right choice for lettering and defined outlines.
Fill stitch covers broader areas. It works for larger shapes and backgrounds, but if the artwork has too many large filled zones, the hat can get heavy and stiff. That's where good digitizing matters. The goal isn't just to “cover the shape.” It's to control density so the cap still wears well.
Thread choice matters too. Some clients prefer a softer matte effect. Others want more sheen. Neither is universally right. The better choice is the one that fits the brand and the garment. A rugged outdoor cap usually wants a different finish than a golf tournament hat or retail boutique piece.
When 3D puff works and when it fails
3D puff is popular because it adds presence fast. But it's not a cure for average art. It works best on simple, bold forms with enough width to cover foam cleanly.
For 3D puff hat embroidery, one practical method is to use 2 to 3 mm foam, stitch a placement outline first, insert the foam, and then sew a satin stitch that fully covers it before tearing away the excess, as described in this 3D puff embroidery workflow. That same guidance also notes that testing on a similar hat matters because curved cap surfaces can throw off alignment and tension.
Common mistakes with puff include:
- Using thin fonts
- Trying to puff complex icons
- Mixing too many small internal cutouts
- Applying it to art that should stay flat
Puff is a statement treatment. Use it where the design earns it.
A quick video can help if you want to see how cap embroidery behaves on a curved surface during setup and stitching.
Puff should make the design bolder, not harder to read.
From Digital Proof to Final Product
A bulk hat order usually goes off course at approval, not at stitching. The mockup gets signed off, everyone assumes the logo will look the same on the finished cap, and the problems show up only after production starts. By then, changes cost time, money, and sometimes the whole delivery window.
A proof needs to do more than show where the logo sits. It should tell you whether the art is production-ready for that exact hat style, fabric, and placement.
Digitizing controls how the machine will build the design, stitch by stitch. That includes pathing, direction, density, sequence, pull compensation, and tie-ins. Two shops can start with the same logo file and produce very different hats because the file setup matters as much as the artwork.
What a proof should answer
Review the proof like a buyer who has to approve the invoice and like a production manager who has to prevent rework. Check these points before you release a full run:
- Is the main brand element still the first thing people notice?
- Is the design too close to a center seam, crown break, or panel edge?
- Will small text stay open after stitching, or will it fill in?
- Do solid areas look balanced, or are they likely to feel heavy and stiff?
- Do the thread colors still read clearly on the actual hat color?
If you are still deciding between front, side, or back embroidery, this hat embroidery placement guide helps compare the options before approval.
Digital proofs are useful, but they do not show everything. A flat mockup cannot show push and pull on a curved crown, how a seam affects a border, or how thread sheen changes the look of brand colors under normal light.
Why a sample hat saves expensive mistakes
For first orders, I strongly recommend a sample hat when the design includes small text, layered elements, unusual placements, or a premium cap style. That single sample usually answers the questions that email proofs miss.
A sew-out shows whether the design holds its shape on the actual hat. It also reveals practical issues that matter in bulk production, such as edge clarity, registration, tension balance, backing show-through, and whether the finished cap still feels wearable. Those are commercial decisions, not cosmetic ones. A hat that looks acceptable in a PDF can still look cheap in hand.
This matters even more for staff programs, resale merchandise, and event orders. If the sample looks slightly off, a full carton will magnify the problem.
Dirt Cheap Product, Inc. offers custom decoration services with proof review as part of the ordering process. That kind of workflow helps catch color, placement, and stitch-detail issues before a full production run is approved.
Approve the order only after the proof answers the production questions and the sample confirms the result. That extra step is usually cheaper than rerunning hats that were approved too quickly.
Frequently Asked Questions About Hat Embroidery
Can any logo be embroidered on a hat
Most logos can be adapted, but not every version should go straight to production. Logos with fine outlines, very small text, gradients, or too many separate elements usually need to be simplified first.
Are embroidered hats better for branding or retail
They can do both, but the artwork approach should change. Uniform and event hats usually need direct recognition. Retail hats often work better when the branding is more selective, such as an icon, badge, or abbreviated mark.
Is front-center always the best placement
No. Front-center is the most common choice, but side and back placements can create a cleaner result if the front design is too complex or the brand wants a quieter look.
What kinds of designs work best for 3D puff
Simple, bold lettering and solid shapes usually work best. Thin scripts, narrow outlines, and busy illustrations tend to fight the process.
Why do some hats look stiff after embroidery
That usually happens when the design has too much stitch coverage, too many dense filled areas, or artwork that wasn't adapted properly for the cap surface.
Should I choose a structured or unstructured hat
Choose based on the artwork first and the vibe second. Structured hats usually handle more detail. Unstructured hats usually look better with simpler decoration.
If you're planning a first order or trying to improve a hat program that hasn't looked right in the past, Dirt Cheap Product, Inc. can help you sort through hat style, placement, and decoration options before production starts. A clear proofing process and artwork review usually make the difference between hats that just get delivered and hats people want to wear.