
You've got a team event on the calendar, a logo that looks sharp on screen, and a stack of quarter zips that need to feel polished rather than promotional. The order can still go wrong before the first needle moves. A zipper can split the logo, lightweight performance fabric can pucker under dense embroidery, and a color that looks right on a phone can shift badly on polyester.
To customize quarter zip pullovers successfully, choose the garment and decoration method as one production decision. The quarter-zip placket is a real design constraint, and fabric weight determines what will sit cleanly on top of it.
Table of Contents
- Picking the Right Quarter Zip Before You Decorate
- Matching Decoration Methods to Quarter Zip Fabrics
- Preparing Artwork the Way Your Decorator Wants It
- Getting Placement, Sizing, and Colors Exactly Right
- Pricing, Minimums, and Production Timelines
- Quality Checks, Care, and Common Pitfalls
- Your Quarter Zip Customization Checklist
Picking the Right Quarter Zip Before You Decorate
Before approving a quarter zip, inspect the structure that will frame the decoration. Zipper length, collar shape, cuff construction, and hem finish determine how the garment fits, layers, and presents a logo. A blank can look excellent on a product page yet leave too little usable chest area once the placket and collar are accounted for.
The blank controls the decoration
Start with three structural decisions:
- Zipper length: A true quarter zip usually has a zipper extending about one-quarter of the way down the chest. Some cadet styles use a longer opening, roughly 12 to 14 inches, reducing the space above the placket and changing the garment's visual balance.
- Collar construction: A stand-up cadet collar, rib-knit funnel collar, and self-fabric stand frame the logo differently. A bulky collar seam can crowd a high chest placement.
- Cuff and hem finish: Ribbed set-in cuffs, elasticated finishes, and open bindings change the garment's casual or technical character. They also affect how the quarter zip layers over other clothing.
A quarter zip may use lightweight jersey, performance fabric, fleece, cotton blends, or sweater-like knits. These categories have different hand feels, stretch levels, and surface textures. The garment definition and common fabric categories are outlined in Men's Wearhouse's quarter-zip guide.
| Fabric Weight | Typical Blend | Best Decoration Method | Watch Out For |
|---|---|---|---|
| 200–220 gsm | Poly-spandex double-knit | DTF or light heat transfer | Dense embroidery can pull and pucker |
| 280–320 gsm | Cotton-poly fleece | Embroidery, screen print, or DTF | Heavy fills can swallow fine details |
| 360+ gsm | Sherpa-lined or heavy fleece | Patch or carefully controlled embroidery | Heat presses may scorch the surface |
Fit creates another production variable. Classic, slim, and relaxed cuts do not place the chest panel in the same position on the body. Women's fits can shift chest width and sleeve length enough to make a left-chest logo sit higher and tighter than it does on a unisex pullover. Measure the actual blank, not just the size chart, before setting final artwork dimensions.
Before approving a blank, confirm:
- End use: Office uniform, teamwear, outdoor work, retail merchandise, or event giveaway.
- Climate: Lightweight performance fabric suits active or warm conditions, while fleece and sherpa-lined garments suit colder settings.
- Dress code: A clean embroidered fleece reads differently from a printed technical layer.
- Decoration method: Decide whether the logo needs stitches, ink, film, transfer, or a patch.
- Reorder likelihood: Choose a blank that can be sourced consistently if more sizes are needed later.
A buyer once selected a lightweight performance quarter zip for a corporate golf event because it looked modern and breathable, then approved a dense embroidered chest logo. The sample showed puckering, a distorted chest panel, and a logo that pulled during movement. The production lesson is simple: approve the garment's construction and fabric first, then build decoration around what the blank can support.
Matching Decoration Methods to Quarter Zip Fabrics
A quarter zip can look excellent in a catalog and still fail on the production floor. The zipper placket interrupts the chest panel, the collar seam crowds the decoration area, and heavier fleece can swallow fine details. Choose the fabric and manage the placket before touching the logo. A method that looks sharp on a flat cotton tee may appear careless on a quarter zip.
Choose the method by failure risk
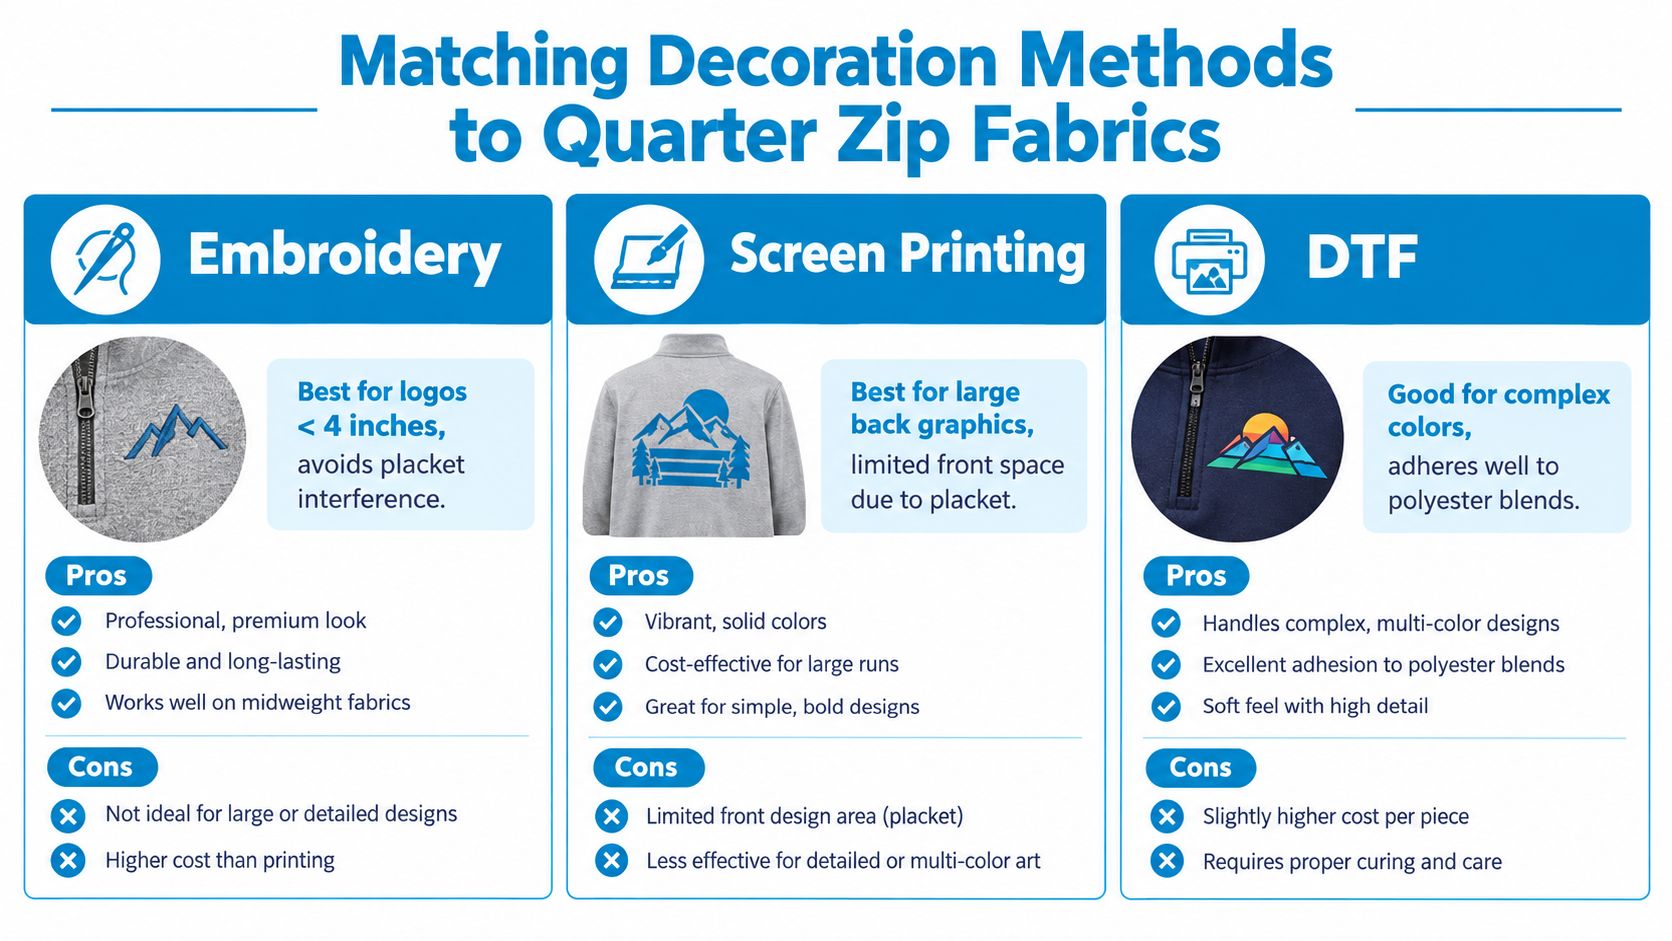
Embroidery is my first choice for premium corporate apparel. It performs well on 280+ gsm fleece, particularly with a compact left-chest logo. It is a poor fit for 200 gsm poly-spandex when the artwork contains dense fills. Backing, controlled density, and stable fabric are required to prevent puckering and distortion.
Screen printing suits smooth polyester and larger team orders. Textured fleece creates problems because ink sits on the nap instead of forming a clean, level print. The placket further restricts chest artwork, so a large back graphic usually gives the decorator a better working area.
DTF, or direct-to-film, handles detailed athletic logos on poly-spandex and mid-weight fleece. It supports complex color work and adheres well to polyester blends. Its lower curing temperature than some heat-transfer workflows also makes it a practical choice for heat-sensitive technical fabrics.
Heat transfer is fast and inexpensive, so reserve it for short-life promotional runs. Fleece can show cracking after repeated washing, as described in the technical quarter-zip decoration guide. Dark polyester can scorch when the press lacks controlled settings and a proper cover sheet.
Patches avoid many direct-decoration problems. Leather, woven, and embroidered patches add a defined border and raised profile, which can suit a badge-style program. Use them when the fabric cannot support direct decoration or when that identity is the intended design.
My production ranking is clear:
- Embroidery for premium corporate apparel.
- DTF for detailed athletic logos and mixed-color artwork.
- Screen print for large team orders and broad graphics.
- Heat transfer for short-life promotional runs.
- Patches when fabric stability makes direct decoration risky.
The same substrate-first logic applies across branded goods; this guide on how to choose a logo decoration method explains how material behavior shapes the decision for other products. A related resource on how to make a custom bass drum head reinforces the same production principle: select the process around the material before applying artwork.
The production flow is easier to understand visually:
Preparing Artwork the Way Your Decorator Wants It
A quarter-zip logo can look correct on screen and still fail at production. The zipper placket changes the usable area, while fabric weight determines how much detail the decoration can hold. Prepare the file for the actual garment and process, not for a generic apparel template.
For embroidery and screen print, send AI, PDF, or EPS files whenever possible. DTF artwork should be a PNG at 300 dpi minimum with a transparent background. Heat-transfer work is best supplied as SVG or layered PDF. If the logo exists only as a small JPEG, run it through a proper vector conversion workflow before production.
Make the file usable at the needle and press
Color conversion is where embroidery proofs often fail. Convert PMS colors against Madeira or Coats & Clark Polyneon charts instead of relying on generic RGB values. Flag neon and metallic thread requirements early because they affect thread selection, stitch behavior, and proofing.
A typical 3.5-inch left-chest logo runs 5,000 to 8,000 stitches. Designs above 12,000 stitches require more production time and can carry too much detail for the garment. Use those benchmarks as a starting point, then let the digitizer adjust density for the quarter-zip fabric and the area beside the placket.
Your digitizer also needs to account for:
- Underlay: It anchors embroidery on fleece and keeps top stitches from sinking into the surface.
- Pull compensation: It prevents letters and shapes from narrowing on knit fabrics as stitches tighten.
- Text size: Keep lettering at least 1/4 inch high for practical legibility.
- Stitch density: Match density to fabric weight. Light knits need flatter, lighter designs than stable fleece.
- Artwork scale: Supply the logo at final size so the decorator does not have to estimate the finished dimensions.
Send outlined fonts, embedded images at final size, and separate layers for each colorway. Include a mockup on a photo of the exact blank. The decorator can then catch a zipper conflict, collar collision, or scale problem before film is cut or a needle is programmed.
Production-floor rule: If the decorator has to guess the garment, size, or color, the proof is not ready.
Getting Placement, Sizing, and Colors Exactly Right
A quarter-zip can have a correct logo file and still produce a poor garment. The zipper placket is the constraint. Put the mark too close, and the placket crowds it. Put it too far away, and the logo looks misplaced. For most branded quarter-zips, the left chest remains the safest location because it stays visible while the wearer stands, sits, or appears on camera.
A typical logo measures 3 to 4 inches wide. Many quarter-zip zippers extend roughly 6 to 8 inches from the collar, leaving a workable panel beside the opening. Set the logo at 3.5 to 4 inches wide, then position it about 3 to 4 inches below the collar seam. Keep the full design clear of the zipper and collar seam. Request a digital mockup on the exact blank, fit category, and color. A flat artwork file cannot show how the placket changes the visual balance.
Use fixed measurements
| Placement | Size (in) | Design Gate | Best For |
|---|---|---|---|
| Left chest | 3.5–4 | Clear the zipper and collar seam | Corporate logos and uniforms |
| Sleeve | Set from shoulder seam | Confirm sleeve width and seam clearance | Team marks and secondary branding |
| Right hip | Set from bottom hem | Check visibility when seated | Small marks and lifestyle branding |
| Upper back | Scale to available panel | Avoid collar and yoke seams | Staff identification and larger logos |
Measure sleeve placement from the shoulder seam and right-hip placement from the bottom hem. Record those measurements on the production proof so every size follows the same reference. Because women's cuts shift the chest panel, order a fit-specific mockup for each fit category in the run rather than scaling one unisex proof across sizes.
Color approval also requires a physical reference. Use Pantone TPX or TPG coated swatches under D65 lighting, not a phone screen. Request a pre-production proof with stitch colors or ink swatches on the actual fabric. Heat can shift polyester color, while heathered blanks may absorb or reflect decoration unevenly.
Approve the proof only after checking the zipper distance, the logo's apparent size on the wearer, and contrast against the fabric. A technically accurate mark can still fail if the placket crowds it. Capture the approved placement and color reference with the purchase order so production has one standard to follow.
Pricing, Minimums, and Production Timelines
A quarter zip can look inexpensive until the zipper placket forces a slower method or a second placement setup. Price the fabric and placket together with the decoration plan. Embroidery commonly runs $4 to $9 per logo, plus a one-time digitizing fee of $40 to $80. Screen printing commonly runs $2.50 to $5 per color per location, though fine detail may be lost. These are typical planning ranges, not a substitute for a written quote.
DTF and heat transfer often suit smaller runs because they handle detailed artwork without the same setup pattern as traditional screen printing. Embroidery decorators commonly set minimums around 12 to 24 pieces, while DTG-style methods may open at 1 piece with no setup fee. Ask which method matches the garment's fabric weight and placket construction before comparing unit prices.
Build the schedule from separate stages
Plan for blank sourcing in 3 to 7 days, decoration in 5 to 10 business days after art approval, and additional shipping time. The production clock starts after proof approval. An unresolved placement or color decision can hold the entire order.
Reduce avoidable delays by:
- Approving quickly: Return the proof within 24 hours when the deadline is tight.
- Shipping strategically: Send customer-supplied blanks directly to the decorator when accepted.
- Grouping repeat sizes: Bundle recurring sizes so scattered changes do not pause production.
- Confirming stock early: Check color and size availability before promising delivery.
Treat minimums as production requirements. For a short run, request a method priced for small quantities instead of asking an embroidery shop to absorb setup work. A written quote should confirm blank availability, decoration method, setup fees, minimums, shipping, and the date tied to final proof approval.
Quality Checks, Care, and Common Pitfalls
A quarter zip can pass a logo check and still fail the customer. Inspect the blank before decoration for stitching defects, zipper function, color consistency, and fabric damage. The zipper placket deserves special attention because a tight or uneven opening can distort placement and expose poor clearance. A clean stitch-out cannot fix a crooked seam or faulty zipper.
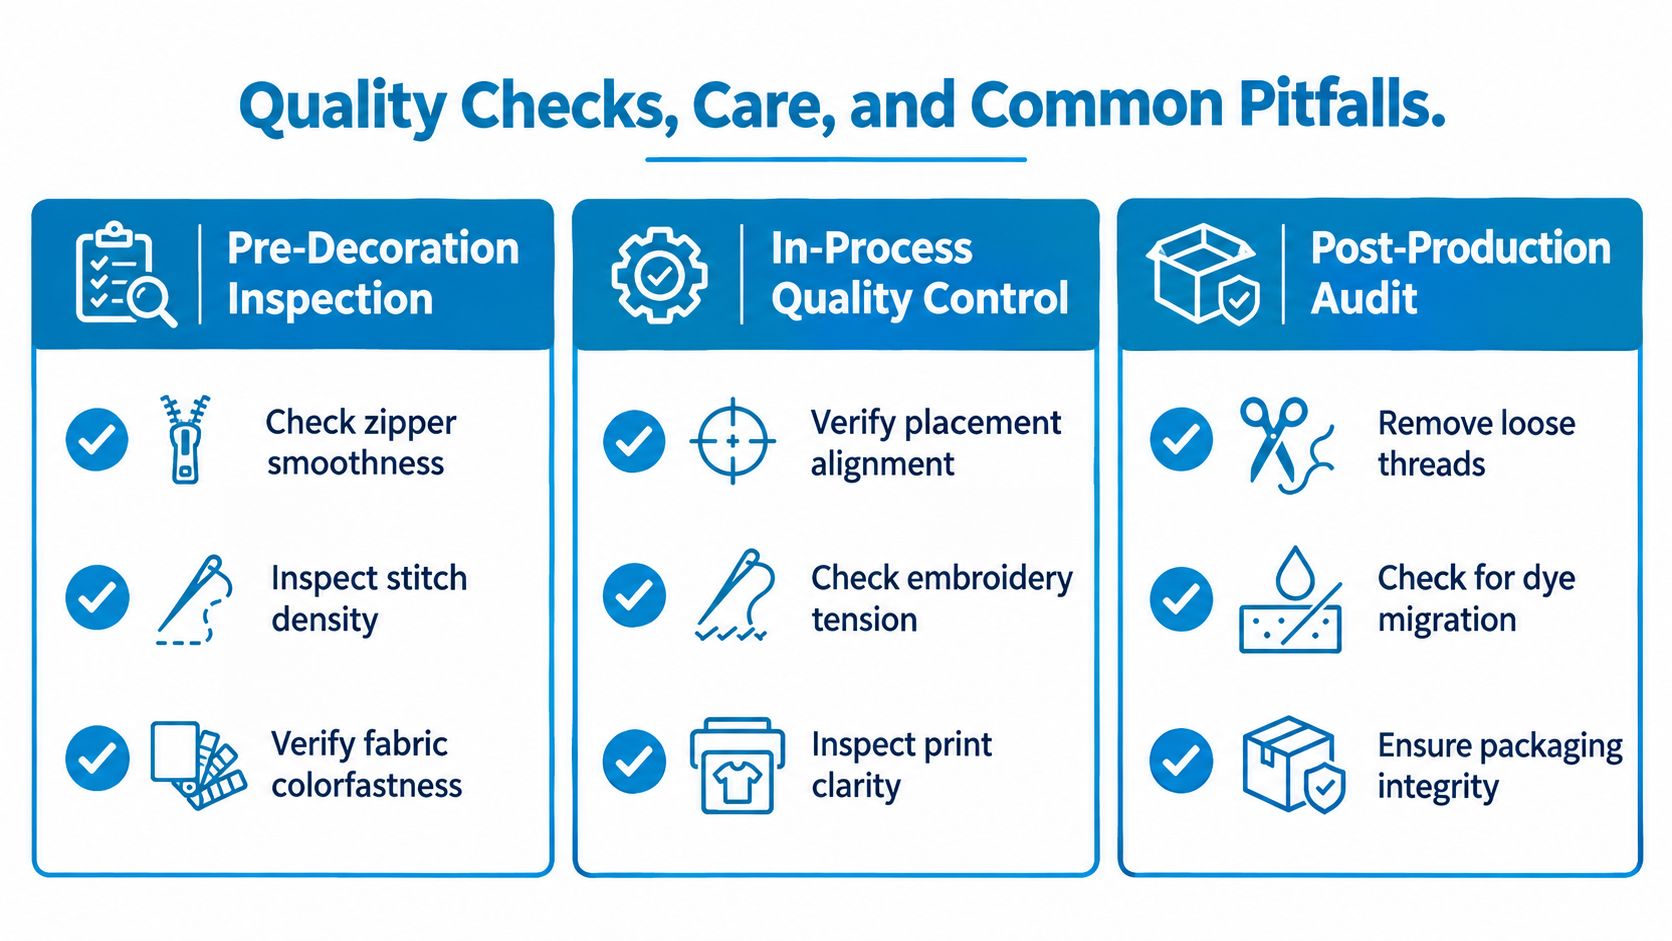
Use three inspection gates
Before decoration, compare the blank with the approved specification. Manufacturing guidance treats the bill of materials as the controlling document, listing shell fabric, rib, thread ticket and color, zippers, labels, hangtags, polybag, and carton, as described in this apparel quality-control resource. For the inspection gates and documentation standards behind these checks, see our quality control measures.
During production, pull a finished piece and check placement, color, backing security, stitch tension, print clarity, and zipper clearance. On embroidery, inspect broken stitches, loose edges, excessive density, and puckering around the design. Heavy fabric can support dense embroidery, while lighter fabric may need reduced density or a different method.
After production, inspect the full run for loose threads, dye migration, inconsistent placement, packaging damage, and missing care information. Apparel QC programs may set measurable limits for fabric weight, color fastness, shrinkage, seam strength, and stitching density. Examples include ±5% of target GSM, grade 4+ color fastness, shrinkage under 3% after washing, a 30-lb pull, and 10 to 12 stitches per inch, as described in this custom apparel manufacturing guide.
Spot-check at least 10% of the order and record the results. Catch placement drift before the shipment reaches the client.
Care instructions protect the decoration and the relationship. Put them where the wearer will see them.
Recommend cold washing, turning the garment inside out, and tumble drying low or hang drying. Care labels must survive decoration, and a short care card can prevent avoidable returns. Warn wearers about hot dryer cycles, especially with polyester-spandex blends, because excess heat can encourage pilling and damage the finish.
Your Quarter Zip Customization Checklist
A quarter zip can look right in a mockup and fail on the production floor. The zipper placket limits usable space, affects left-chest placement, and can distort decoration. Complete this checklist before requesting a final quote, with fabric weight and placket construction confirmed first.
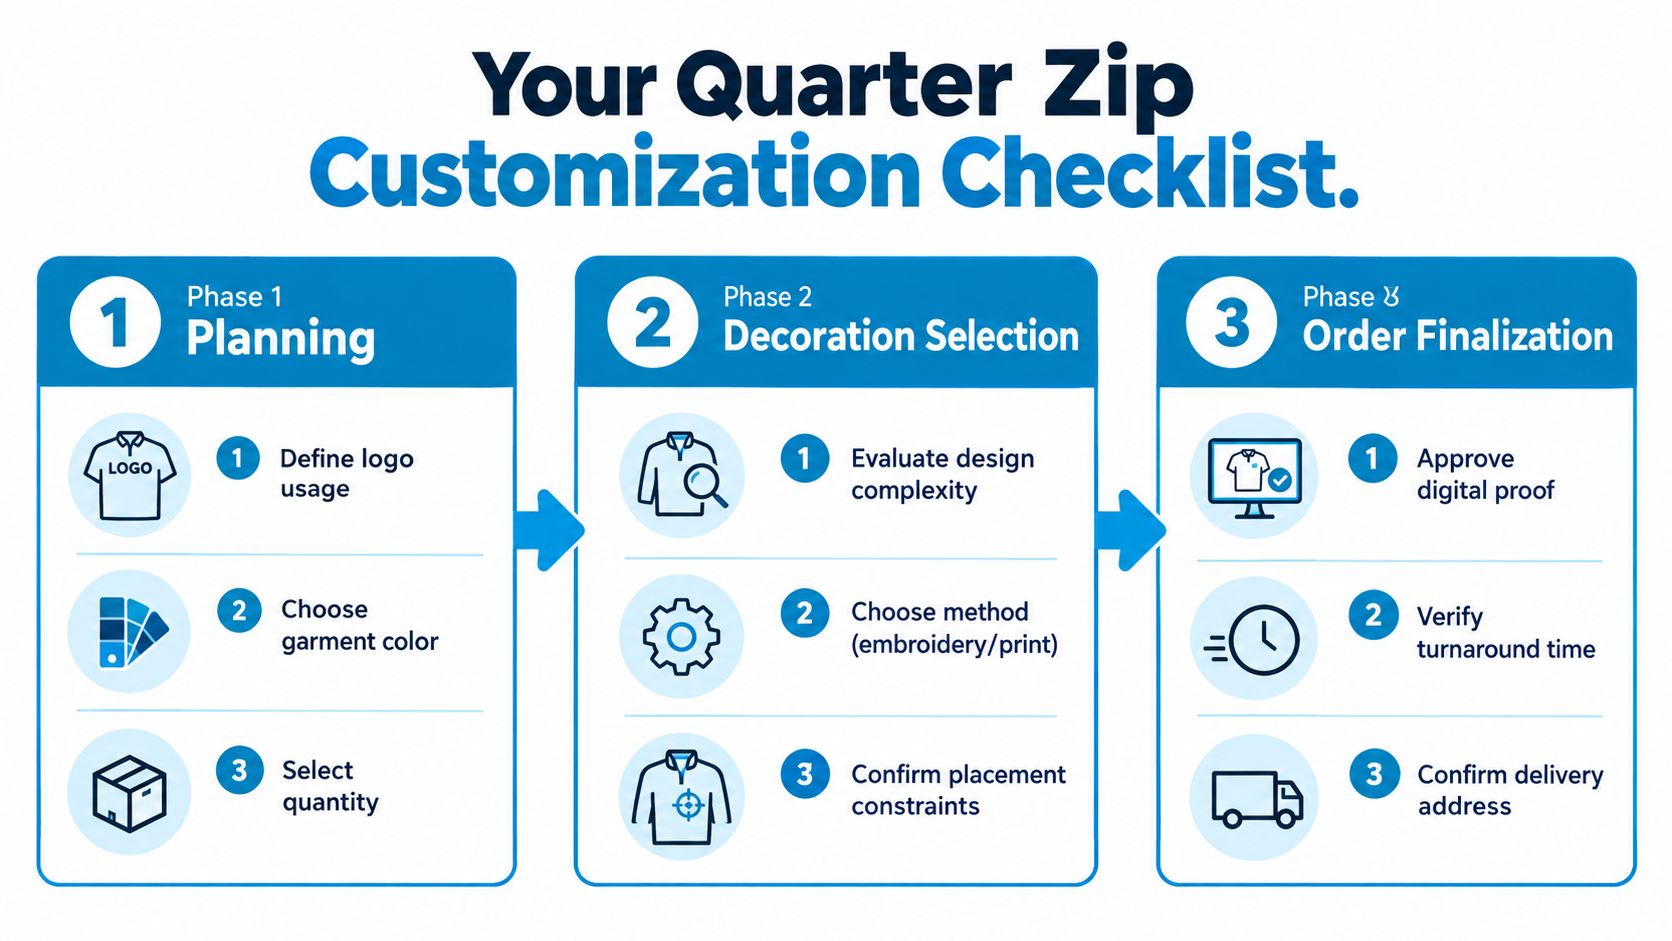
Phase one, select the garment
- Define the use: Office uniform, field team layer, event apparel, retail merchandise, or gift.
- Choose the silhouette: True quarter zip or longer cadet style.
- Confirm construction: Check the collar, cuff, hem, and zipper placket.
- Select the fabric: Technical double-knit, mid-weight fleece, or heavier lined option.
- Lock the fit: Classic, slim, relaxed, women's, or unisex.
- Confirm the color: Approve a physical swatch or color reference.
- Check reorder potential: Verify that the blank can be sourced again in the needed sizes.
Phase two, choose decoration
Fabric weight determines the method before the logo is finalized. Stable fleece can support embroidery, polyester blends often suit DTF, larger team graphics work well with screen print, and short-life promotions may justify heat transfer. Use a patch when direct decoration risks puckering or interferes with the placket.
Then confirm:
- Artwork format: AI, PDF, EPS, transparent 300 dpi PNG, SVG, or layered PDF as appropriate.
- Color system: Translate PMS colors to the decorator's thread or ink chart.
- Placement: Measure left chest, sleeve, hip-right, upper back, or another location from seams and the zipper.
- Final size: Confirm dimensions in inches at 100% scale.
- Production proof: Require the exact blank, color, fit, placement, placket clearance, and decoration method in the mockup.
Phase three, finalize the order
Approve a physical or accurately prepared proof before production. Confirm quantity by size, minimums, blank availability, decoration pricing, setup charges, production timing, shipping address, and care instructions.
The common failures are predictable: skipping sample approval, crowding the placket, choosing dense embroidery for light fabric, and assuming minimums are flexible. Record each decision in the order brief so the garment, method, placement, and care plan stay aligned.
Dirt Cheap Product, Inc. offers embroidery, screen printing, DTF, sublimation, and custom patches for quarter zips and other branded apparel, with artwork refinement and proofing support. Visit Dirt Cheap Product, Inc. with your logo, garment preferences, quantity, and deadline ready.