You've got the logo saved on your laptop, the staff polos picked out, and a launch date circled on the calendar. Then the embroidery shop asks a question you didn't expect. Has the artwork been digitized, and has anyone sewn a test on the actual garment?
That's where many first orders slow down. Your designer made a picture for a screen. An embroidery machine needs something different. It needs a precise set of stitch instructions that tells the needle where to go, when to change color, and how to handle the fabric underneath.
Custom embroidery digitizing is the step that bridges that gap. Done well, your logo stays sharp, your letters stay readable, and the garment still moves like a garment. Done poorly, you can get puckered fabric, filled-in letters, and a design that feels stiff enough to crack at the edges.
You don't need to become a digitizer. You just need to know what you're approving, which file to ask for, and what a good test sample should look like before you release a bulk order.
Table of Contents
- What Digitizing Turns Your Logo Into
- Which File Formats Your Machine Needs
- Stitch Types, Density and Underlay Explained
- What Drives Digitizing Price and Turnaround
- How to Prepare Artwork for Digitizing
- Approve a Test Sample Before Bulk Release
What Digitizing Turns Your Logo Into
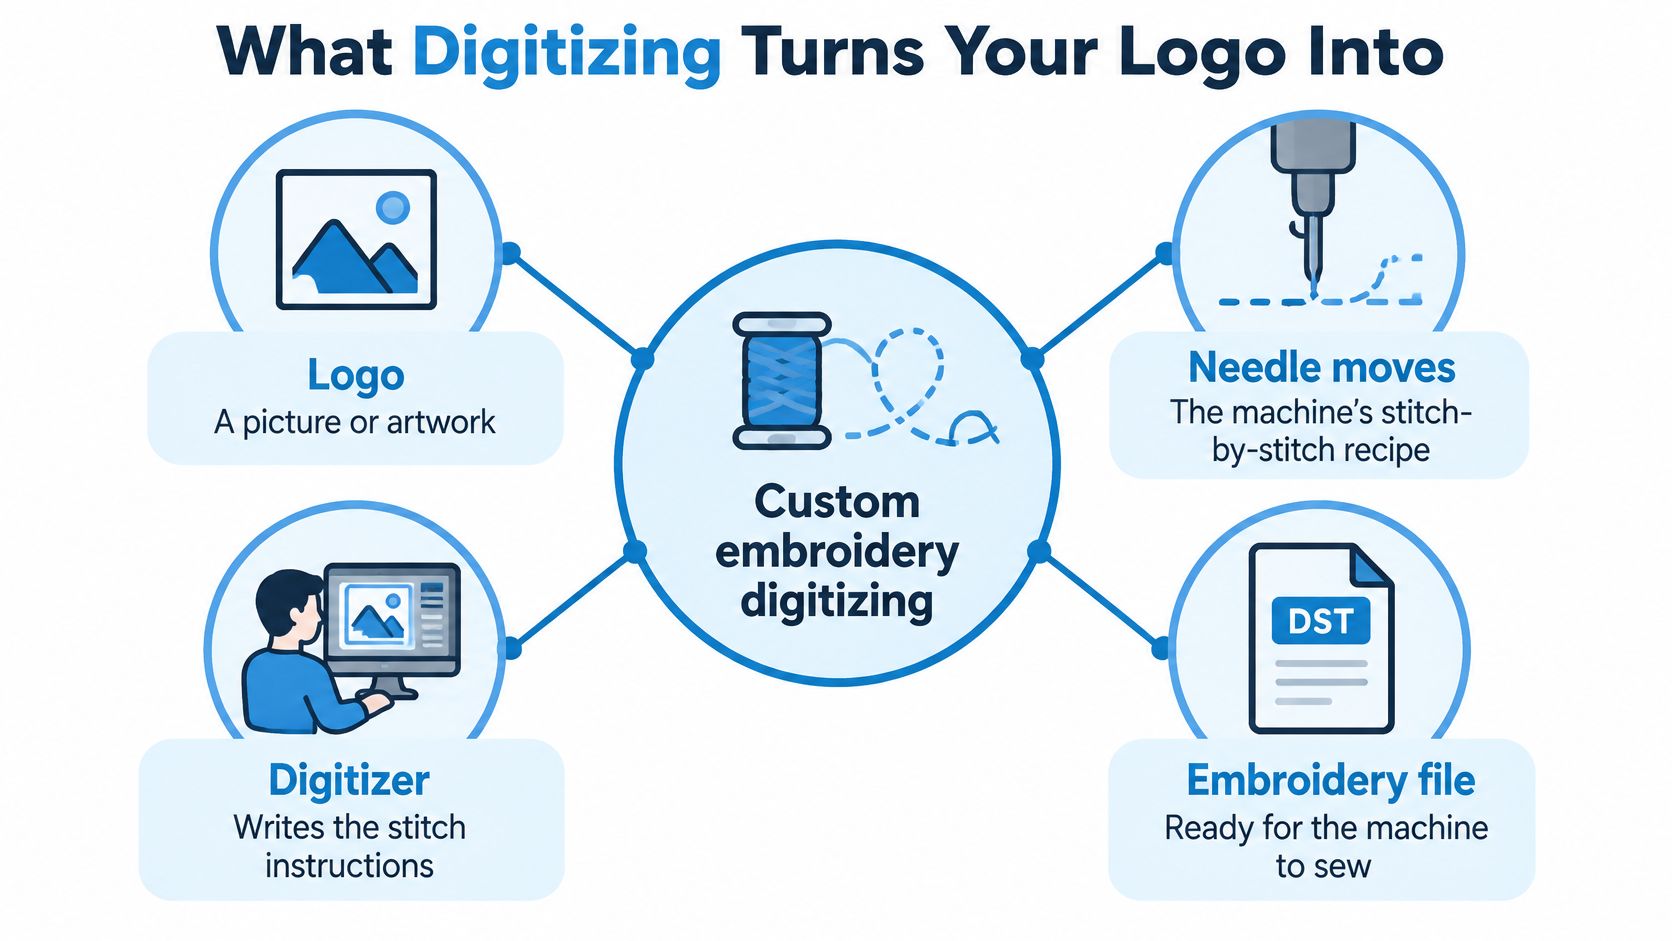
Think of your logo as a photo of a finished dish. An embroidery machine can't cook from the photo. It needs a recipe, with ingredients, order, timing, and technique. The digitizer writes that recipe in needle moves.
That simple analogy explains the core job. Custom embroidery digitizing doesn't just trace your picture. It rebuilds the artwork as a production plan for thread.
A Picture Is Not a Stitch Plan
A JPEG or PNG tells a computer how to show colored pixels. It says nothing about thread tension, stitch direction, or how fabric will pull under the needle. The machine can't guess those details from a flat image.
The Amann guide to how embroidery digitizing influences production quality describes the result as an ordered machine instruction set containing stitch types, stitch direction, density, underlay, pull compensation, trims, jumps, entry and exit points, and color changes. Those choices affect how thread reflects light, how color appears, how sharp the contours look, and whether the design holds its shape.
Sequence matters, too. A background fill usually sews before foreground details. If the order is wrong, layers can misalign and leave gaps at overlaps.
A logo file shows what the design should look like. A digitized file tells the machine how to build it in thread, one step at a time.
Why One File Rarely Fits Every Garment
Say you want the same logo on a structured cap, a polo, a fleece, and a stretch knit. Each material behaves differently. Caps are firm and curved, fleece lets stitches sink, and stretch knits move under thread.
The program has to change with the garment. Underlay anchors unstable fabric. Pull compensation offsets contraction from satin columns and dense fills. Density changes help the design cover without becoming stiff.
That's why click-to-convert tools can disappoint. They may produce a file, but that doesn't mean the file is production ready for your exact garment, size, and placement. If you want background before ordering, understanding embroidery digitizing software can help you see how the software side fits into the process.
Before you approve anything, ask three direct questions. How will you sequence the objects? How will you compensate for this fabric? Will you sew a test on this garment type before bulk production? Clear answers protect you more than a pretty screen preview.
Which File Formats Your Machine Needs
The machine family decides the file format. That's the rule to remember. Formats aren't interchangeable, and guessing from a familiar looking extension won't make the file run correctly.
You can think of the digitized design as the master recipe and the format as the version written for a specific kitchen. The design remains consistent in essence. The export changes to match the equipment that will sew it.
Common Embroidery File Formats by Machine Family
| Format | Typical machine family | Request it when |
|---|---|---|
| DST | Tajima-based industrial machines | The shop runs Tajima equipment or needs a common industrial file |
| PES | Brother and Babylock machines | The shop runs Brother or Babylock equipment |
| EXP | Melco machines | The shop runs Melco equipment |
| JEF | Janome machines | The shop runs Janome equipment |
| VP3 | Husqvarna Viking machines | The shop runs Husqvarna Viking equipment |
Reading the Table Without Guessing
Start with DST if your shop uses Tajima-based industrial machines. It's widely used in commercial settings, but that doesn't make it universal. Ask the shop to confirm it before you pay for digitizing.
PES is the format tied to Brother and Babylock machines. If a smaller shop runs that equipment, request PES specifically. Don't assume a DST file will behave the same way just because both contain stitch data.
EXP belongs with Melco equipment. JEF is for Janome machines. VP3 is for Husqvarna Viking machines. Each export is built for one machine family, even though one digitized design can be exported several ways.
Ask before you order: Which format do your machines run? Put the answer in your request, in writing, so the export matches the shop from the start.
Two similar file names can target different machines. The extension alone also doesn't tell you whether the file was programmed for a cap, a flat polo, or a jacket back. Format answers the machine question. It doesn't answer the fabric question.
Keep the editable native file as well as the machine export when the shop provides it. The native version is the one a digitizer can revise easily if you change size, placement, or garment later. Without it, small changes can turn into rebuilding work.
Your practical move is simple. Name the garment, the placement, and the target format in the same request. That gives the shop the full picture before the first stitch is programmed, and it avoids the common delay of creating a good design in the wrong export.
Stitch Types, Density and Underlay Explained
Density means how many stitches fill a given area. Too few stitches leave gaps and thin, washed out coverage. Too many stitches create a stiff patch, pucker the fabric, and distort the design.
There's no universal correct setting you can demand without context. The right density depends on stitch type, fabric stretch, stabilizer, thread, logo size, and design structure. A number that works on a heavy jacket can overwhelm a light polo.

Stitch Types and What Each One Does Best
| Stitch or technique | Best used for | Main risk |
|---|---|---|
| Satin stitch | Lettering, narrow borders and bold outlines | Long satin stitches snag or pull on stretch fabric |
| Fill stitch | Solid color areas and logo backgrounds | Too much density creates stiffness and puckering on light knits |
| Run stitch | Fine outlines and small details | Too light to hold a color area on its own |
| Underlay | Anchoring layer under satin and fill stitches | Missing underlay lets fabric shift; too much adds bulk |
| Pull compensation | Offsetting fabric contraction in borders and lettering | Wrong amount distorts shapes and thins letters |
How the Main Stitches Feel in a Real Logo
A satin stitch creates smooth, raised columns. It's the natural choice for readable lettering, narrow borders, and bold outlines. If satin stitches get too long, though, they can snag and pull, especially on stretch fabric.
A fill stitch covers larger solid areas, such as the body of an icon or a logo background. Fills need enough stitches to hide the fabric underneath, but restraint matters. Push density too far on a light knit and the area turns boardy.
A run stitch is a simple line. It works for fine outlines, travel paths, and small details that don't need solid coverage. It won't carry a color block on its own, because it's built for definition rather than fill.
Underlay sits underneath what you see. It anchors the fabric, reduces shifting, and gives the top stitches a stable base. The backing or stabilizer under the garment also matters, and you can review embroidery backing and stabilizer options when you discuss your fabric with the shop.
Pull compensation is the quiet adjustment that saves lettering. Thread pulls fabric inward as it sews, so the digitizer widens certain shapes slightly to offset that contraction. Too little can thin letters. Too much can make borders look swollen or uneven.
More Stitches Don't Automatically Mean Better Quality
That point surprises many buyers. A high stitch count can mean rich coverage, but it can also mean thread buildup, needle stress, stiffness, and puckering. Quality is balance, not maximum density.
Read a good sample with your eyes and hands. Edges should look crisp. Fills should look smooth, not ropey or patchy. Letters should stay open at the production size. The design should bend with the garment rather than pulling the garment into waves.
If the sample feels like a badge glued onto a soft shirt, density or underlay may need adjustment. If you can see fabric through a fill that should be solid, coverage may be too light. Both problems are fixable before production. Neither is something you want to discover across a full run.
What Drives Digitizing Price and Turnaround
The biggest price driver is the time needed to build a clean stitch program. After that, production cost follows the file you've approved. More stitches, more colors, and more revisions all add work.
A quote makes more sense when you separate two costs. One cost pays for the digitizer's programming time. The other pays for machine time, thread, setup, and handling during production.
Pricing Factors and How Each One Changes the Quote
| Factor | Effect on quote | How to reduce it |
|---|---|---|
| Logo size and detail | Small lettering and fine lines need more care and more revisions | Simplify fine lines or enlarge the artwork |
| Stitch count | More stitches mean more production time and thread | Remove tiny shapes that add little to the design |
| Number of colors | Each color change adds a stop and a setup step | Merge similar colors where the design allows |
| Garment type | Caps, fleece and stretch knits need their own program | Choose the garment before the design is finalized |
| Revisions after proof | Each change means reworking the file | Approve a clear proof and a test sample before production |
Where the Money Goes
Small lettering costs attention. The digitizer has to keep letter counters open, choose stitch paths carefully, and test whether the text survives at actual size. Enlarging the logo or simplifying tiny copy can reduce both programming time and revision rounds.
Stitch count affects production every time the design runs. A dense background may look impressive on screen, but it adds machine time to every garment. Removing tiny shapes that nobody notices at normal viewing distance can save money without weakening the brand mark.
Color count matters because each color change adds a stop and setup work. Two nearly identical blues may not justify two thread changes. Merging them, when your brand standards allow, simplifies production.
Garment changes are the hidden budget breaker. A file built for a flat polo isn't automatically ready for a cap or fleece. Choose the garment first, and use guidance on how much embroidery costs to frame the conversation before you request final pricing.
Why Turnaround Slips
The usual stages are artwork review, digitizing, proof approval, test sewing, and production. The stitching itself isn't usually the longest delay. Waiting for approval and fixing artwork that needs rework slow more orders.
Ask for the stitch count and color count with every proof. Those two numbers let you compare quotes on the same basis. If one quote is lower because it uses fewer colors, lighter coverage, or a smaller size, you'll see that difference before you commit.
How to Prepare Artwork for Digitizing
Good artwork doesn't guarantee good embroidery, but poor artwork almost guarantees extra questions. Your goal is to give the digitizer clean shapes, exact instructions, and no avoidable guesswork. Work through these steps in order.

The Artwork Checklist
Send a vector file when you have one. Use AI, EPS, SVG, or PDF because clean edges help the digitizer rebuild shapes accurately. If you only have a PNG, send the largest high-resolution version available. The common slip is sending a small screenshot pulled from a website. If your logo needs cleanup first, review how to convert artwork to vector format before you submit it.
Give the exact final size in inches. Stitch choices depend on the actual sewn size, not the size it appears on your screen. A design that works large can fail when it's reduced for a left chest. The common slip is saying standard size and assuming everyone shares the same standard.
Limit and name your colors. Keep only the colors the design needs, and provide thread or Pantone references when brand matching matters. Every extra color adds another stop during production. The common slip is letting the shop guess from a screen color that shifts between monitors.
Remove or enlarge details that are too fine. Hairlines and tiny text can break up, fill in, or disappear in thread. Simplify them before digitizing rather than asking thread to perform like ink. The common slip is keeping a tagline that's readable on a monitor but unreadable at garment size.
Flatten gradients and photo effects into solid shapes. Stitches can't reproduce soft tonal transitions the way a screen can. Drop shadows, glows, and photographic blends need to become clear areas of solid color. The common slip is approving a digital effect that has no clean thread equivalent.
Mark the garment and placement. State whether the logo goes on a left chest, cap front, sleeve, bag, or jacket back. The same artwork is programmed differently for each location. The common slip is changing the garment after the file has been tested on something else.
Keep the original native file and a flattened reference. The native file supports future edits, while the reference shows the intended final look. Together, they prevent revisions from starting with a damaged or incomplete copy. The common slip is overwriting the only good version.
Name the target format and machine family. Put DST, PES, EXP, JEF, VP3, or the shop's required format directly in the request. That ensures the export matches the equipment before the file is built. The common slip is assuming the extension alone tells you which machine family it serves.
Send instructions with the artwork, not after it. Size, garment, placement, colors, and format belong in the first message.
A clean submission doesn't have to be long. It just has to be complete. When the digitizer can see the artwork and the production conditions at the same time, the first proof has a much better chance of matching what you pictured.
Approve a Test Sample Before Bulk Release
A digital proof shows layout and color order on screen. It can't reliably predict puckering, registration, thread behavior, or loss of fine detail on a real garment. Only a sewn test gives you that evidence.
Sew the test on the same garment class planned for production, with the same backing and thread weight the shop expects to use. The TextileTuts guide to embroidery construction recommends sewing a sample on representative material, changing one variable at a time, and evaluating coverage, flexibility, and sewability. That discipline tells you whether density, underlay, or another single change caused the improvement.

Sample Approval Checklist
| Check | Pass looks like | Fail sign |
|---|---|---|
| Puckering | Fabric lies flat around fills and satin areas | Wavy or pulled fabric around the design |
| Registration | Edges and overlapping color layers line up | Gaps or misaligned color layers |
| Small lettering | Letters stay open and legible at actual size | Counters fill in or letters blur |
| Flexibility | The design bends with the garment | The patch feels stiff or cracks at the edges |
| Wash durability | Thread holds after a wash test | Loose threads or lifting edges after washing |
One Fabric Pass Doesn't Cover Every Fabric
Polos, performance knits, fleece, hats, bags, and outerwear each need their own sample. A pass on a stable polo doesn't guarantee the same result on a stretchy performance knit. A clean cap sample doesn't prove the design will sit correctly on fleece.
Treat each fabric class in the order as its own approval. Sew the sample on that fabric, check it against the list above, and wash it when durability matters. When a check fails, adjust density or underlay and sew again on the same fabric. A fix proven on fleece tells you nothing about the polo run.
Put the Release Decision in Writing
- Sew the sample on the actual garment class, using the backing and thread weight planned for production.
- Check the proof's stitch count and color count against what the sample shows.
- Record the approved conditions: garment, backing, thread, size, and placement.
- Agree who pays for rework if the garment changes after approval.
- Release the bulk order and keep the approval notes with the job file.
The rework agreement matters more than people expect. If you switch from a polo to a performance knit after approval, the file may need new programming and another sample. Decide upfront whether that rework is included or billed separately. Clarity here prevents a delay from becoming a dispute.
Approve the sample, not just the artwork on screen. Once the garment, backing, thread, size, placement, and sample result are written down, bulk production becomes a repeatable process instead of a hopeful one.
If you're ready to turn your logo into embroidery for polos, hats, fleece, bags, and outerwear, Dirt Cheap Product, Inc. can help with embroidery and apparel decoration. Visit the site, upload your logo with your garment and placement notes, and ask for a sewn sample before you approve your bulk run.