
You're about to place the kind of order that looks simple until the quote lands in your inbox and the terms start stacking up, stitch count, digitizing, placement, proof approval. That's exactly where most first-time buyers slow down, because the shirt is easy. The key decision is whether your logo, fabric, and order size work together once thread hits cloth. If you're buying custom embroidered polo shirts for staff, events, or resale, the smart move is to treat the process like a production buy, not a casual apparel purchase.
Table of Contents
- Why Custom Embroidered Polos Earn Their Spot in Your Brand Kit
- Choosing the Right Polo Fabric and Brand for Your Use Case
- Embroidery Methods, Stitch Types, and the Anatomy of a Logo
- Artwork Prep, Digitizing, and Proofing Without the Headaches
- Placement, Sizing, and When Embroidery Is the Wrong Choice
- Pricing, Minimums, and Turnaround for Small and Bulk Orders
- Care, Durability, and the Performance-Fabric Question
- Common Use Cases and a Clear Path to Your Order
Why Custom Embroidered Polos Earn Their Spot in Your Brand Kit
A bad polo order shows itself fast. The collar warps, the logo looks tired, and the team ends up wearing something that feels disposable instead of branded. Embroidered polos avoid that problem when you need staff to look consistent without looking overstyled, and they hold up well for lobbies, job sites, trade shows, hospitality floors, retail counters, and event crews. The finish reads clean, and the garment usually keeps its shape better than a flimsy throwaway shirt.
Price is where buyers usually get surprised, because the shirt is only one piece of the bill. Custom embroidered polo shirts are usually a mid-priced branded apparel item, with industry pricing commonly falling between $18 and $80 per piece, while many orders average around $30 (custom polo shirt cost guide). Budget options are often cited at $18–$25, while premium performance polos can reach $80. Fabric choice, decoration complexity, and the level of finish you expect all push the cost up or down.
What embroidery buys you
Embroidery sends a different signal than print. It looks permanent, it feels more finished, and it makes sense for uniforms that need to hold up in front of customers day after day. Printed polos are often priced about 30% to 40% less than embroidered versions, which is why print works for some promo jobs but falls short for uniforms where presentation matters (best custom polo shirts 2026).
Use embroidery when the garment represents your company face-to-face. Save print for short-life giveaways, fast-turn promo pieces, or jobs where the budget matters more than the finish.
The catch is detail. Embroidery does not handle ultra-fine art as cleanly as print, and tiny lettering can blur or fill in if the design is cramped. That is why a smart buyer does not start with, “Should this be embroidered?” The better question is, “Does this logo, this fabric, and this order purpose make embroidery the right call?”
Choosing the Right Polo Fabric and Brand for Your Use Case
The blank decides a lot before the first stitch. A logo that looks sharp on one polo can pucker, distort, or sink into another, even if the artwork is identical. So stop thinking about “a polo” as one thing. Think in fabric families, because the fabric surface controls how thread sits, how the garment drapes, and how the finished shirt feels in real use.
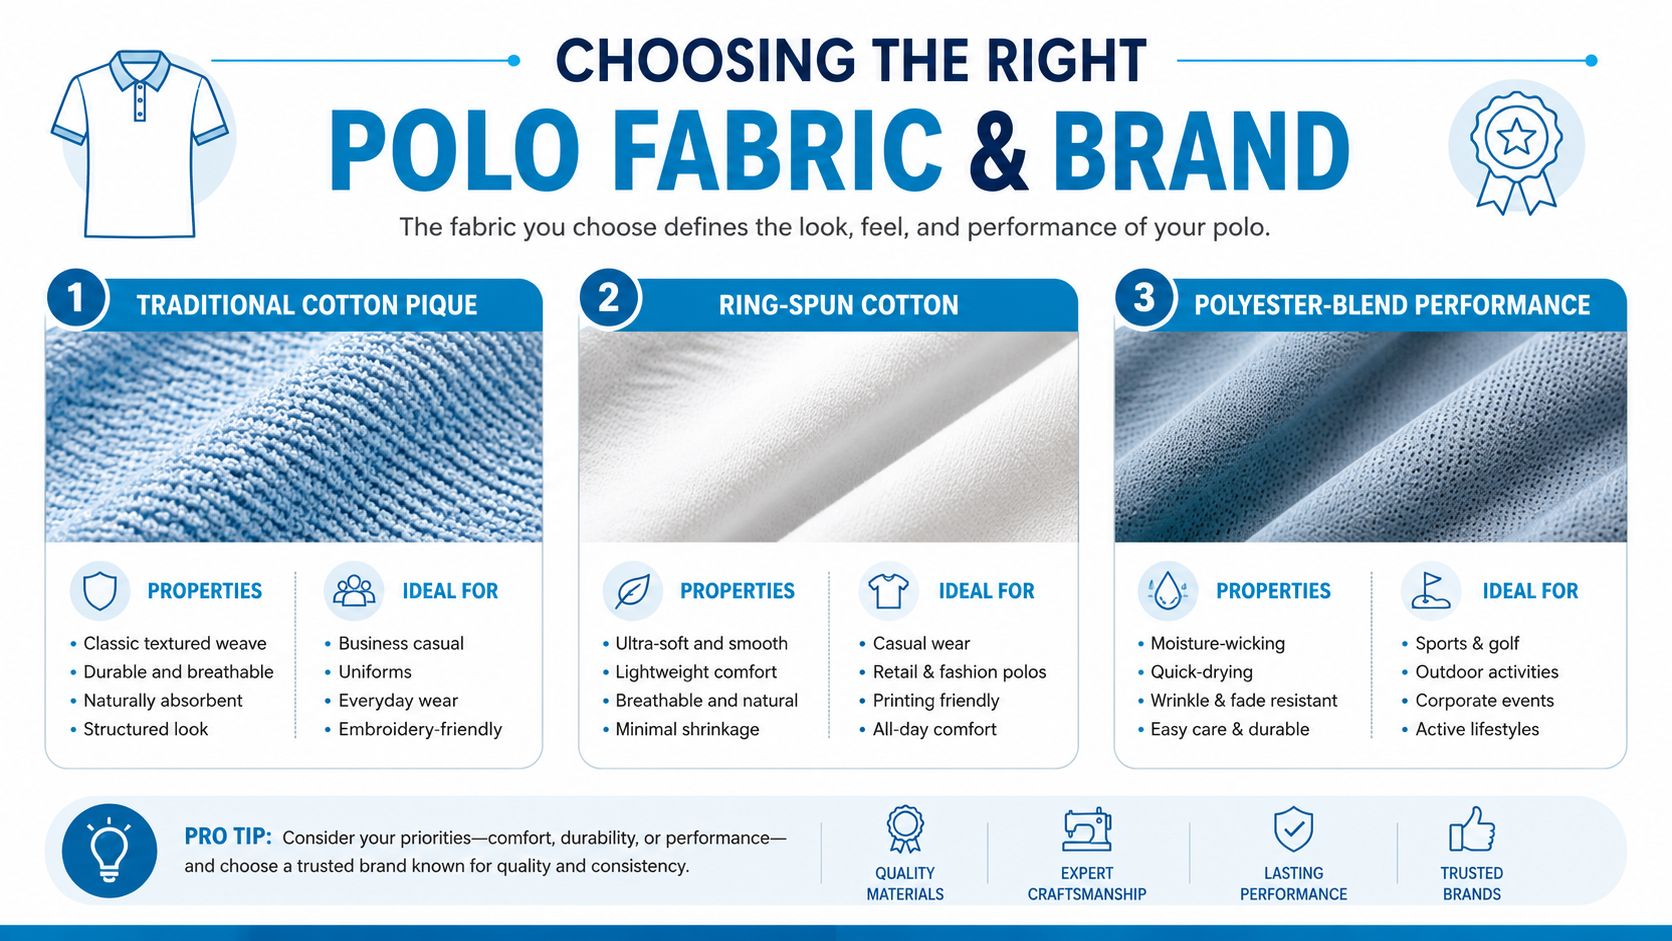
Match the fabric to the job
Traditional cotton pique is the textured classic. It has that waffle-knit look people expect from a business polo, and it works well for office staff, front desk teams, and most uniform programs. Ring-spun cotton feels smoother, closer to a well-made tee, which makes it a better fit for retail, casual hospitality, and merch that should feel softer on the body. Performance polyester blends are the athletic option, built for movement, moisture management, and hotter work environments.
Here's the blunt version. If your team is customer-facing and you want a structured look, pick pique. If comfort and softness matter more than a traditional uniform feel, ring-spun cotton is cleaner. If your staff works hard, sweats, or moves a lot, performance fabric is the safer choice.
Why brand tier matters even with the same logo
The same design can behave differently on a $15 blank and a $35 blank because construction quality changes how the fabric supports the thread. Better blanks usually give you a more stable surface, cleaner collar shape, and more consistent sizing. Lower-tier shirts can still work, but the embroidery often looks less refined because the base garment shifts more.
Better fabric doesn't just feel nicer, it gives the embroidery a steadier foundation.
The safest buying move is to think in use cases. Office staff usually need polish. Restaurant front-of-house teams need polish plus comfort. Field technicians need durability and movement. Golf and event teams often want a more athletic profile. If you line the polo up with the actual job, the logo has a much better chance of looking intentional instead of forced.
Embroidery Methods, Stitch Types, and the Anatomy of a Logo
A logo becomes embroidery through stitch paths, not by magic. That matters because the machine has to translate art into thread, and every choice affects cost, speed, and legibility. The two machine setups buyers hear about most are flatbed and tubular systems. Flatbed setups work with flatter garment positioning, while tubular machines are built for finished garments on a cylindrical arm, which is why decorators use them so often for shirts and sleeves.
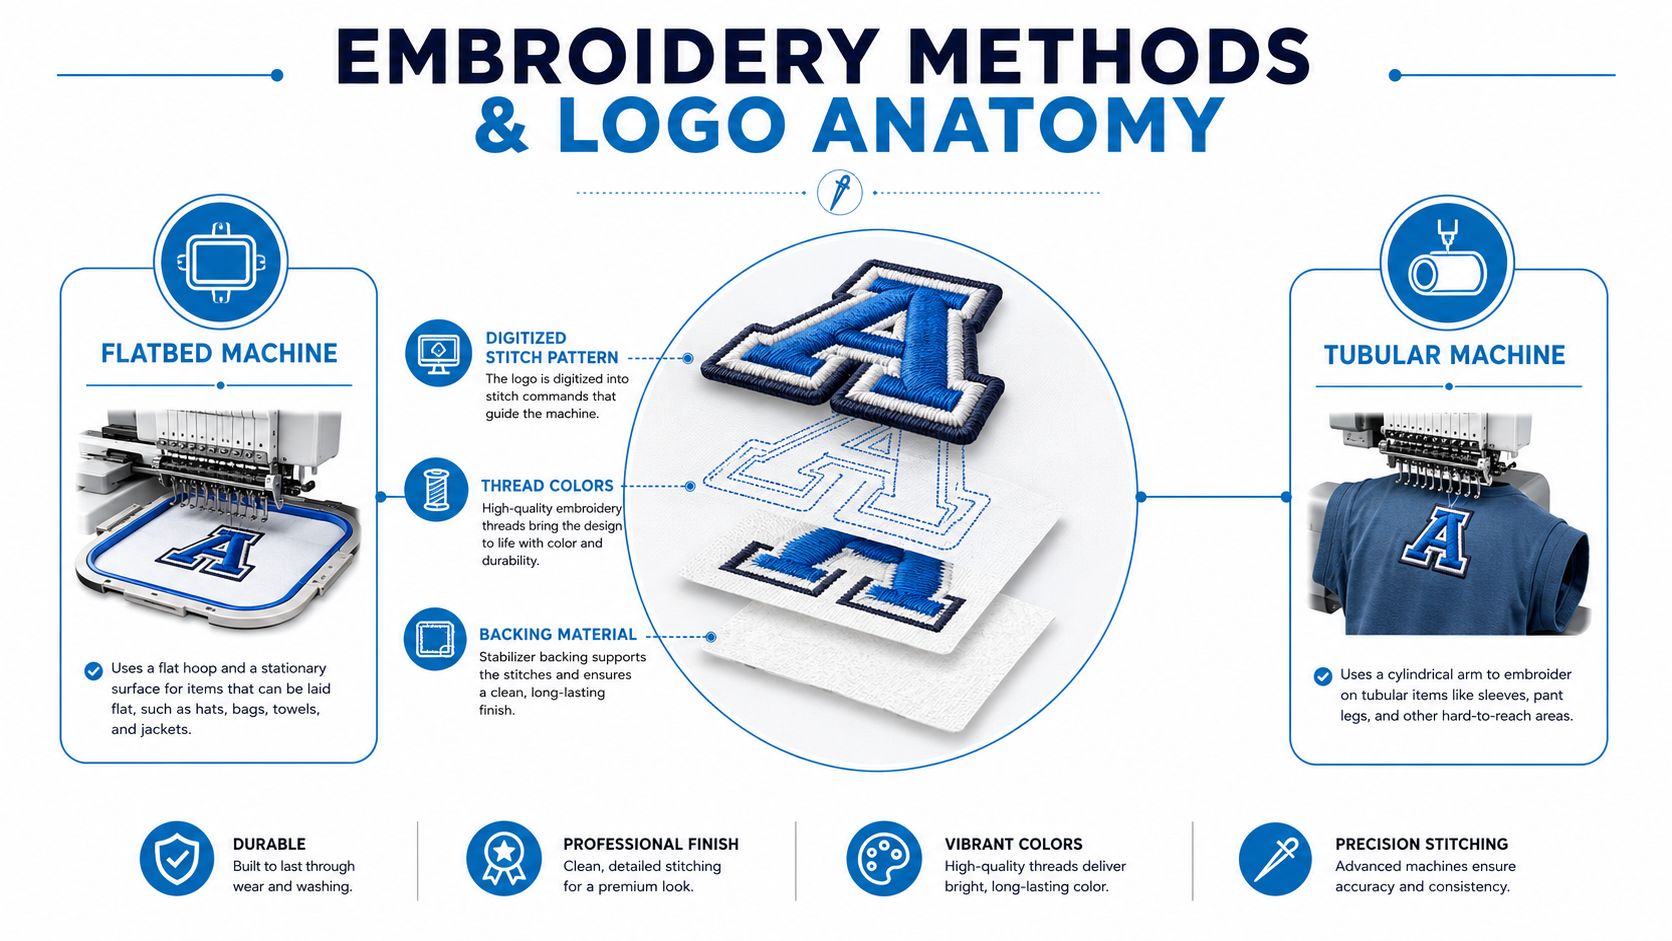
Stitch types that matter
Satin stitches are usually used for borders, lettering, and narrow shapes because they create a clean, raised finish. Fill stitches cover larger areas and give logos body. Run stitches handle thin lines and simple outlines, but they are not the right answer for tiny, delicate detail that can disappear in thread.
The main cost driver is stitch count. For a typical left-chest polo embroidery field, a practical benchmark is about 4 inches by 4 inches, with an upper stitch-load ceiling around 15,000 stitches (left-chest field benchmark). Once a logo gets dense, multi-color, or full of fine texture, the quote goes up because the machine has more thread to lay down and more time on the garment.
What logo anatomy looks like in production
The machine does not care how elegant your file looks on screen. It cares whether the logo can be stitched cleanly. That is why minimum legibility thresholds matter, including 0.25 inch lowercase letter height, 0.3 inch uppercase height, and 0.05 inch minimum shape thickness (left-chest field benchmark). Below that, details start collapsing, especially on textured pique or stretchy knits.
Thread color choice should happen before production starts, not after the first proof comes back. A simple palette keeps the logo cleaner and usually keeps costs saner, too. Use the thread color guide when you are choosing thread matches, then keep the palette tight so the decorator is not chasing unnecessary color changes.
Artwork Prep, Digitizing, and Proofing Without the Headaches
Most first orders go sideways before the needle ever moves. The culprit is usually bad artwork. Decorators want vector files like AI, PDF, EPS, or SVG, and some will accept 300 DPI raster files only as a backup for simpler artwork (logo setup guidance). If you send a fuzzy JPEG and hope for the best, you're asking for cleanup, delay, and probably a second round of proofing.
What to send and what to avoid
Start with the cleanest version of your logo you can find. Then simplify it. Gradients don't stitch well. Photographs don't stitch well. Very fine detail usually doesn't stitch well either, because thread needs room to turn and stack without turning into a blob. That's why good embroidery artwork gets outlined text, bolder linework, and simplified shapes before digitizing.
Digitizing is the step that converts your flat logo into a stitch-ready file. It's not the same thing as design work, and it's not optional for new artwork. The digitizer decides stitch direction, density, underlay, and the order of each segment, which is why a cheap auto-conversion often looks fine on a screen and terrible on a shirt.
How to proof like someone who's done this before
Read the sew-out like a buyer, not like a designer. Check whether thin letters hold their shape, whether corners are crisp, and whether small elements are visible from conversational distance. If a logo has type that's too small or a detail that's already fighting the fabric, flag it immediately. Don't wait until production is underway.
Good proofing question: “What will this look like after ten washes and real wear?” If the answer depends on tiny details, the logo probably needs simplifying.
For companies that want a quote-driven workflow rather than a fixed catalog price, one seller says buyers can get a free estimate with a Quote Calculator on every product page and also contact sales by phone (quote calculator workflow). That's useful when you're still deciding on placement, quantity, or artwork complexity. If your order has any moving parts, don't rush proof approval. A clean approval today is cheaper than a rework after production starts.
Placement, Sizing, and When Embroidery Is the Wrong Choice
Placement is a paper decision until the first shirt comes off the machine. Then every millimeter shows up in the physical world, and a logo that sits too low, too wide, or too busy starts looking amateur fast. The default is the left chest because it reads cleanly, feels familiar, and works for most uniforms. Other placements make sense when the shirt has a second job, such as carrying a name, department mark, sponsor logo, or a larger brand hit on the back.
Use the garment like a canvas, not a billboard
A left chest mark keeps the shirt professional. A right chest name lockup helps service teams. Sleeves are better for secondary branding, and back yokes keep the front quiet. Full-back embroidery is the loudest option, and it only earns its keep when the logo must be visible from a distance or the brand wants the shirt to do the talking.
The key question is whether the placement matches the job. A small office team usually needs a restrained chest mark and nothing more. A retail opening crew may need the same treatment, while a promo event can justify a mixed order with some embroidered polos and some printed shirts. If you need a practical starting point, use the placement guide for embroidery before you send the art file, because bad placement is easier to catch on a mockup than on a boxed order.
Embroidery, print, or DTF
| Attribute | Embroidery | Screen Print | DTF |
|---|---|---|---|
| Finish | Raised thread, premium look | Flat ink, bold color | Printed transfer, smooth surface |
| Best use | Uniforms, hospitality, polished branding | Promo shirts, larger art, cost-sensitive runs | Short runs, mixed art, flexible decoration |
| Price position | Higher-end | Usually lower | Often middle ground |
| Detail handling | Best for simplified logos | Best for bold graphics | Better for detailed art than embroidery |
| Wear feel | Textured | Light | Smooth |
Printed polos are often priced lower than embroidered versions, which makes print attractive when the budget matters more than the texture and depth of thread. That does not make embroidery overpriced. It makes embroidery the better choice when the shirt needs a polished, durable look and the logo can hold up in thread.
Use embroidery for clean logos, short text, and placements that need a finished uniform look. Use print or DTF when the artwork is large, detailed, or better left flat. I would also steer a buyer away from embroidery when the design is too small to read, when the art has fine gradients, or when the shirt is part of a one-off campaign that needs a faster, cheaper decoration route. In those cases, a hybrid order usually makes more sense, some garments embroidered for staff and others printed for event traffic.
Pricing, Minimums, and Turnaround for Small and Bulk Orders
A bad embroidery quote usually starts with a buyer staring at shirt price and ignoring the rest of the order. The number comes from the blank, the artwork, the stitch count, the quantity, and the production steps around the job. For a standard online custom order with one logo placement, a realistic planning range is $15 to $30 per shirt (custom polo FAQ). Start there if you want a budget that holds up.
What actually changes the number
Stitch density drives a lot of the price. Some providers price embroidery at $0.50 to $4.00 per 1,000 stitches (custom polo shirt cost guide). A simple logo stays in control. A dense mark with more detail and color can rise fast. Quantity matters too, because setup costs spread out as the order gets larger.
The first run usually costs more than the reorder. Digitizing, proofing, and setup all live in that first invoice, and that is normal. A single shirt tests the whole process. Fifty shirts are where the unit economics start to make sense. Once the stitch file is built and approved, later runs move faster because the hard prep is already done.
Fixed quote or quote-driven workflow
Suppliers usually handle pricing in two ways. Simple jobs often get a direct cart price. Orders with artwork review, alternate decoration, or mixed placements usually move into a quote workflow. That is the right setup when the logo needs judgment before production starts.
Rule of thumb: if the order needs human judgment, do not force it into a one-click cart.
Buyers get into trouble when they underbudget the first order, assume rush service is automatic, or forget that sample approval takes time. Treat the first run like a build, not a reorder. The second run is where you get the payoff.
If you need a broader market view, the pricing and minimums guide from Printful gives a useful outside reference point on how decoration costs are commonly structured.
Care, Durability, and the Performance-Fabric Question
If you want the logo to last, treat the shirt like decorated apparel, not laundry-day filler. Turn it inside out before washing. Use a normal wash, not a harsh one. Avoid high heat if you want the embroidery and the fabric to stay stable longer. That's especially true on lighter polos, where aggressive drying can stress the garment around the stitched area.
Why performance fabric needs a different mindset
Performance polos are useful, but they're less forgiving under embroidery if the fabric is stretchy, slick, or lightweight. The issue isn't the logo alone, it's how the stitch interacts with the cloth underneath it. If the backing and thread choice don't match the fabric, you can get puckering, distortion, or snagging, especially on repeated wear.
That's why performance-fabric polos deserve a second look before you approve the order. If the shirt is meant for hospitality, healthcare, or field staff, ask how the decoration will behave under real use and repeated laundering. The garment may look fine fresh out of production and still fail after a few hard wash cycles if the setup wasn't right.
For moisture-management blanks, this moisture-wicking fabric guide is the kind of reference that helps you choose the right base before you commit to embroidery. The decision is usually not “Can it be embroidered?” It's “Will it still look clean after work starts using it every day?”
Keep the logo file consistent, and keep the wash instructions simple. The more complicated the care routine, the less likely your team follows it.
Common Use Cases and a Clear Path to Your Order
Start with the job, not the logo. Staff uniforms need consistency across the whole team. Event merch needs artwork that reads fast and can move through production without delay. Retail-ready private label pieces need a blank that feels worth buying at shelf level. Promotional giveaways need a cost structure that keeps the order inside budget. Each use case points to a different fabric, placement, and quantity choice.
A bad order usually starts with the wrong priority. A good order starts with a clear answer to who will wear the polo, how often they will wear it, and what the logo has to do on the shirt.
Four common buying paths
- Staff uniforms: Lock in the shirt color first, then pick a restrained chest placement and a fabric that fits the work setting.
- Event merchandise: Set quantity and turnaround first, then simplify the logo so production does not become the bottleneck.
- Private label retail: Choose the blank quality first, then make sure the decoration looks intentional enough for resale.
- Promotional giveaways: Set the price ceiling first, then decide whether embroidery earns its place or whether another decoration method fits better.
Dirt Cheap Product, Inc. handles embroidered polo orders through upload, proofing, decoration, and reorder support, with sales coverage Monday through Friday, 9am to 5pm EST. That matters because the cleanest orders are the ones where the artwork, placement, and shirt choice are checked before production starts.
Quick FAQ
Do embroidered polos have minimums? Some suppliers now offer single-unit ordering with no minimum, while others still price more efficiently at higher quantities.
What about digitizing fees? New artwork usually needs digitizing, because the logo has to become a stitch file before production.
Does embroidery hold up on performance fabric? Yes, when the blank, backing, and stitch plan are matched correctly. It is not automatic, though.
How do I reorder the same logo? Keep the original art file and the approved stitch file together so the second run matches the first.
If you are ready to place a real order, gather your logo file, decide on the shirt use case, and request a proof before anything goes to production. Then contact Dirt Cheap Product, Inc. and send the art, quantity, and preferred placement together so the quote reflects the actual job, not a guess.